Yesterday I weighted and sealed about a dozen freight cars, small shot poured into the tank cars to bring the weight up to MNRA specs, hopper cars with shot mix in the bottoms, to be covered by a load at some time, boxcars with 9mm and .45 bullets epoxied to the floors. Came up one boxcar floor short so will go print one in a bit. Always a question as to truss rod or not, will have to go back to the reference drawings for that one. Work cars and cabooses awaiting installation of windows before installing floors and sealing. As to the tank cars, perhaps I should derive a method to seal the shot in place though not necessary as a simple shake will distribute it properly. For gondolas I attached small shot in between the floor stringers but it's not enough weight. Loads I guess!

You are using an out of date browser. It may not display this or other websites correctly.
You should upgrade or use an alternative browser.
You should upgrade or use an alternative browser.
Narrow Gauge rolling stock 3D printing.
- Thread starter 747flier
- Start date
A pausing place for the cabooses and work cars is the windows. After experimenting with a trial work car, it seems as if backings of clear plastic can be attached successfully with the Testors Window maker adhesive. After going through the almost dozen Boxcars I found one that in my enthusiasm that I failed to includes weights, but I was able to pry the bottom back off without damage. Two 200 grain 45 cal lead bullets seem to do the trick given the extra mass of the printed Boxcars. For the last box car it was necessary to print a new floor/chassis since I was one short.
Currently I have some 25 pieces of misc freight rolling stock, which will take some time to decorate and weather! One issue is my currently small "layout" is hanging on the wall and might not have enough track for so much rolling stock!.
Currently I have some 25 pieces of misc freight rolling stock, which will take some time to decorate and weather! One issue is my currently small "layout" is hanging on the wall and might not have enough track for so much rolling stock!.
Snowman
Well-Known Member
You might try "cold casting" using powdered tungsten if you need something really heavy in a limited space:Yesterday I weighted and sealed about a dozen freight cars, small shot poured into the tank cars to bring the weight up to MNRA specs, hopper cars with shot mix in the bottoms, to be covered by a load at some time, boxcars with 9mm and .45 bullets epoxied to the floors. Came up one boxcar floor short so will go print one in a bit. Always a question as to truss rod or not, will have to go back to the reference drawings for that one. Work cars and cabooses awaiting installation of windows before installing floors and sealing. As to the tank cars, perhaps I should derive a method to seal the shot in place though not necessary as a simple shake will distribute it properly. For gondolas I attached small shot in between the floor stringers but it's not enough weight. Loads I guess!
I would avoid using it without a binder, as you never know what effects it might have on your electronics if you have a spill. Bullets you can see. Lead shot you can see.... But powder? Mmmmmm...maybe not.
-----------
I saw a comedian once, joking about hobbies. "Glitter," he said, "is the herpes of arts and crafts." Not sure about tungsten.
You try it first.

Still following your thread, btw, even if I can't sneak in here too often any more.
Last edited:
ShadowNix
UP and GN Modeler
Awesome stuff. Stalking a resin printer myself, so I love seeing this stuff! And if anyone else had no idea what "cold casting"
was...here is a great video... How much can you do this with resin printers? I would assume it can interfere with laser?

 www.smooth-on.com
was...here is a great video... How much can you do this with resin printers? I would assume it can interfere with laser?
How To Make a Metal Cold Casting With Smooth-Cast™ 325 Resin
The metal cold-casting process is faster and much less expensive compared with foundry casting of molten metal.
www.smooth-on.com
Masters can be made in various ways for a casting process, including 3D printing. This sounds a bit like when I used to make molds for resin cast parts by hand.
I use a SLA printer which uses UV light to cure the resin in the vat. For each exposed layer the LCD only lets light through according to the design layer being processed at the moment. I have heard about laser activated models, but I am not familiar with them.
Small items can be printed well, including truss rod turnbuckles, brake hand wheels, brake units and whatnot. What I have not explored yet is the possibilities of very strong resins which could be used to print items such as locomotive valve gear etc. Currently the resins I use are not strong and rigid enough for such applications.
Cheers: Tom
Snowman
Well-Known Member
The one that comes to mind is a variation on the fishing line, in that you melt and flare the ends of the cut line before threading them into the turnbuckles, thus keeping the center of the casting open. Then the usual finish going up through the floor and twisting them back together to proper tension (unless gondolas or flats).
One other "turnbuckly" detail is lining the openings up so you can insert a a common wood plank between two adjacent castings--a 1" x 4" or similar, thus preventing one or both from spinning and creeping back as the tension (real world) comes and goes. I've seen real world photos of that done--perhaps on the Rio Grande Southern, the narrow gauge railroad I followed the most closely.
Your windows look good, and the broken pane is an eye-catcher. Might want cardboard, a stolen pallet, or even a scrap of bed quilting for cold weather. That last one would be a detail I've never seen before, in fact--I just thought of it while typing.
Window panes: Many years back I recall a prize winning model where the builder raised the bar a bit, using real glass for his panes. In that case his glass of choice was microscope slide covers, but these days a much more common, cheap, and widely available material might be cell-phone "screen protectors."
Last edited:
A ship building friend uses thin glass, probably microscope slides, to back his port holes. He lives in a big city Korea so such supplies are usually easily available. Yes real glass is always the best! If perhaps a bit interesting to cut in small sizes.
In aviation turnbuckles are secured on place with safety wire, for turn of the century tech I can see where slats might make good security items. Especially for narrow gauge I'm sure they used whatever was at hand, or simply adjusted them every now and then.
In aviation turnbuckles are secured on place with safety wire, for turn of the century tech I can see where slats might make good security items. Especially for narrow gauge I'm sure they used whatever was at hand, or simply adjusted them every now and then.
Adding couplers and trucks to some rolling stock today and printed a couple of WWII vintage dump trucks as used ion the ALCAN. Using some nice arch bar trucks. Out of assembled couplers so maybe tomorrow assemble some of the little buggers. Fortunately they supply a few extra springs, which on occasion eject themselves to parts unknown. Looking at the Skagway photo I posted elsewhere I discovered that the numbered flat car I built decades ago was the one in the photo! I'll probably have more rolling stock than track to put it on!
BigGRacing
Aka. Gary Russell
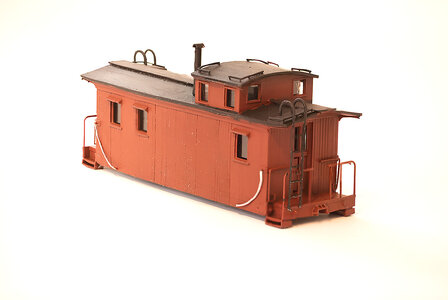
What is the chance of getting the plan for this caboose version?Caboose printed mainly as one piece. End ladders and stove chimney as separate items. View attachment 161787
Snowman
Well-Known Member
Yes. Your Piper Cub or something similar? Or any biplane too, I suppose. Or even a slow Fieseler Storch?A ship building friend uses thin glass, probably microscope slides, to back his port holes. He lives in a big city Korea so such supplies are usually easily available. Yes real glass is always the best! If perhaps a bit interesting to cut in small sizes.
In aviation turnbuckles are secured on place with safety wire, for turn of the century tech I can see where slats might make good security items. Especially for narrow gauge I'm sure they used whatever was at hand, or simply adjusted them every now and then.
General Rommel use to fly a Storch around! The turnbuckles are used in great profusion on the floats of my Supercub, both as bracing wires and for rigging the water rudders. The wing struts sort of use a turnbuckle system with threaded rods and forks on the ends to rig the wings.
Snowman
Well-Known Member
A real-world flying super cub? And with actual floats? Seriously? Are you EAA then?General Rommel use to fly a Storch around! The turnbuckles are used in great profusion on the floats of my Supercub, both as bracing wires and for rigging the water rudders. The wing struts sort of use a turnbuckle system with threaded rods and forks on the ends to rig the wings.
