ModelRailroadForums.com is a free Model Railroad Discussion Forum and photo gallery. We cover all scales and sizes of model railroads. Online since 2002, it's one of the oldest and largest model railroad forums on the web. Whether you're a master model railroader or just getting started, you'll find something of interest here.
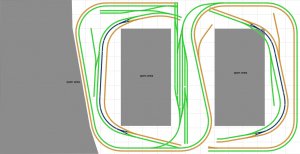
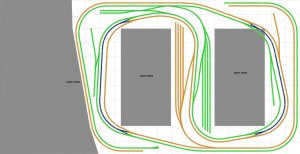
I did practice a little while building it. 48” feels ok for now, thanks to otiscnj suggestion to increase the height. Will see if I regret it in the future. Unfortunately I won’t be able to follow trains all the way around layout, but on the positive side if I build double mainline it will allow two people (me and my son) to simultaneously operate the layout. I've considered quite a few layout options and could not find something interesting that would fit in the space and not require duckunders.
It's been another year and finally I've finished my roadbed!
I am going to paint it this weekend and start laying track next week.
+1 for www.cchobbies.com, received all my track from them today, good prices and fast shipping.
Your bench work looks good, it could probably support my 150 pounds without an issue lol. Have you decided on a time frame for your layout or location? Things seem to be progressing nicely for you
The benchwork does support my 230 pounds . In terms of time/location I am thinking something 1960+, I'd love to model some Russian location but unfortunately there are not many Russian locomotives/cars available in HO (or they are custom made and very expensive) so I have not decided yet. My first priority (for the next year ) is to layout track and do the wiring to get some trains going.
BTW - do you folks solder feeders before or after laying the track? On one side it would be easier to layout track first and worry about feeders later, on the other side it would be more convenient to solder feeders before track is attached to layout.
I do believe the conventional way is to solder the feeders after the track is laid, lest you wind up with a feeder right on top of a cross member. Once the track is down a quick zap with a 1/8" drill bit right between the ties on the outside of the rail gets you the hole, I like to come around with a vacuum and clean things up before soldering. Then, I tin the rail where I want my feeder, and tin the wire. Nickel silver rail solders pretty easily. Once things are tinned, a quick hit with the iron gets you a good solid solder joint. You will probably melt a few ties at first, I would suggest doing your hidden yard tracks before you get good at it. Then, with pre-drilled holes and pre-placed feeders it goes by really quick.
I am envious, laying track is one of my favorite bits... And you're just up in Seattle... Can I come over and play =P
How about getting some railjoiners with the wires all ready attached? Glad you like the added height. You should be able to make a 'step stool,' that your son can use, which will boost his height. They sell these types of things made out of plastic over here in all the 'hardware stores/lumber yards.' Things looking good-keep up the good work!
The roadbed is now painted with some base color, I am still waiting for track templates (SweepSticks) to start laying track. I'll be using nails (ordered some #20 1/2" and 3/4"), it will be first time for me and I am afraid I could create some mess if I use caulk, also I'd like to be able to reuse/redo the track is something goes not perfect. I am also inclining towards soldering rail joiner to the feeders as I want to keep the track reusable, I can always solder feeders directly to the rails later if needed.
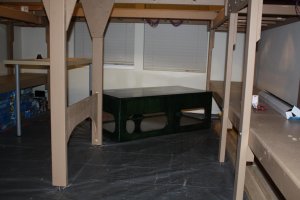
I've built step stool/seat/storage/coffee table from a 3/4" plywood that I've used as a table top for my previous layout, thanks for advice.
I am always amazed at how sturdily American modelers build the benchwork! Truly civil engineering! But here in the UK, a good proportion of layouts are made as portable ones and are taken to exhibitions around the country, so have to be light enough for transportation without causing hernias!
Finally, after year and a half I've nailed the track! Next on the list is to finish track wiring and install & wire switch motors. Hope to see trains running soon .
I need to read thru this subject thread as it appears my new layout (undefined at this moment) will be limited to a 10x16 room rather than a 12x16 I was hoping for. I want to do a round-the-wall with a peninsula.
I'm reading thru this subject thread, and see several references to diagrams and photos, BUT where are they? I don't have any such links or photos on my viewing??
I’ve finally installed all the signals on my layout - 26 dwarf signals, 16 tall 2 aspect signals and 2 signal bridges that have 4 of 3 aspect heads. The signals operate according to switch positions and photo or occupancy sensors and connected to 6 of my custom designed signaling boards. Photo and occupancy sensors are set to 25-30 seconds delay and yellow is set to 8-10 seconds delay before green. Wiring is done, all turnouts are motorized and routes are programmed.
Next I need to figure out what era/location I am modeling and learn how to do scenery ...


") . In terms of time/location I am thinking something 1960+, I'd love to model some Russian location but unfortunately there are not many Russian locomotives/cars available in HO (or they are custom made and very expensive) so I have not decided yet. My first priority (for the next year
. In terms of time/location I am thinking something 1960+, I'd love to model some Russian location but unfortunately there are not many Russian locomotives/cars available in HO (or they are custom made and very expensive) so I have not decided yet. My first priority (for the next year 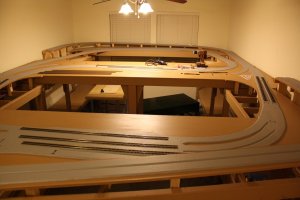


")

 and learn how to do scenery ...