Kriegsloks building shops


KriegslokBR52

Well-Known Member
Just starting a new thread. My main areas of interest are polish locomotives and rolling stock, as well as american. So my modeling is pretty varried. My american specialty are the many electric locomotive models, especially those which we will not see anymore in service and my personal favorite subject are Conrail electric operations and its predecessors; Penn Central and Pennsy. Long time ago i have built a few E33 locomotives, since the only available models at the time were brass models (way beyond my budget):
20221228_213937.jpg
20221228_213336.jpg
20221228_213257.jpg

After E33 came E44. Here was the problem, there are no scale drawings available. Based on drawings of E33 taken from "Shore Line" 1980 issue and armed with a pencil, measuring tape, and notebook and with the blessing of Railroad Museum of Pennsylvania curator, i was able to crawl all over the only survivor of the clan: E44-4465. After a weekend of measuring and note taking i've had my very own E44 drawings:
20221122_225848.jpg
20221122_225839.jpg
20221122_223224.jpg
20221122_222541.jpg

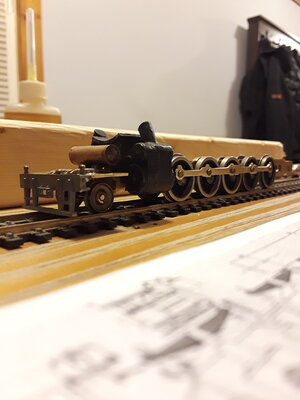
Out came 4427 in Conrail dress blues and 4431 in interim PC black with CR stensils. I am a steam nut at heart, always will be, so project started few months ago is a Lehigh & New England F1 decapod:
20221204_075403.jpg
20221204_075259.jpg
20221204_075150.jpg

It took several months researching this locomotive and finding plans for it. Found plans for almost identical I2 Western Maryland, and that is my main refference. More on that later.
 
Great work, very interesting...

Steam locomotive diagrams also available here (I did not notice any decapods, however I believe they had a couple in their roster)


Dave LASM
Thanks. Looks like these are for Northern Pacific. There is a decapod drawing there, apparently they had 2 machines.
The locomotive i'm building is from Lehigh and New England. First time i've found out about their existence was several years ago while looking through "Classic Trains" magazine. Besides being a huge machine the real attention getter was side rod booster truck under the tender. At the time i was still in the Conrail electric locomotive modeling mood. The image of that brute as it was traveling across spectacular bridge over Lehigh River stuck in my mind. During spring this past year i decided to bite the bullet and started researching material. Turns out the F1 machines of L&NE were almost identical to Western Marylands I2 decapods and built by Baldwin Locomotive works around the same time. "Wild Marys" versions were even heavier and had huge six axle tenders attached. Brass was out of the question, as they command around $900 if you can even find one. There was one available on brass traders site. Thinking i could kitbash one maybe from Bowser decapod i found an older Penn Line model which apparently took a dive to the floor. After fixing and requartering two pairs of drivers which were separated from the axles i made measurements and discovered not only incompatibility with my project, but that even for Pennsy I1 axle spacing was off. I decided to dig out an older never finished project for a polish mikado tank locomotive and axle spacing was almost identical for what i needed. There was also enough meat on the main frame to make a slot for the offset fifth set of drivers as on L&NE prototype:
20220911_193426.jpg
20220911_193256.jpg

Meanwhile the PennLine decapod became an L1 mikado:
20220911_195456.jpg
20220911_195354.jpg
20220911_195245.jpg

Recently purchased resistance soldering station from Micro Mark helped in building KW trailing truck. So basically i'm in a process of building one steamer and kitbashing another. More progress on the heavy decapod on free time and basic main frame was made:
20221025_201045.jpg
20221023_181735.jpg
20221023_094314.jpg
20221020_194403.jpg
20221016_181155.jpg

I tried to adapt as many parts as possible while scavenging train shows. Pilot is a Bowser from i don't know what, cylinder block...?, it works:) In one antique shop i found an excellent book "Eastern Steam Pictorial" where the authors included drawing of L&NE version with booster equipped tender. More to come.
 
Cylinder blocks look like those on my Varney's.

Maybe doesn't matter a lot what the road name is I notice locos sent to various roads based on orders the manufacturers receive also in some cases locos ordered then cancelled sent off to other roads.
 
Cylinder blocks look like those on my Varney's.

Maybe doesn't matter a lot what the road name is I notice locos sent to various roads based on orders the manufacturers receive also in some cases locos ordered then cancelled sent off to other roads.
Thanks. I will have to wrap up a sheet of brass around them to make them more massive. These particular decapods were only build in limited number, 20 for Western Maryland and only 4 for L&NE. So even with that very rare. Too bad none were saved.
 
Thank you. This is actually first scratch build in full metal, so i'm learning many dos and don'ts as i go along. I have put together Bowser kit before, but this is a whole new ball game:
20221108_230715.jpg
20221108_221303.jpg
20221108_204913.jpg
20221106_134318.jpg
20221106_133230.jpg
20221106_112307.jpg
20221106_100519.jpg
20221109_201338.jpg
20221109_195206.jpg

The fact that the boiler is tapered really proved to be a challenge, i would do some things different next time.
 
Thank you. This is actually first scratch build in full metal, so i'm learning many dos and don'ts as i go along. I have put together Bowser kit before, but this is a whole new ball game:View attachment 159451View attachment 159452View attachment 159453View attachment 159454View attachment 159455View attachment 159456View attachment 159458View attachment 159449View attachment 159450
The fact that the boiler is tapered really proved to be a challenge, i would do some things different next time.
:) Always a learning curve in this hobby I've found, but that looks great.
 
A very ambitious project to scratch build a steam loco in metal! My guess is that photo etching is used extensively in making parts for the commercial Japanese brass locos. That and lost wax castings. If I can find a suitable narrow gauge mechanism I might build one via 3D printing.

I am certain that you are learning a great deal and have a much better understanding of what works and what doesn't. Such challenges, in whatever field of the hobby are a major satisfaction. Good work!

Best wishes! Tom
 
After getting the superstructure done, it was time for the start of valve gear. First i had to do the whole rack that supports it. After studying some pictures i came to conclusion that this one was unique to these decapods, i couldn't find any other locomotives with same style frame.
20221120_122358.jpg
On the way i helped myself with some drawings from pictures, the plans don't show everything.
20221120_122503.jpg
20221120_122407.jpg
20221120_122601.jpg
20221120_155739.jpg
20221120_155700.jpg
20221120_131205.jpg

Even with resistance soldering station everything needs to be braced. I also had to solder together bottom plate for the main frame.
20221120_184608.jpg
20221120_160749.jpg
20221120_160530.jpg

And the whole "kit" as of late November. The actual valve gear i've had for few years purchased on some train show. As i was to find out the whole thing needed to be reworked to fit.
 
Continuing on the decapod i've started to put details on the valve gear rack and mechanism. The rack itself had ribs which gave it strength and was obviusly cast on real machines. I chose to use copper wire instead brass wire. The reason being that even with annealing brass wire would still be difficult if not impossible to bend to desired shape.
20221122_215112.jpg
20221122_214851.jpg
20221122_214834.jpg
20221122_214819.jpg

Next was the addition of crosshead guides:
20221124_231907.jpg
20221124_231830.jpg

At this point crosshead guides still needed a lot of trimming. I don't like on models when there is empty space under the cab, or worse when there is solid metal casting just to fill up the space. Using the drawing and what ever i could see from pictures i've soldered stoker screw housing imitation:
20221126_201541.jpg
20221126_201522.jpg

At the same time did the guiding truck to keep the whole thing together:
20221203_225831.jpg

Wheels are standard metal 33" for freight cars with shaved off points. Lastly all in one piece at the end of November, and so far it passed free rolling test on the glass.
20221204_075236.jpg
 
Continuing on the decapod i've started to put details on the valve gear rack and mechanism. The rack itself had ribs which gave it strength and was obviusly cast on real machines. I chose to use copper wire instead brass wire. The reason being that even with annealing brass wire would still be difficult if not impossible to bend to desired shape.View attachment 159690View attachment 159691View attachment 159692View attachment 159693
Next was the addition of crosshead guides:View attachment 159694View attachment 159695
At this point crosshead guides still needed a lot of trimming. I don't like on models when there is empty space under the cab, or worse when there is solid metal casting just to fill up the space. Using the drawing and what ever i could see from pictures i've soldered stoker screw housing imitation:View attachment 159698View attachment 159699
At the same time did the guiding truck to keep the whole thing together:View attachment 159697
Wheels are standard metal 33" for freight cars with shaved off points. Lastly all in one piece at the end of November, and so far it passed free rolling test on the glass.View attachment 159696
That's really coming along nicely, really good workmanship, love it.
 
Work on the valve gear was progressing through out late november and into december. Started with the main rods and crosshead, all of which i had to modify.
20221204_173126.jpg
20221204_173119.jpg
20221204_125340.jpg
20221204_125331.jpg
20221204_125327.jpg
20221204_075259.jpg

First fitments of main rods, and also new smoke box door, not finished yet. Valve gear must have came from a "Pacific" of some kind because all linkage was long and had to be shortened.
20221126_201611.jpg
20221208_204936.jpg
20221208_201938.jpg


20221208_201912.jpg


The crossheads especially turned to be rough to finetune. Had to disconect them and trim them several times. Also crosshead guides needed a lot of work so there would not be any binding. And a little clip:
 
my first thought wow a little rough..Santafewillie linked so I came and looked,

then my brain switched on,
S C A TC H B U I L T not a kit, at which point brain fully engaged. Very nice work, lovely to see. Kudos, and thank you for sharing the build.
 
my first thought wow a little rough..Santafewillie linked so I came and looked,

then my brain switched on,
S C A TC H B U I L T not a kit, at which point brain fully engaged. Very nice work, lovely to see. Kudos, and thank you for sharing the build.
Thank you. I will keep on posting, as more work was done to it. That boiler turned to be a real challenge, because not only is it tapered, but also with Wooten style firebox. I really also admire the craftsmen from that time building the real machines, as even building a model is sort of an art form.
 
Last edited:
Continuing with the decapod and working on that valve gear. Here i've had to disconnect about half of the linkage to shorten it:
20221211_135232.jpg
20221211_135216.jpg

After soldering the linkage back to proper size:
20221211_144046.jpg
20221211_140016.jpg
20221211_135813.jpg

After that it was time to connect it to the rest and testing:
20221211_145459.jpg
20221211_145436.jpg

The bolt for the main crank pin turned out to be wrong choice and eventually got the flat head one put on.
20221211_172629.jpg
20221211_145546.jpg

At this point i was still dealing with one crosshead falling off the guide. But seeing the valve gear with most components really gave me a kick of motivation:
20221224_143155.jpg

Last picture after i replaced hexagonal bolt head on main crank pin with flathead.
 
Continuing with the decapod and working on that valve gear. Here i've had to disconnect about half of the linkage to shorten it:View attachment 160057View attachment 160058
After soldering the linkage back to proper size:View attachment 160054View attachment 160055View attachment 160056
After that it was time to connect it to the rest and testing:View attachment 160061View attachment 160062
The bolt for the main crank pin turned out to be wrong choice and eventually got the flat head one put on.View attachment 160059View attachment 160060
At this point i was still dealing with one crosshead falling off the guide. But seeing the valve gear with most components really gave me a kick of motivation:View attachment 160063
Last picture after i replaced hexagonal bolt head on main crank pin with flathead.
Lovely work.
 
Thank you. I will keep on posting, as more work was done to it. That boiler turned to be a real challenge, because not only is it tapeted, but also with Wooten style firebox. I really also admire the craftsmen from that time building the real machines, as even building a model is sort of an art form.
It's amazing to think 1:1 only took 6 to 8 weeks to build in their heyday.


Back
Top