Installing n scale switch machines - manual and remote


jayareed

New Member
Hello all. I need help on how to control my atlas code 55 switches. Not knowing that basically everything is now made for under the table switching, I made my layout on 1/2 plywood with 2 inches of foam on top of that. This will make it very inconvenient to install anything under the table. Whats a simple solution? I've been reading ideas around the Internet but nothing seems to look good or be convenient to install.

I don't want to use the caboose industries ground throws since they are way to large for scale.

Any thoughts are greatly appreciated! Thank you.
 
Take a look at the Tam Valley Depot turnout control system that uses R/C servos. The servos are mounted under the layout yet can easily control turnouts through several inches of foam and plywood.

Here is a servo mounted on the underside of my layout.

underside_servo_strap1a.jpg


The servo moves a piece of music wire (piano wire) that rotates inside a brass tube that extends from the underside of the layout, through the plywood and foam, to a location near the turnout's throwbar. Here is what it looks like on the top side of the layout.

servo_linkage1.jpg


Once the servos are installed, you connect them to the Tam Valley control boards. The control boards provide pushbutton control of your turnouts and (optionally) DCC control as well. I hot glued the servos to the bottom of the layout and then installed a homemade styrene strap for extra security.

The servos are standard R/C servos, and the wiring is all done with standard servo extension cables. No soldering required. You can buy the servos and cables from Tam Valley or from any hobby shop or online vendor that serves the R/C airplane market.

Compared to a Tortoise, for example, the servos are tiny. They extend below the layout only about 1/2".

A great solution, in my opinion.

- Jeff
 
Jdetray, thanks for the great idea. That looks like the solution for me. Already have lots of extra servos too. So much less expensive than the most popular electronic devices. :)
 
Jdetray, thanks for the great idea. That looks like the solution for me. Already have lots of extra servos too. So much less expensive than the most popular electronic devices. :)
The servos can be had for less than $3 each (shipped) on eBay. Shop for SG90 servos.

The servos are the least expensive part. You will still need controller boards. There are lots of circuits on the web for homemade servo controllers. Or you can use the Tam Valley Singlet, Quad, or Octopus boards.

- Jeff
 
I should mention that if you are installing the music wire/brass tubing mechanism, you will need a 1/16" drill bit that is long enough to drill through the plywood and foam layers of your layout.

You may be able to find extra long bits at a home center such as Lowe's or Home Depot. They are also available online. Search for "long boy" or "aircraft" drill bits to find them. One online vendor that carries them is Drill Bit Warehouse.

I used 1/16" brass tubing with 0.032 music wire. These are standard items at any hobby shop serving R/C airplane enthusiasts.

- Jeff
 
Questions;
1. How can these be used w/o the brass 'sleeve' for Peco turnouts? Is there any 'direct' method w/o using a bent piano wire?
2. If/when the servo takes a dump, how easy is it to pry it off the board?
3. Can something other than hot glue be used or is it a issue with setting up time?
4. If it found the servo is positioned incorrectly, or has to be 'tweaked' afterwards, what then?

I never used hot glue before, I assume it sets within seconds where as caulks take an extended period of time which is the problem.
 
1. How can these be used w/o the brass 'sleeve' for Peco turnouts? Is there any 'direct' method w/o using a bent piano wire?
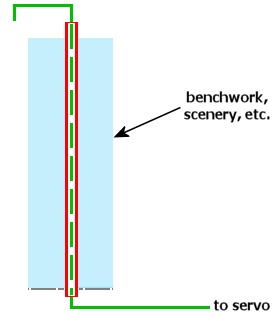
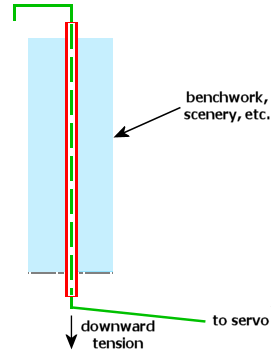
I used the brass-tubing-music-wire method because I was adding the servos to turnouts that were already glued down to the layout. It seemed like the easiest solution. If installing the servo at the same time you are installing the turnout, see the following link for the recommended "direct" method.
http://www.tamvalleydepot.com/products/servosaccessories.html

2. If/when the servo takes a dump, how easy is it to pry it off the board?
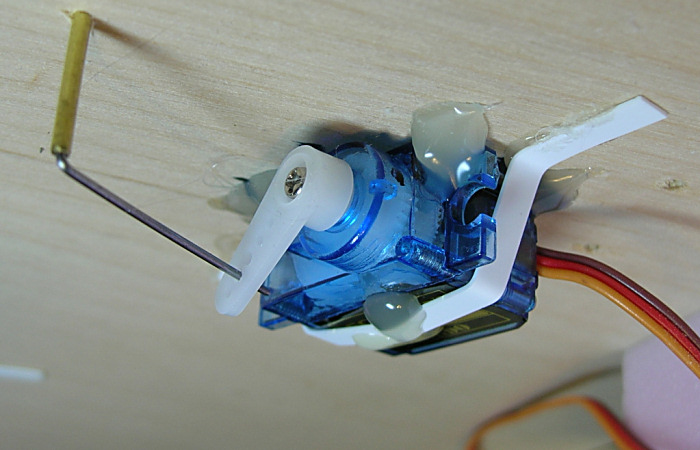
Easy; a little prying with a screwdriver, and the servo pops right off. The reason I add a homemade styrene strap over each servo is to make it more difficult to remove the servo. It was too easy. By the way, I no longer use hot glue on the security strap. Instead, I affix each end of the strap to the plywood with #4 wood screws. Less messy, and easier to replace a servo if necessary. Except for one bad servo that I pulled from my model airplane junk box, I have not had to replace a servo.

3. Can something other than hot glue be used or is it a issue with setting up time?
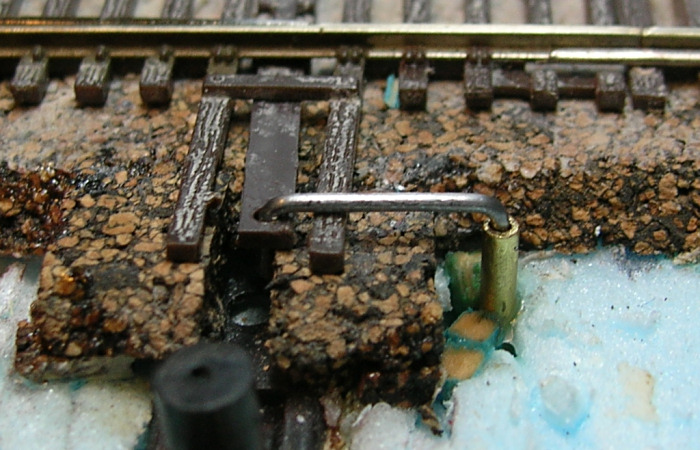
If you don't like hot glue, you can purchase a mounting kit for the servos, available at the link above. Personally, I like hot glue a lot. I install the brass tube and music wire first, then use it to determine the servo location. To mount a servo, I hold it in place without any glue and use a Sharpie marker to trace the desired location onto the plywood. This serves as a guide for placing the servo. Then I apply the hot glue and press the servo against the plywood, aligning with the Sharpie markings. Wait a few seconds for the glue to set, then you are done. The hot glue makes for quick installation.

4. If it found the servo is positioned incorrectly, or has to be 'tweaked' afterwards, what then?
Using the brass-tube-and-music-wire actuator, the position of the servo does not need to be very precise. I don't bother measuring anything; I just eyeball it and use the method described in the previous paragraph. If you are way off, pop off the servo and try again. Not a big deal. If you are using the "direct" method to actuate the turnouts, then accurate servo placement is very critical. Not so with the brass-tube-and-music-wire method, which is quite forgiving. I do make sure the servo is centered in its range of motion before mounting it.

I never used hot glue before, I assume it sets within seconds where as caulks take an extended period of time which is the problem.
Yes, I use hot glue precisely because it sets up very quickly. I'm a big fan of caulk and use it extensively elsewhere on the layout; it's just not the best adhesive for mounting servos.

- Jeff
 
In point of fact, the brass tubing bushing/piano wire approach can be used with any number of arrangements of switch machines/servos, etc. The main thing is to get the linkage and mechanical advantage correct for the switch machine or even a hidden manual mechanical (choke cable, lever, etc.) As far as PECO turnouts are concerned, if you use a switch machine OTHER THAN PECO's (which do not have a spring loaded stop in the machine itself), you can remove the spring on the turnout point throwbar. It just takes a second with a small screwdriver to pop the spring loose. Be sure, however, that that is what you want to do because putting the spring back in is a b---h! :(
 
I used the brass-tubing-music-wire method ...If installing the servo at the same time you are installing the turnout, see the following link for the recommended "direct" method.
Yeah but, the direct method has several disadvantages that vary with the thickness of the piano wire used. I often ended up having to cut a slot to do it that way. Plus they seem to require adjustments more often than I would like. Where I have used the piano wire in a sleeve (in fact I use dual sleeves so there are two pieces of metal that can pivot) in almost 25 years they have been trouble and maintenance free.

Using the brass-tube-and-music-wire actuator, the position of the servo does not need to be very precise.
Yes another HUGE advantage of this method.

Can't think of how much time I wasted trying to get things lined up for direct connects exactly right. The brass tube "cranks" I eyeball it and mount one side of the machine with a screw. Test the throw out and back once. Maybe shift the other side an 1/8" one way or the other, screw it down, and done.

Oh yeah, in the direct connect method the further the distance from the machine pivot to the points the harder to align and more precise the motor must be mounted.
 
Last edited by a moderator:
I'm a DC guy and have looked at the tam valley depot option however it does not "play nice" with (on) off (on) switches that I already have (to be honest I was a bit surprised that you can’t control the turn out direction, you can only toggle it back and forth). I'm taking my atlas snap switches, removing the "switch", using the brass tubing / .025 wire, mounting the atlas snap under the deck, and done.
Got the idea via a google from someone using this technique for HO and figured it work for N, gave it a shot and was pleasantly surprised how well it worked out.
I’ll try to post some pics, eventually :p
 
you can’t control the turn out direction, you can only toggle it back and forth)
???
All you need is a simple push button to flop the points back and forth. No SPDT toggle. That makes things a lot easier.
 
So if the alignment is slightly off I have to hit the button twice. I know, I get it, but you aren't telling the turnout what way to go, you're toggling it to get it in the right direction.

The ridiculous example would be, I want to turn my bedroom light off, twice, you can't do that with Tam. You have to turn it back on to turn it off.

Edit
Maybe it's just me, but I'll admit I've had my trains go the wrong way down a turnout and it's left the turnout slightly off center so even if I "fix" my derailment, you have to sometimes fix the turnout position. Also, I had mentioned an investment in (on)-off-(on) switches. I also mentioned a "free" option that in my testing worked fairly well. For essentially 10.00 I can hide all my "switches" under the table without additional investment. I could easily invest 250+ into tam, then redo my control board, etc. Don't get me wrong, I'm not saying tam is bad, just not always the best fit for all folks :)
 
Last edited by a moderator:
@jdetray
How do you get the 90 degree bends into your music wire at both the top and bottom of the tube,..and get that into the small hole thru the deck??
 
@jdetray
How do you get the 90 degree bends into your music wire at both the top and bottom of the tube,..and get that into the small hole thru the deck??
Briefly, you first make the bends in the upper portion of the music wire, so it looks like this:
music_wire_1.png


Then drop the straight end of the wire into the brass tubing. Under the layout, make the final 90° bend in the music wire.

The final relationship between the brass tubing, music wire, and benchwork/scenery is:
music_wire_3.png


There is more information on my website:

Scroll about halfway down the page to for information on the linkage I use. Post here if you still have questions!

- Jeff
 
So you don't have any problems making that 90 degree bend at the bottom,...nice clean bend,....close enough to the tube's end to keep the music wire from riding up into the tube,..and possible des-ingaging from the throwbar ??
 
I wonder if those servos you utilize are strong enough to throw the spring-loaded Peco turnouts in HO scale? I do like the the stock spring action/positive contact of the Pecos.
 
So you don't have any problems making that 90 degree bend at the bottom,...nice clean bend,....close enough to the tube's end to keep the music wire from riding up into the tube,..and possible des-ingaging from the throwbar ??
This has not been a problem for me.

I bend the music wire as close to the tube's bottom end as I can. I also make sure the length of the tube that extends beneath the bottom of the layout is fairly short. In doing so, I must actually pull the music wire away from the underside of the layout in order to attach it to the servo arm. This imparts a small amount of downward tension on the music wire, so that the upper end of the wire is pulled down into the throwbar. Therefore, when the music wire is attached to the servo, the shape of the wire is more like this:
music_wire_4.png


I do not have any experience with Peco spring-loaded turnouts, so I can't help you there.

- Jeff


Back
Top