Camera Recomendations - for Model Railroading Photos


Greg@mnrr

Section Hand
Hello Forum Members:

Can anyone offer a suggestion to purchase a camera to photograph my layout and rolling stock?

My camera is an old digital and does not do the greatest job.

I'm not looking to break the bank to buy a new camera, but would like to find a reasonable price camera, yet take some decent photos.

Thanks for your comments and advice.

Greg
 
I have a couple of digital cameras, one being a nice Cannon SLR, but I have been using my smart phone for most of the photos I have been posting lately. I can get the phone into places where the SLR won't fit plus I guess I'm lazy too because it's easier to email the photos to myself instead of downloading them from the camera. I use an HTC1-M8 phone. I always have the phone handy whereas the camera is put away on a camera case upstairs.
 
Last edited by a moderator:
I have a couple of digital cameras, one being a lice Cannon SLR

Being a Nikon man, I always knew Canon cameras were second best, I just didn't know why. Now I know, they've got LICE! :p

Seriously, any functional camera will take great photos of your layout, including your cell phone. It's truly a matter of how you use it. If you haven't already, I'd recommend you read the sticky thread in the General Discussions Railphotog's Tutorial on Model RR Photography.

On the other hand, I'm sure either a Nikon D5 or a Canon 1D X will give great results if you want to spend around $6500. Or a Nikon D5500 or Canon 70D will give good results for about 1/10 that price. And that's not even considering the other 10 good brands. If you get my drift, buy a new camera if you want a new camera. Otherwise, just practice and practice with the equipment you have and you will still be able to get great results. Here's a fact: my Nikon D90 is capable of taking far better pictures than I take with it. And that is my fault. I knew the in and outs of my N90 (film) camera and I took (IMHO) fantastic photos with it. I've just been too lazy to learn all the necessary aspects of digital photography, from the cameras options to the digital darkroom (I still have a wet darkroom, all be it in boxes).
 
Good advice Kevin. I have enjoyed photography as a hobby since I was a kid. I still have a few film cameras ranging from a Milolta SLR to an old Speed Graphic which takes 5x7 film. Digital photography has made the hobby a lot easier not having to develop film and have prints made. One of the most important things you need is lighting. I have decent lighting in my train room, but I do use a simple clamp light for a "fill light", which is used to give additional light to the subject being photographed. The one thing I can't do, or haven't figured out how to do is to improve the depth of field, which for non photographers is to try to get not only the subject being photographed in focus, but also trying the get things in the foreground and background in focus. This requires an F stop setting which is pretty high, F-22 or higher which can improve the depth of field, but does require a longer exposure time. I still have my old light meters which makes this simple for a quality digital camera. Hard to do that with a camera phone, but I am really suprised at the quality some camera phones provide.
 
Not to hijack the thread - I'm move off with my comments if Greg wants -- there are several ways to improve depth of field. The first is light, lots and lots of light. I have 3 1800 watt second strobes from my old studio. Lots of light will let you use your camera's minimum aperture, depending on the lens, somewhere between F22 and F64. But even then, in model photography, you may want even more depth of field. In film photography, this was accomplished with what was (is) know a pin hole lens. Literally, a pin hole in a thin cover of the lens' iris. This yielded a minimum aperture from F128 to F256. With digital photography, the depth of field is manipulated in software using a package know as image stacking software. In essence, you take a series of photos from the same position, moving the focal point as you go. Import the series into the stacking software and viola, a single image with a tremendous depth of field. I use Helicon Focus (or at least I will again, once I get my desktop computer completely recovered after a hard drive failure).
 
Not to hijack the thread - I'm move off with my comments if Greg wants -- there are several ways to improve depth of field. The first is light, lots and lots of light. I have 3 1800 watt second strobes from my old studio. Lots of light will let you use your camera's minimum aperture, depending on the lens, somewhere between F22 and F64. But even then, in model photography, you may want even more depth of field. In film photography, this was accomplished with what was (is) know a pin hole lens. Literally, a pin hole in a thin cover of the lens' iris. This yielded a minimum aperture from F128 to F256. With digital photography, the depth of field is manipulated in software using a package know as image stacking software. In essence, you take a series of photos from the same position, moving the focal point as you go. Import the series into the stacking software and viola, a single image with a tremendous depth of field. I use Helicon Focus (or at least I will again, once I get my desktop computer completely recovered after a hard drive failure).

I remember an article on this in MRmag a few years ago, using IIRC that same Helicon Focus with your computer.
 
I learned about Helicon Focus in a "What's New" YouTube by Ken Patterson of Model Railroad Hobbyist in 2015. The price was reasonable and the performance better than I expected.
 
Combine ZP was freeware last I looked. It's every bit as good as Helicon.

I will show two photos, both taken with my inexpensive Canon Powershot point-and-shoot camera as much as seven years ago already. The first is with no photo stacking...just F8 and manual settings, plus on-board colour correction for white balance:

C-water-tank.png


Next one is WITH Combine ZP processing, I seem to recall it was a total of seven images, with the first four focused to within 8" of the camera lens, but at successively deeper foci:

StackJmacro2_editedres.png
 
Seriously, any functional camera will take great photos of your layout, including your cell phone.

Actually, a cell phone camera is one of the best possible options. The reason, without getting all technical, is due to the sensor size and the lens. They have a tiny sensor, which means very large depth of field, meaning more objects will be in focus, even though they tend to use wide f stops.

On the other hand, I'm sure either a Nikon D5 or a Canon 1D X will give great results if you want to spend around $6500. Or a Nikon D5500 or Canon 70D will give good results for about 1/10 that price.

Here's a laugh. All other things being equal, the D5500 will give you BETTER photos than the D5. Why?!? Again, the sensor size and depth of full. The D5 is a full frame sensor. The D5500 is a crop frame sensor. With the same lens and F stop, the D5 will have shallower depth of field, meaning more of the foreground and background objects will be blurry. Given the choice of either one, a good lens and a tripod, I'd choose the D5500 for this project.

In fact, that's one of the best tools you can get for this job, a nice sturdy tripod. Then you can crank up your aperture and increase your depth of field.
 
Actually, a cell phone camera is one of the best possible options. The reason, without getting all technical, is due to the sensor size and the lens. They have a tiny sensor, which means very large depth of field, meaning more objects will be in focus, even though they tend to use wide f stops.


Here's a laugh. All other things being equal, the D5500 will give you BETTER photos than the D5. Why?!? Again, the sensor size and depth of full. The D5 is a full frame sensor. The D5500 is a crop frame sensor. With the same lens and F stop, the D5 will have shallower depth of field, meaning more of the foreground and background objects will be blurry. Given the choice of either one, a good lens and a tripod, I'd choose the D5500 for this project.

In fact, that's one of the best tools you can get for this job, a nice sturdy tripod. Then you can crank up your aperture and increase your depth of field.

Thank you! That makes things much clearer :)

Seriously that is a great explanation, thank you again.

Happy Holidays!
 
Last edited by a moderator:
Interesting thread. I have to admit to mostly using my phone to photograph my layout. I do have a DSLR (Canon) and a compact camera with more megapixels than the SLR (also Canon). I sometimes back away from the subject and use zoom which seems to give a better depth of field. I also agree about light, more is better! I have a multi-led lamp which can be hand held, or sits on a mini tripod so can be placed just where needed. Maybe two of these would be better.

I will continue to experiment with various cameras and tripods.
 
Shooting model trains: Tilt-shift lenses and depth-of-field.

Well, I've been bucking for an assignment from MRH Magazine to show some fabulous examples, but so far they haven't called. One piece of gear that's particularly applicable to shooting trains is a tilt-shift, or perspective-control lens (i.e., "PC-lens"). These things are fairly expensive, but you can buy a bargain brand that's still capable of producing super-sharp images, such as those from Rokinon and Samyang. For example, a 24mm f/3.5 maximum-aperture tilt-shift lens from Rokinon costs about $800, while Nikon's version is over $2,000.

What does a tilt-shift lens do? Its principle benefit is being able to shoot long skinny things (like trains), or large flat things (like a layout), while still being able to keep the entire train or layout in focus, without having to stop-down to an ultra-small aperture. Instead of the normal plane-of-focus being parallel to the image-plane, a tilt-shift lens can alter the angle of the plane-of-focus, enabling lines or planes not completely parallel to your image-plane, to be completely in focus.

So, instead of stopping your lens down to f/32 to get a whole train in focus (which starts to erode sharpness due to diffraction), you would only need a few inches of depth-of-field if using a tilt-shift lens to change the angle of the plane-of-focus to the same angle as the train or layout (this is known as the Scheimpflug principle).

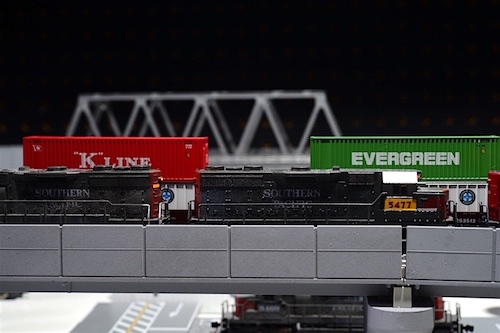
In the photo below, the line of the train is parallel to the camera's image-plane (sensor), making this the easiest way to keep an entire train in focus when using a fixed-mount lens. However, when the train isn't parallel to the image-plane (and you're not using a tilt-shift lens), you need a ton of depth-of-field to keep everything in focus.

WS-dof-2.jpg


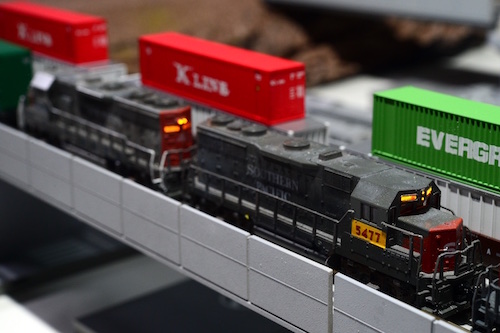
The photo below was shot with a 60mm macro lens on a full-frame DSLR. The depth-of-field is fairly shallow even though the aperture was set to a relatively high numerical value of f/16. This is mainly due to the fact that the lens is just a few inches away from the subject, and the closer the focus (i.e., the shorter the subject-to-camera distance is), the less depth-of-field you get. Unfortunately, I can't show the "after" picture since I don't own a tilt-shift lens (but as soon as I get that call from MRH, I'm buying one!).

WS-dof-3.jpg


Since most of us don't own a tilt-shift lens, here's the general procedure for getting the most stuff in-focus:

1. Set your camera on a tripod.
2. Set your camera's exposure mode to "manual."
3. Set your lens' aperture to f/22-f/32.
4. Adjust ISO and shutter-speed to enable proper exposure.
5. Determine your lens' hyperfocal distance and set your focus to this distance.

For starters, try an ISO of 200-400, and a shutter-speed of two seconds. If too dark, extend your shutter-speed; if too light, reduce your shutter-speed. Exact exposure depends on the amount of ambient light on your layout, but with a few test-exposures, you should be able to nail it. If you don't know your lens' hyperlocal distance, the general rule is to focus approximately one-third of the way into your scene.

Since your shutter speed is likely to be several seconds at that small of an aperture, you'll also need to set your camera to its self-timer setting so that you don't mar the image when touching the camera to release its shutter. Using the camera's built-in self-timer takes the place of an old-school cable-release, or use an IR-remote to enable more precise timing of your shutter-release. IR-remotes are inexpensive and handy to have: For Nikon-owners, you can get the Nikon ML-L3 IR-release for just $17.95, or the Canon RC-6 if you own a Canon DSLR for only $19.89.
 
Hi,

I spent about 100 on a cannon powershot (I think 300) camera and I like it for pictures and videos. The nice thing about the small size is you can set it in the layout and get photos that a larger camera cannot take. The camera was used and came refurbished from the factory.

It is easy to use and the biggest drawback is the microphone is not that good, in my opinion.
 
Variables which affect depth-of-field:

ModelBob is correct in stating that smaller sensors are capable of taking photos which deliver greater apparent depth-of-field (though, strictly speaking, the depth-of-field doesn't change when different sensor sizes are employed, even though more depth-of-field is perceived). There are four variables which affect depth-of-field (both actual, and apparent):

1. Focus-distance: The closer the focus-distance, the lesser the depth-of-field (fewer objects in focus).
2. Physical aperture: The smaller the opening (i.e., numerically higher f/stop; e.g., f/22), the greater the depth-of-field (more objects in focus). Conversely, the larger the opening (i.e., a numerically lower f/stop; e.g., f/1.4), the lesser the depth-of-field.
3. Focal-length: A wide-angle lens will produce more apparent depth-of-field than a longer focal-length lens. Though the actual depth-of-field doesn't change, a telephoto lens renders a much smaller field-of-view, with the apparent effect of reduced depth-of-field.
4. Sensor-size: Similarly, a smaller sensor (e.g., iPhone camera) will exhibit greater apparent depth-of-field than a larger sensor (e.g., full-frame DSLR).
 
Last edited by a moderator:
Just in case you missed the little link in the corner of his post, GO TO CHERVON'S WEBSITE: LEARN LIGHT : LIGHTBASICS.COM
Everyone interested in photography will find something of value there. Keep this in mind while looking at the info there: you are basically taking a portrait of your layout. The fundamental principles are the same. The fact that he's a Nikon / ProFoto guy is just icing on the cake.
 
Just in case you missed the little link in the corner of his post, GO TO CHERVON'S WEBSITE: LEARN LIGHT : LIGHTBASICS.COM

Everyone interested in photography will find something of value there. Keep this in mind while looking at the info there: you are basically taking a portrait of your layout. The fundamental principles are the same. The fact that he's a Nikon / ProFoto guy is just icing on the cake.
Wow! Thank you for your gracious endorsement! Appreciate the kind words!
 
The fact that he's a Nikon / ProFoto guy is just icing on the cake.
Unfortunately, my pockets aren't deep enough for Profoto strobes, arguably some of the best flash equipment money can buy (the other being Broncolor). The only Profoto gear I own is their parabolic modifier. Profoto's standard modifiers are really just standard fare, and are actually too heavy since they're designed to accommodate both flash and hot lights. Their larger softboxes are too heavy for their supports, bending their steel rods even under light use. I ended up returning a bunch of large Profoto softboxes because of this.

I went crazy when Elinchrom switched US distributors and took advantage of a 50%-off sale that Adorama held to clear out their stock about two years ago. I spent like a bazillion dollars, but got two-bazillion dollars' worth of Elinchrom gear. I bought six Elinchrom ELC500HD strobes, plus four Elinchrom D-Lite RX2s, plus a small D-lite RX One kit, which was something like an insane 70%-off. My only regret is that I didn't buy more, specifically, some their ELC1000HDs. Virtually all Elinchrom strobes come with built-in RF-triggers, so simultaneous wireless triggering is a breeze.

While Elinchrom is quite good, Profoto (Sweden), and Broncolor (Switzerland) are considered the Rolls Royce of strobe equipment. Briese' (Germany) specialty line of focusable umbrella-strobes are considered one of the fanciest of them all. Elinchrom (Switzerland), is sort of like the Mercedes Benz of strobes. However, among all brands, Elinchrom's modifiers (softboxes) are considered superior in many ways to all others, and in fact are the lightest modifiers of any other manufacturer's. Many pro shooters consider them the best and even use Elinchrom softboxes on other brands' strobes using adapter rings. It's one of the main reasons I chose to go with their strobes as well.

To further the automotive analogy, Dynalite and Speedotron are two American brands which are like Ford and Chevy. Very rugged, built to last, and priced less than their European counterparts. I own two Speedotron 1,000Ws monolights and they really pack a punch. These are two of the best 1,000Ws strobes ever made (many manufacturers overrate their actual Watt-second output), but unfortunately Speedotron chose to discontinue them a few years ago. For the budget shopper, Paul C. Buff reigns king of the non-import, value-priced brands with excellent bang for the buck. Their top-of-the-line, Einstein E640 is quite good and competes favorably with other name-brands.
 
Last edited by a moderator:
You don't need strobes of any kind. Stage the scene, find the best lens vantage point, light the scene with your overhead permanent lights (already carefully considered for this purpose), and bring a secondary light to stand nearby if it's needed. Try to make sure the shadows are sharp and consistent. Then, set your camera on a small platform to which it can be returned for each successive image whose depth of focus into the scene has gone deeper into it. It's how I got my results. Somewhat painstaking, but that little Powershot A710is with its whopping 7 megapixels is so easily handled and managed.
 
I never said you need strobes to photograph layouts. Continuous light sources are fine, and probably preferable in this application.


Back
Top