Building the Wilton Sub (long and continuous)


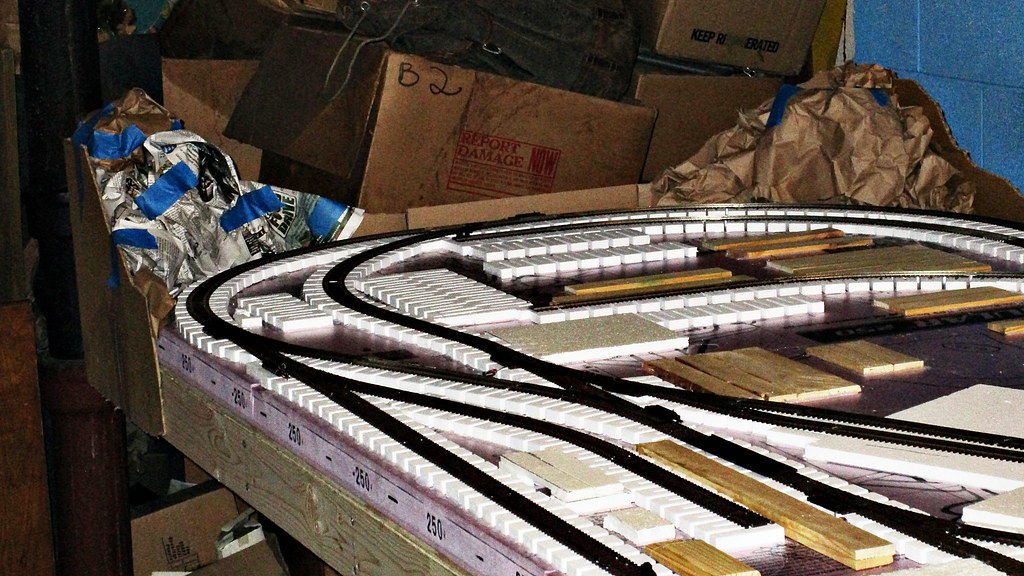
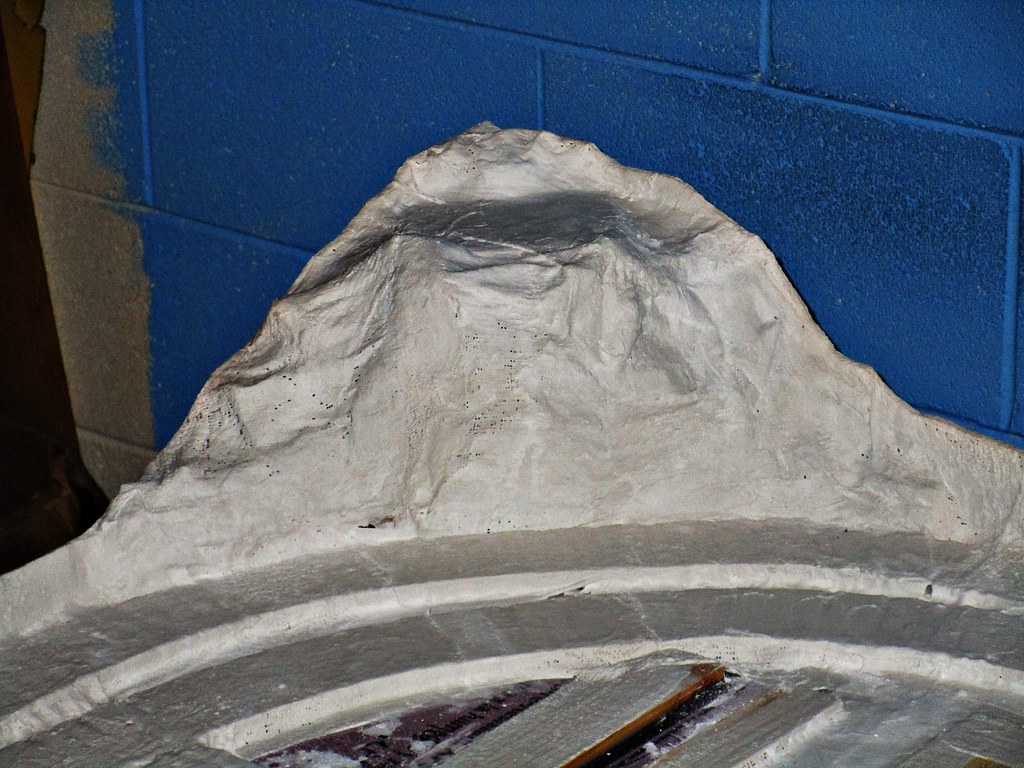
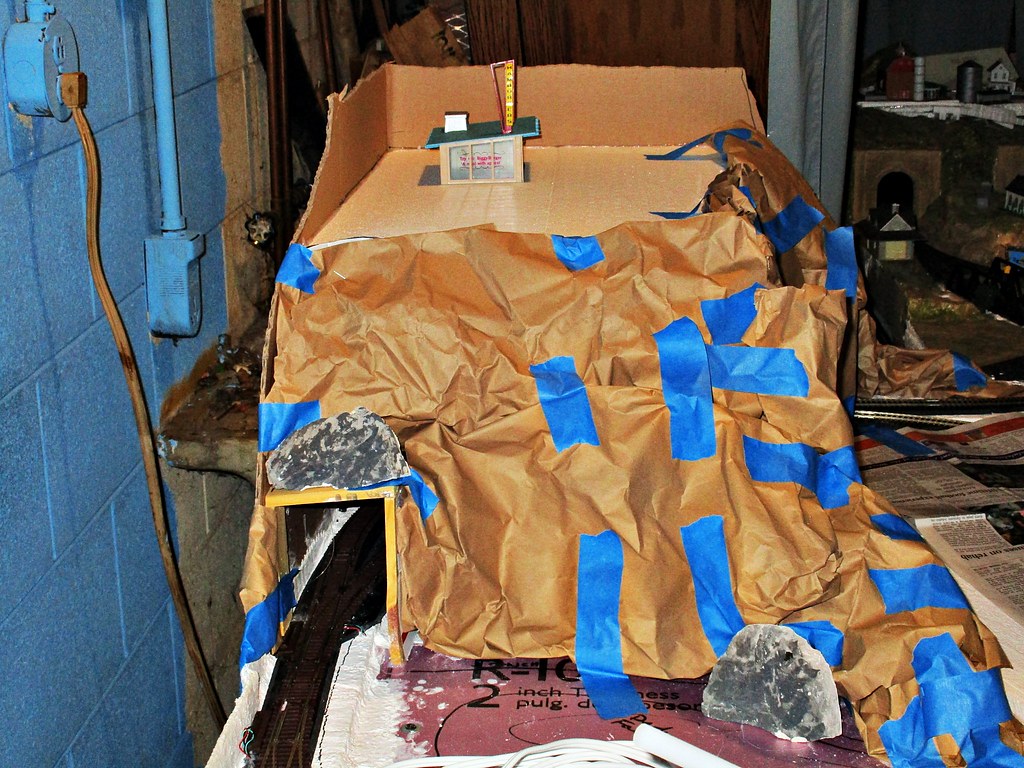
An so in past post some wag suggested I use a "view block" ... IS this what you had in mind?

]
31398736115_db55e26007_b.jpg


Well???? IS IT ???

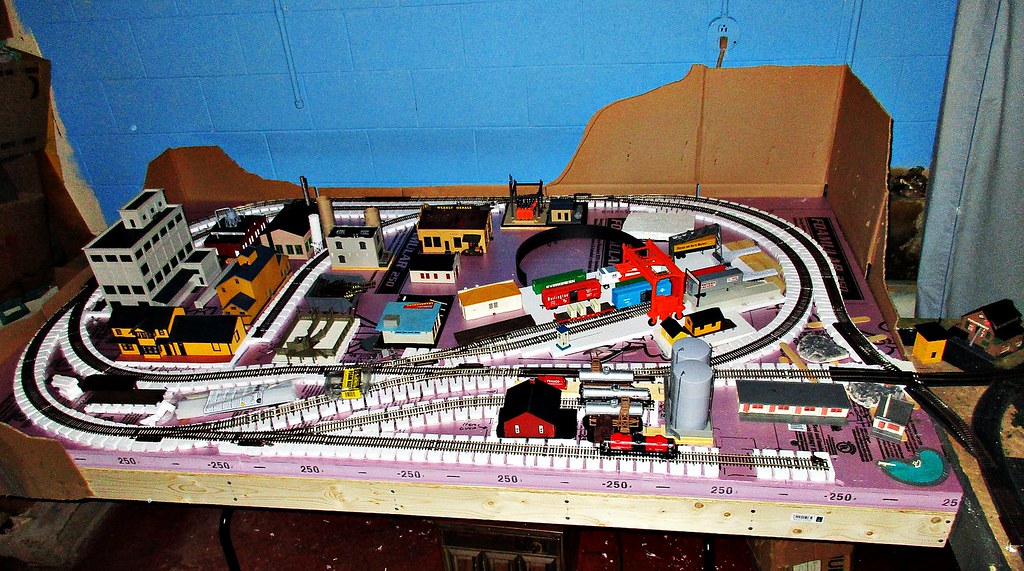
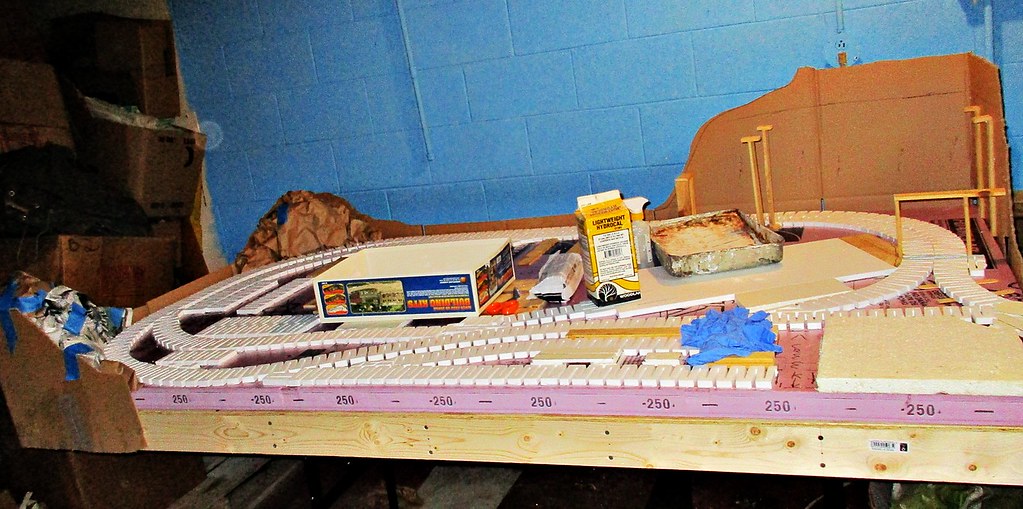
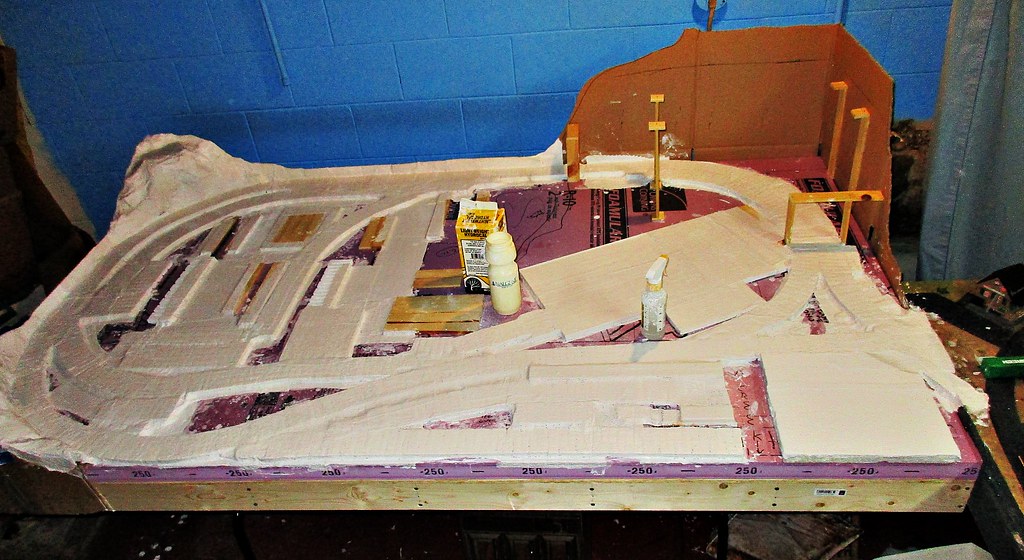
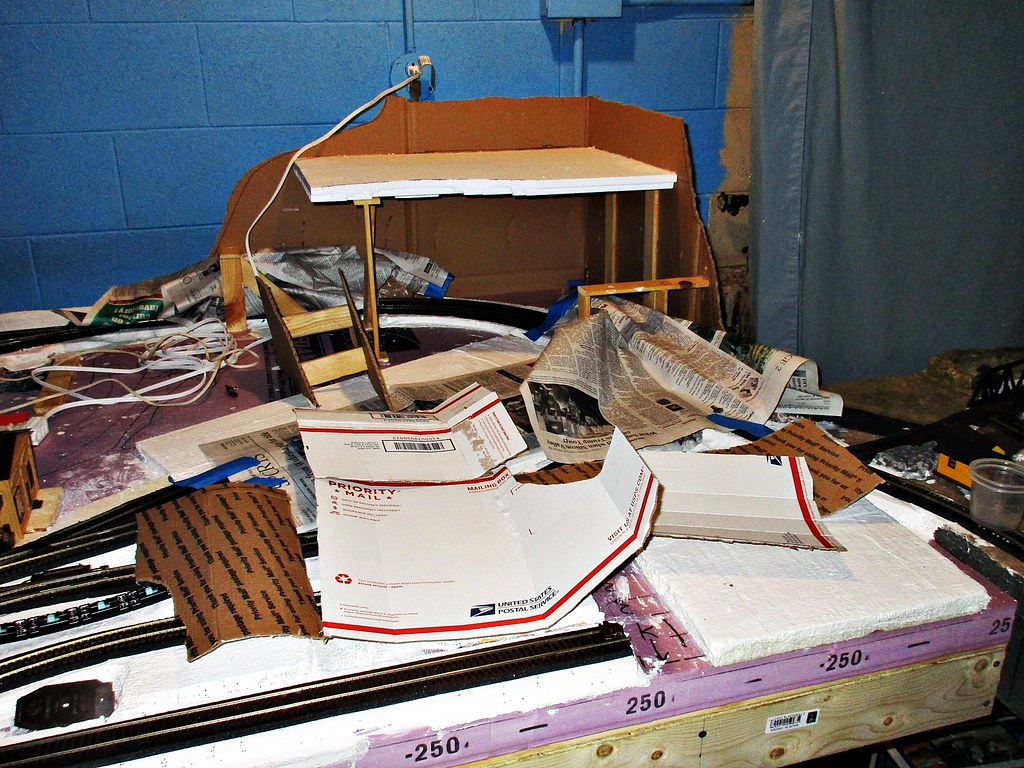
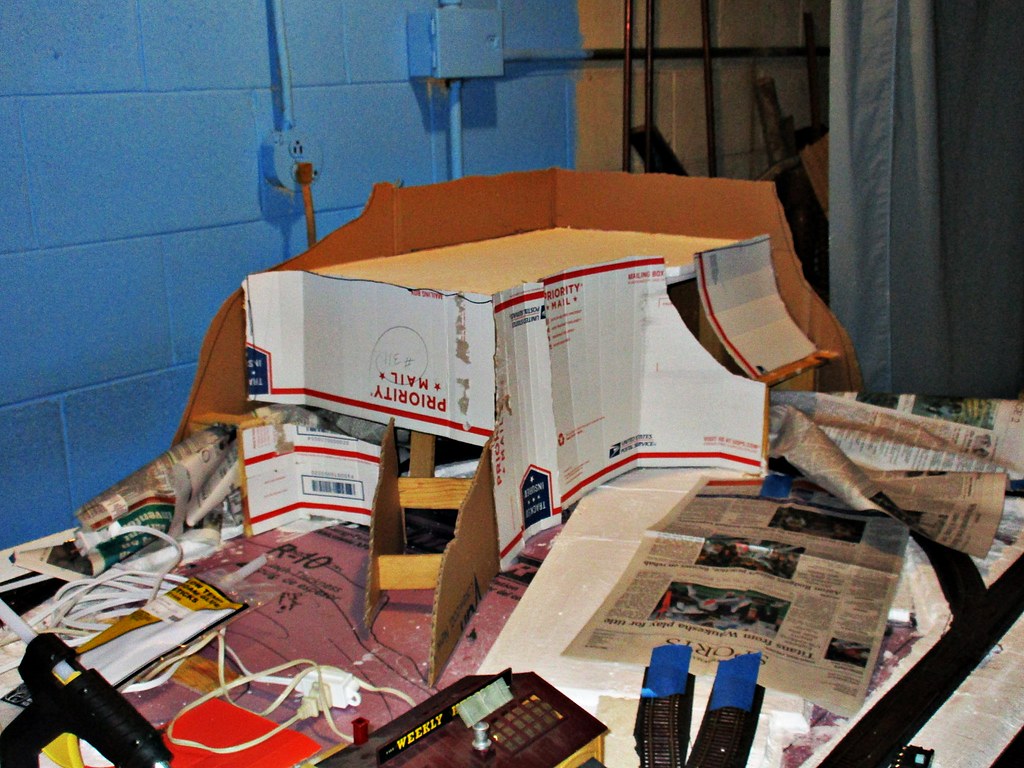
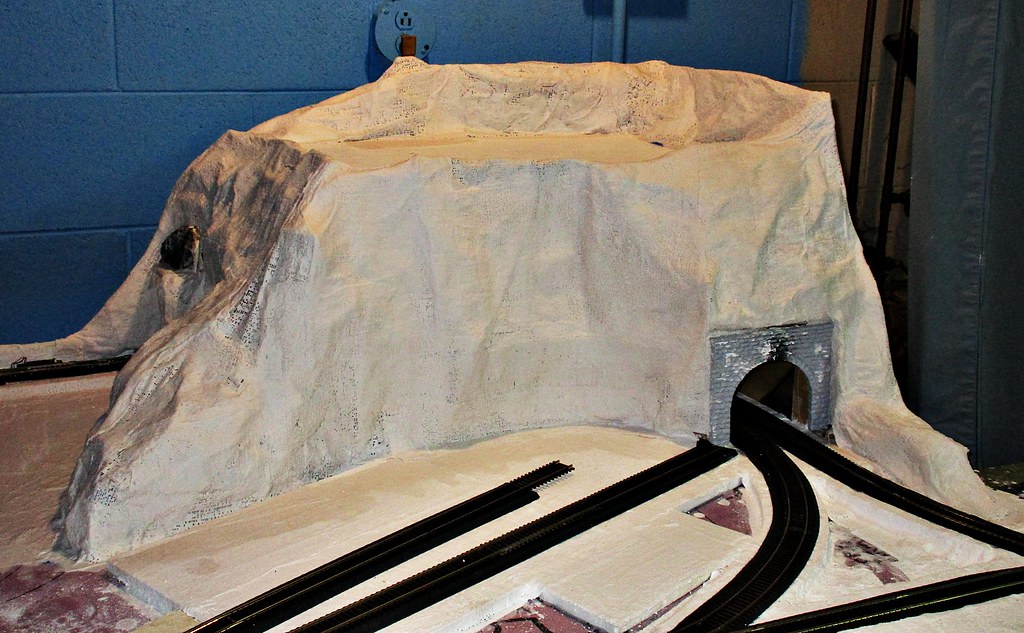
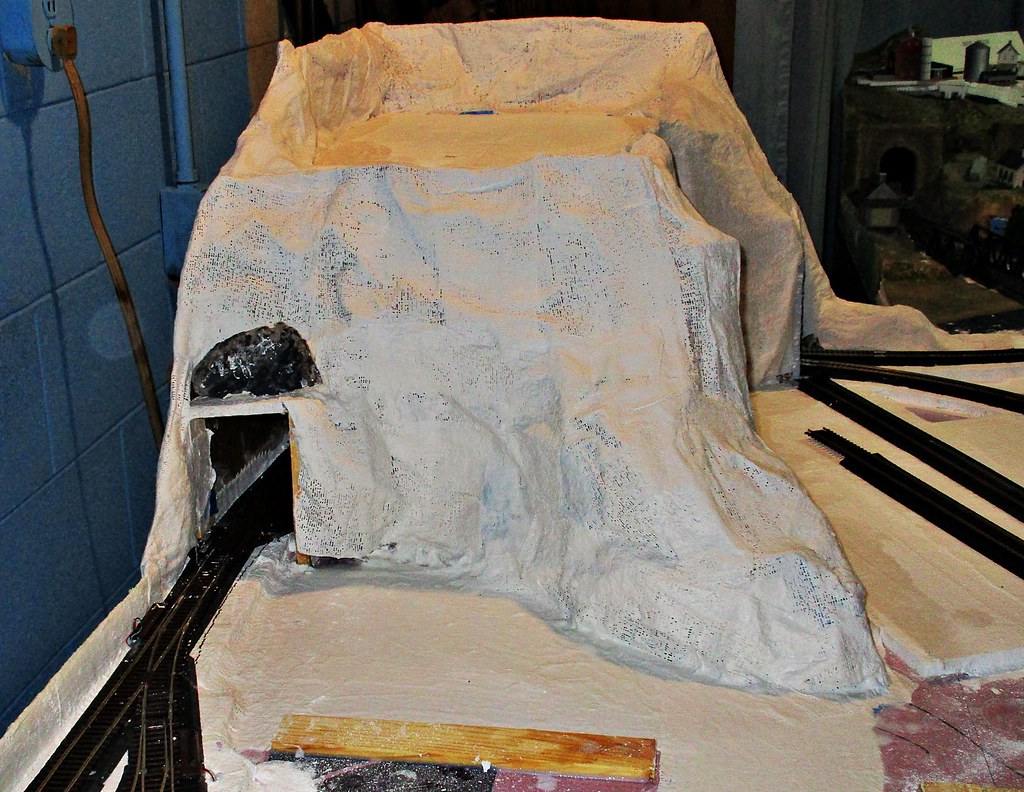
It is the weekend work time, and I am setting the corner back boards. those will form the "box" for the stuff which goes into the hills to make up the hills. Rather than try carpentry, chicken wire, canvas strips and then put wet paper towels over it dipped in plaster of Paris, I am using the woodland method.

Much faster, neater, and can be adjusted right up to the time you do the finish work

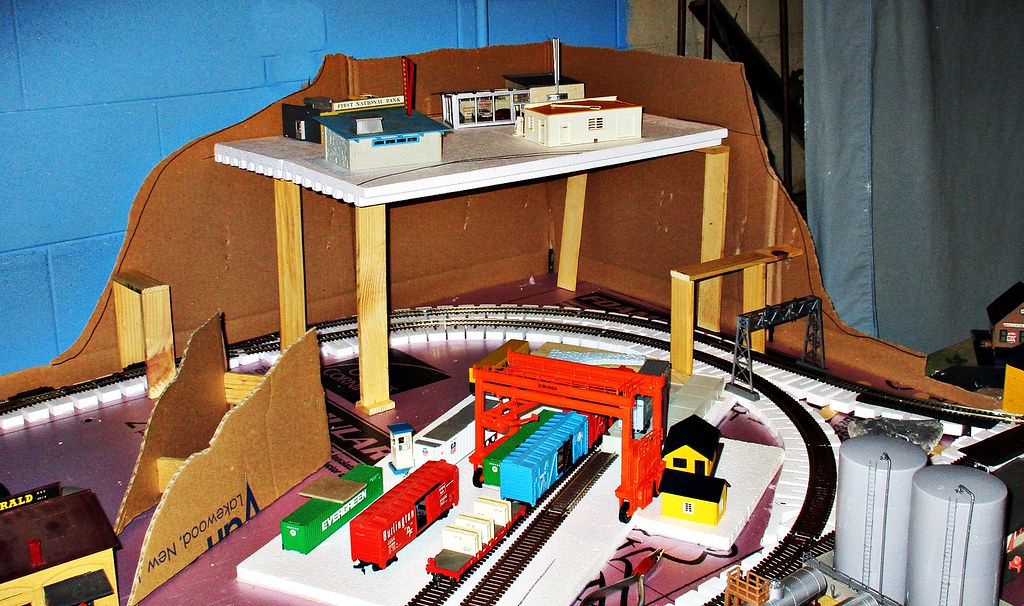
Go back to my posts A + B = New sub ... look at photo A and you will know what I am doing.

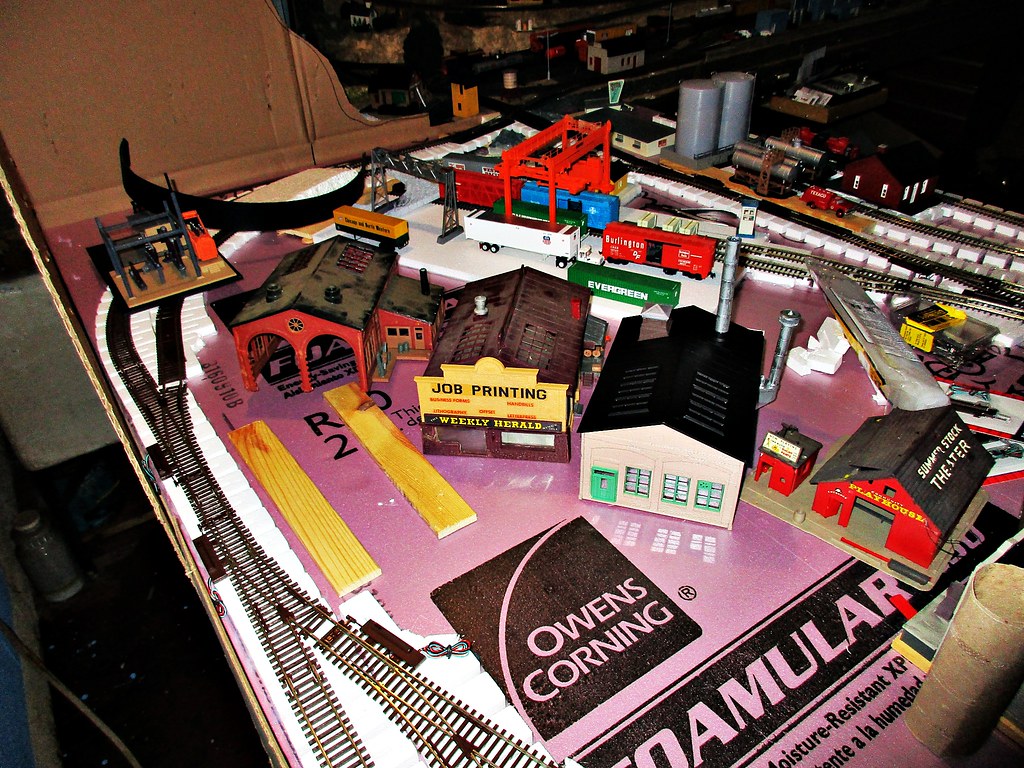
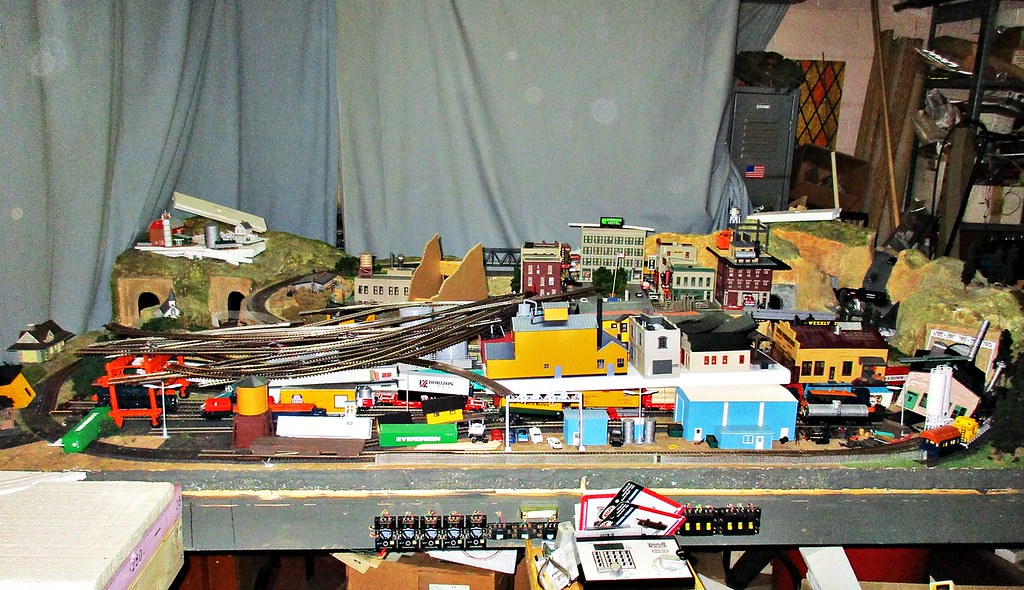
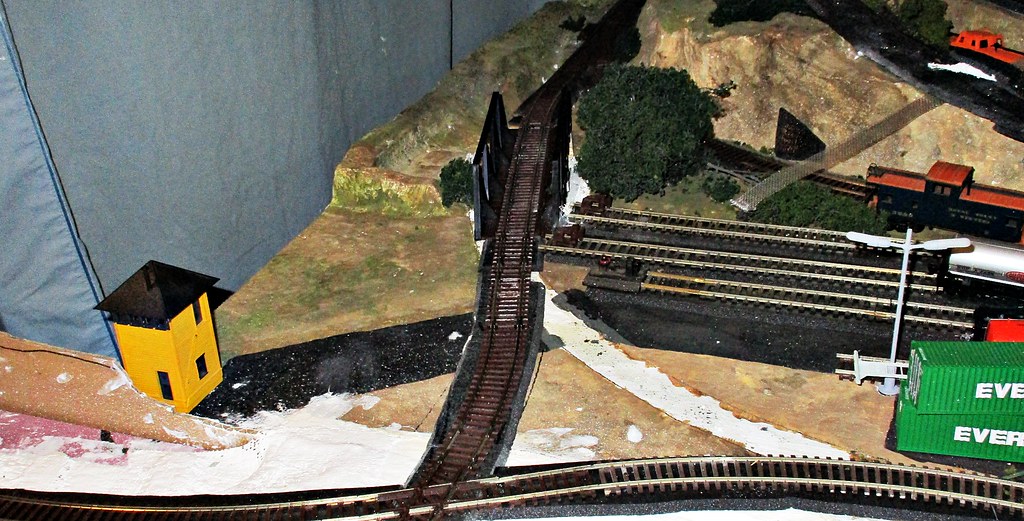
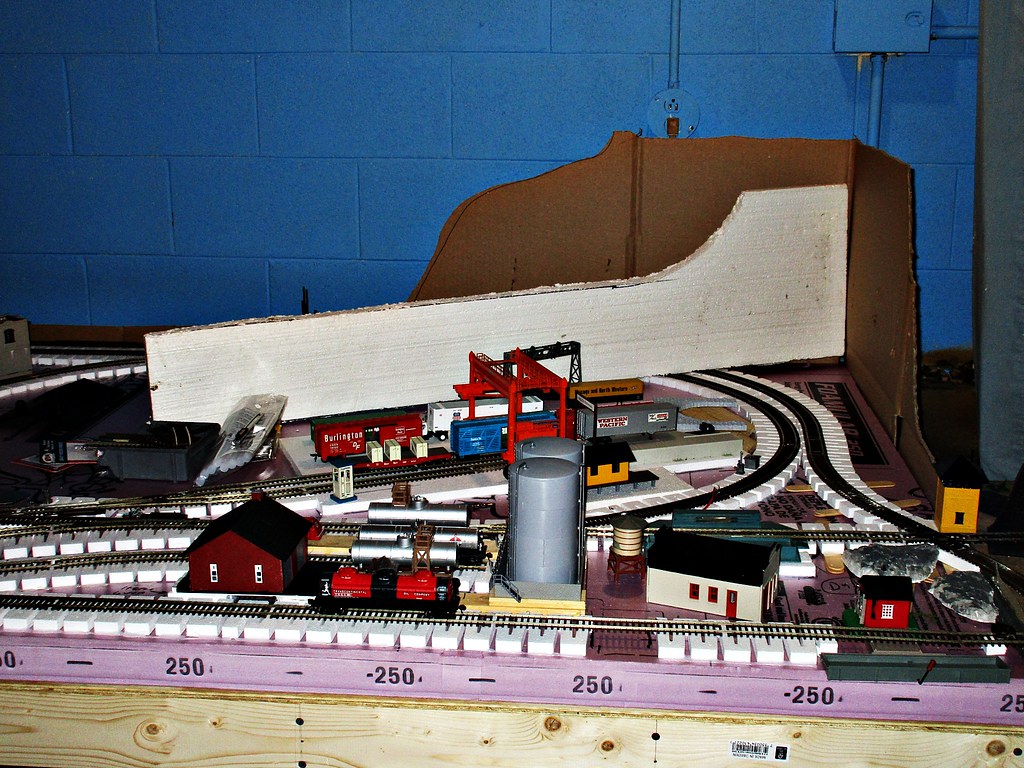
Also note Dyden has changed again, and I moved that unloader over to the main line. Now just stop the train, dump the boxes and move on! I wish i had one for unloading the stock cars as well - the same process I think .... Dyden is going to be the only building without a pier under it. This is the undesirable part of town anyway -- who would build a Mc Mansion behind a fuel depot ???

Also note the line of back board along the rear edge -- there is one around both sides where the track is close. Woodland did this on the River Pass and I am using the same technique.

Later

The Aerojet
Royal Point and Western
 
And on we go! Since I had hinted at three other Revel buildings - I guess no body as usual picked up or had seen them -- try these!

30630577484_4030ebc055_b.jpg


Okay from left to right -the original engine house from the 70's, that printer / newspaper office I spoke of, the bakery now rebuilt, and that summer stock theater. All Revel models from the 70's thru the 80's. I would guess all now long gone.

The bakery gave me some trouble. I thought the one wall was a but warped from sitting out in the garage for 18 years, and thought I could glue to tight and straighten it out. Turned out to be more than that - the roof was warped as well, funny at the same spot. Glue, hold, and hold some more. When ever I let go the roof came up 1/8 of an inch and the wall buckled in 1/8 of an inch. This is not going to get the best of me, I can go another way and force it, really force it into place and then see what it does --

31434635906_eacbacac80_b.jpg


PAIN IN THE PANTS!! So you want to play rough? I can too -- take that you stubborn model! .. Took it over to the bench and grabbed one of the bar clamps and then worked it onto the building. Suspending it from the two bar ends over night, by morning to was where it was supposed to be. Problem fixed.

Well getting to the end of the "build"process. One more building to complete and then - a couple to rehab, they are on the board now - and then the "construction phase" is done. Next will be the start of the scenery - which is a different area to post in.

One last look before I go on to the next part .........

31100779230_0347e63a0f_b.jpg


LOTS of changes here, but know I am not done with those yet. As of now you are looking at what I have on the board and about where it is going to sit in the final working out of the scenery.

It isn't some super huge room sized triple decker layout, with two spirals and everything else which seems to wow people - it is my own road. AND one which you can build too. Which is the reason I bothered to post this part out - it was to inspire others who are sitting on the sidelines thinking and wishing for some kind of layout to run or for that matter build. This is an easy way to get into model railroading without the total commitment of time and materials to build a room sized pike.

You too can build a 4 x 8 which is more than a plywood central - it just takes your own determinations that this is for me, and then go for it.

Thanks for reading along, and I will catch ya later on one of the other forum sub sections....

For The Royal Point and Western --

The Aerojet
 
AJ - I have two of those Revell structures, the engine house and the bakery on the layout. To fixed warped walls and roofs, I place them into a baking dish full of hot tap water for a few minutes, then lay them on a flat surface and apply weights (old encyclopedias) on top for a day or so. Probably doesn't need that much time but so what! Sometimes I have had to add a little boiling water, not much, to keep the water hot.

Willie
 
Okay, I guess I can keep on posting here - it would be nice of some of the almost 600+ people said something, or made good contributions of ideas.

So it is getting to the time when we start to cover the main line in plaster cloth so the track roadbed can go on top, and the "ground" can be lower -- along with that there is also other things which need to get done, like starting on the high work - tunnel work.

Normally you complete the tunnel work before anything else because it is sealed inside the overhead workings. So what exactly is a tunnel anyway? Just a hole in the "ground" - mountain, under a river or thru anything which is too difficult to go over or around. How about a tunnel as a cave? This is how it going to work out. You won't see the cave but know it is under there - it also makes clearing wrecks easier if there is lots of room to reach in and grab something -- also electrical workings can go straight down or around without a lot of filling in the way.

So at this point I am getting ready to cover the board - well most of it, and now I need to start indicating the high work and where it is going to sit, and more -- how.

31423759421_25eda94a76_b.jpg


So here are some of the secrets of this little gem.

First, I said that there was going to be something on the top of that hill. AND there it is - another town, Pine Grove as it was. Well part of it anyway, like many smaller towns around here they have an outlying area of car dealerships, fast food, gas stations and banks which do not fit into the main part of town. So I have shown that. There is a precedent in this - Soldiers Grove got flooded out awhile back and they got tired of being flooded out. So they moved the whole town up on top of the bluff and abandoned the old town down in the Kickapoo valley. Look it up ...

Next the runnel portals need to be set. This is nothing more than a couple of lath boards stapled together to hold up the opening. The high work will come down to them and compromise the actual entry to the "cave" -- the cave is the area under Pine Grove which will be open. Curtain Walls will come down from the upper part along that black line and over near the right portal. Look back and note the wall in Bender's Curve on the River Pass I posted earlier.

The cardboard thingy in the middle is the other end of the hill / mountain. This is an indicator and will be used as part of the final scenery - it shows where the thing will end and how it will peter out in the open board. Note that it is not uniform, both sides are different and end at different places. That is how it going to look / work when I get that far.

The legs holding the platform will be part of the final, the ones on the side board will be hot glued to the side, and the other two will get the footings glued to the board. The board gets hot glued to the line on the side board. In the end this will be a solid as you can get without major carpentry work.

From the back of Pine Grove the board rises to the top of the back board and this will be filled in with more hill as it was -- you will see.

FOR those who are wondering what those buildings are - they are Plasticville units from the early 80's. Just more of the stuff I put away. I was rebuilding those all week from the parts left in the box. Getting the tavern yellow off them, and just in general cleaning them up. This saves having to buy more stuff for this project. I may still use more of them if I can find places for them in a later revision. BUT for now -- it goes up the way you see it.

The lower corners will be built up paper layers like the Woodland method and will make a nice frame for the whole project.

Final notes --

AS of now with the big snow coming this weekend I may just do the lower plaster work this weekend and get it done. ON the high work the tunnel portals need to get placed on the base and plastered in. The pine Grove part will wait until I have all the track work done, including getting the roadbed down. Then I will erect the thing, glue it into place and begin the curtain walls and other sloping parts.

Your thoughts?

Later

The Aerojet
For the Royal Point and Western
 
Getting plastered!

Well a good toot is nice, but I have other things to do other than regret thing in the morning. It is time to get this pike into high gear and get the thing covered in hard shell. This is one of the things which scares a lot of people. It should not. It is an easy and fun process. This took me about 3 hours to finish, and since IT is snowing like MAD out there a good snow day thing to do. Let's get started.

First clear off all the stuff from the board. Next we need to get those two far corners papered up for the hills ....

30774180953_dc9aa69324_b.jpg


You don't like paper hills? WHY NOT? Just await till you see how they turn out... ON to moving all the stuff off the board. Where to put it?

31584032335_3dac29a4d8_b.jpg


I knew there was a reason I did not tear down the old pike ... ROFLOL .... So I piled the whole shebang over here while I work, the train isn't going to run anyway until I get this project back together - so -- pile it here ...

ON to the plaster cloth job ...

30774179233_95c4a455f5_b.jpg


AN so here you see all the stuff you need to do this. A couple of rolls of Woodland Scenics plaster cloth, get at least 4 perhaps 5 to cover a 4 x 8 -- an old paint tray for water, a sprayer, any type will do, that adds water where you need to to smooth out the lumps and get the plaster in the cloth to totally dissolve and cover the area. A pair of scissors you don't mind getting dirty with plaster, and rubber gloves.

Trust me, you need gloves to work with this stuff. It is hard on the hands and almost impossible to get out of stuff. Wear old clothes you don't mind getting dirty either, no goof ball wear the best tux you have!!! -- in the main, this is a messy process but worth it. OH YA - the Hydrocal is for adding more plaster to the area, like paving roads as you go, or covering "holes" in the cloth which look funny ...

Now onto the job. Start by cutting off squares about 8 x 8 - get at least six of them ready and then start laying the stuff, overlapping at least four to six inches between sheets of cloth. Work in any direction covering the risers and other things as you go. Just get it down, then smooth it out so it is not "lumpy" especially under the tracks areas. Then form it up and over the edges as you go, and just keep on going. if you have a helper, they can cut the stuff while you apply it. Don't worry about being exact, or leaving holes, you can cover those later on. Just do a good job of it and it will be okay.

Screw ups and other boo-boos can be dealt with later, or covered with some other form of ground cover. SO don't sweat the goofs. It is part of the game. Just get at least a double layer under the tracks and a single layer under everything else you intend to cover.

Under the tracks will give you a solid road bed which will not shift or sag....

31467951191_968cdab6d2_b.jpg


TA -- DAAAA! Three hours later and this is the final product. You need to get the tracks back down and then lay the road bed under then next - but for now this unit is done! The areas which are under buildings or otherwise covered by something are not covered in cloth, and don't worry about them either. The funny pink areas are where ground cover like something "green" will be going in time..... other areas like under Mal's Hill, won't be done for sometime yet, due to I need to get the track down and running on its roadbed then I can do the final hill....

This is the second lay of track, and when you do that trace out the track on the white plaster and this is where the road bed will go later on.

OH YA -- that paper hill????

30774177683_b72ecdb682_b.jpg


Sculpted and carved... man did I work at that! If you think so you got a real shock. That is just the cloth tossed up on the paper and covering it and then pushing and bunching it as I went along. A little shove here, and another there and the rock outcropping comes alive! Wait till you see that colored in!

With that this phase and punch list item 45 to 50 are completed.

Questions??? ASK ... and don't be shy ...

For the Royal Point and Western
The Aerojet
 
Wow, the extension has come a long way! Interested to see when you get the rear right mountain built. FWIW, I'd put the hamburger joint facing so you can see in the front window. I think it used to come with interior details, or at least a counter of some sort. Plenty of room for tables, as I recall.

My only other piece of advice is not to overcrowd the space you have. Nobody can work at a business, or shop there, if there is no place to park.

Keep those photos coming!
 
otisnj -

The hamburger joint is an early Plasticville model and it only a square building. No floor or interior. As far as parking - this is another consideration which there is no room for. On a 4 x 8 or 4 x 7 there is only so much room. LIKE the town center on the other board, which resembled a lot of old time down towns there is not a whole lot of parking. I will be showing some and have some cars in there - but not the full parking lots which would normally be required. Take the flour mill, you would need at least that much foot print ++ to get parking for all the employees. Not going to happen when there is other things to put on the board.

Space compression is the key.

A model railroad cannot show the full sub / division / road - on one board, or shelf, or group of boards, shelves. There isn't enough room for all the trackage and then the large area for buildings and parking et al. I am getting some "separation" by having two switching spurs off one main switch. This gives the impression that they are not right along side of each other.

Having the flour mill and the bakery on the same siding would be a waste of time, as you could just run a pipe down from the mill to the bakery -- however, having it on another spur, and never mind it is "across the street" -- you give the impression of distance. it is artistic compression of the scene. Likewise having the stock unloading pen on one track and the meat packing plant at the end of another - gives the same impression.

Other industries fill in the gaps and create atmosphere for an industrial park.

I will have Dyden 1 become a truck farm. Wait and see how this turns out! The intermodal yard got a rework while I was laying the road bed due to space constraints and it fits better the space I have to work with. The oil depot is pretty much the same, except I shortened the track and added a bumper near the creek.

Still more track revisions as I go along even at this late date and am still working out kinks and odd trackage problems. It is a never ending process, until at the end when I finish this part it will be pinned down to the road bed and semi permanent in place.

Thanks for your interest! Yes it has come a long way - but - remember, I started this a good six months ago in the planning stage, and drew up how I was going to get things done, in what order, and what I needed to make it come off. Materials and supplies were ordered out in advance, and everything was sitting here someplace in the shop in plies just awaiting it's time to go on to the board. Having this whole thing pretty much worked out in advance meant I did not lose much time in doing it on the fly.

Now it is just a matter of finding the time to assemble the whole shebang. one step at a time, one part of the plan finished and the thing moves right along. Where as most would get bogged down having to buy more supplies as they go along - and - some of that could be more than they are ready to spend right now -- so the thing sits waiting for funding. Thus it takes longer for them to finish the job.

For the Royal Point and Western

The Aerojet
 
All right boys and girls, it is time for your weekly update and big tease!

Lots has been going on around here, work has suddenly picked up and now I need to work nights on this project -- first up --

FIXING an old problem.....

If you go back far enough in my posts you will note on the original board there was a siding leading off to nowhere. This was supposed to be the handle to which a new board would some day attach. It never happened that way. As usual over time your ideas on what is the pike and what is not changes. Now I got me a real problem.

The stupid tracks run not past the end of the old spur, but thru it ... GRRRR ... Worse this is 2 inch riser territory. Now what? Start digging under the hard shell to find the answer. It is about six inches long here and a good four and a half - five wide. Cut and remove the offending risers. BUT NOW WHAT? I got a big hold right in the middle of the new track lay. Answer? Build a bridge!

30846300754_b61b70a274_b.jpg


This project and it's constant problems is starting to get my tail cooked. Now I need to span a big hole, or fill it in. SPAN.

One would think that a new switch would be okay... right? Guess again. I had two of them turn into point pickers / major derail points. NEW Out of the BOX!!! Fixed that problem. Cars keep on uncoupling.... GRRRR ... NOW WHY? It turns out to be McHenry couplers - they do not play well with Kadee units. The Kadee cou0plers stay together the McHenry keep on letting go at the wrong time and only on the new pike ... now why? Beats me, all I know is the older cars and the ones with Kadee's on them work okay, the McHenry keep on letting go at the wrong time. Could be the radius? I am using 18 inch curves -- and the old pike is done totally in 18 inch .. so why now?

One guess is some kind of "up and down" going over track sections are pulling the McHenry's apart -- time will tell but for now I can get them to work in some fashion and it still eats at me.

ON to the high work ....

Okay so we need to build a tunnel. How does one do that? By erecting a tunnel sides and roof and then it forms the tube thru which the train passes. I am not doing that - I am going thru a CAVE. On to the cave building.

31651101646_b3b3e1c52f_b.jpg


This is the start of the high work. The table on top where Pine Grove will sit has been hot glued to the sides, the legs, and all - and is now stable enough to almost stand on, but I would not do that. Also the tunnel portals have had a 45 degree brace added to the back for rigidity, and everything which need to get done is. Paper is placed over the track work to keep it from getting all messed up when I so the hard shell work.... ALSO note the pile of cardboard.

This is old shipping boxes cut to suit what is next. Measure out your height and width on everything and then make up cardboard "faces" to match. This is going to be the back board for the actual hard shell work. Much like the high corners stuffed with paper formed the background for the other two corners.

Time to apply the backing boards to the pike ....

31651100846_11ba2fbc80_b.jpg


LIKE SO! You did not think I was going to fill that whole space with paper did you? Each piece is cut to match where it will be going. In the end, to make something like this you need to have "imagineering" and see in your mind's eyes what will fill the space, then using your X-ray vision, see what goes behind that -- in the end this is what you get.

Now to paper the thing up. Here like the cardboard we work in sections and I am using craft paper, which is heavy duty stuff they use for dunnage today instead of foam peanuts. I got tons of it around here, but you can use old news paper as well.

Fold and crease each section in to what you think it should look like in the end, and apply it to the cardboard forms with painters tape. Work each section separately. Get the edges to fold under each other where they overlap. Let the wrinkles and other things stick out, this will be the "rock" in time. AND SO NOW ???

What does the finished unit look like?

See for yourself!

31651100236_bef60f8773_b.jpg


31651099746_352faa26a8_b.jpg


31651099246_c6b8a82812_b.jpg


That's IT! If you like this work, you can save the images, they are just .jpg and print them out for yourself ... The top needs to be done yet, but that is another work day when I start to lay the hard shell ...

Okay .. NOW WHAT do you think? Like the "hill" - "mountain"? See you can work with something other than heavy duty carpentry, chicken wire, paper towels soaked in plaster and all the other mess and create an interesting scene..

Now tomorrow I will finish this off. May post it out Sunday ,,, maybe not ...

For the Royal Point and Western,

The Aerojet
 
Well it is Saturday, and I have things to do besides the train .... A few work related jobs need to get done and the hard shell applied. That will be done this morning. Now sitting here I am planning the next phase of this project - the actual scenery.

First up, the pike is now in total "snow" as I haven't colored it in yet. That is pretty much the next phase of this thing, getting the background color in. Roads need to be painted in, they are paved with the hard shell already -- buildings need to get their final set, lights in them, street lights and area lights need to get placed, and so on.

Part of the next phase after that is the landscaping.

Not just color, buildings and lights, but actual landscaping. Here we run into the problem of trees and other green stuff. i know that there are tutorials on making trees on this forum and others, and I do - did - use Woodland Scenics armature trees in the past, but those thing shed the green foam like crazy. I am always sweeping up bits of foam from the finished pike.

Thankfully there is the internet. Out here I have found packs of 50 trees from China for $12.00 and this is the solution today. I am not going to pay for individual trees at 20 bux for 6 of them - for what? Show? So get the awl out and "plant" trees when we get that far. Woodland Scenic glue works best -- I tried Elmer's and just about everything else and this I find works the best. Dries clear and holds well, even thru wrecks hitting the things.

Other than that -- first up after the hard shell work is the start of the electrical work - namely wiring up the 10 switches. Once that is complete the pike can run without problems -- I hope -- that McHenry problem still isn't solved but in time if it does not find a way to clear up those will be replaced with Kadee 147 units. That has worked in the past, just trying to save some cash and work if I can.

Other then that - I hope you are enjoying this little trip with me thru the building of the new extension and are understanding that with enough pre-planning and getting all your stuff before you need it the work can go faster. Experience helps, but only so much if you are sitting here waiting for things to come in or try to go over to the hobby shop and as usual they don't have much in the way of what you need or want ....

Catch up with ya next week ---

Have a Merry Christmas and a Happy Holiday!

For the Royal Point and Western

The Aerojet
 
Well you must be enjoying this little trip thru the construction, I see we have now over 1000 views! How about some chatter on the subject? I don't need grease or any praise, but your comments would be welcome and perhaps I could garner some ideas from you on the ongoing work. Having said my bit for today ---

Well paper mountain and all -- here is the final unit before I apply the top coat of plaster ...

31573644382_0452566f03_b.jpg


31573622782_f38696fc33_b.jpg


Not the best photos I could have taken, but will all the lights on over there florescent lights raise havoc with digital cameras - this is the best for contrast that I can show right now. It will look better when I get this thing finished.

The "holes" are the plaster shrinking as it dries. What happens next is you mix up some soupy plaster / hydrocal - and apply it by hand and smooth out the holes sections and other bumps, seams, and things which need attention. Let that sit for a good 24 hours then it is ready for coloring in with earth colors.

There is no tunnel portal on the left side right now. I have one in house, but this project got too close to the edge to use a full portal. Like on the River Pass, I will use about 2/3 of the thing and let it go at that. Tunnel # 3 ---- just another problem to work thru, and why I put the raised section of back wall along the back and one side.

Next up is clean up, that plaster mess on the tunnel portal, and all over the place on the pike, it does clean up with water and a paper towel - then we start the final building settings, getting them placed and light tight so lights inside don't show under the bottom edges.

Like the "paper mountain"? Now you know how I built it and from what. There is always an easier way to do things in model railroading so work at finding the thing that works best for you -- using your time and talents to build the thing as best you can....

For the Royal Point and Western

The Aerojet


Back
Top