
You are using an out of date browser. It may not display this or other websites correctly.
You should upgrade or use an alternative browser.
You should upgrade or use an alternative browser.
Building the Pinnacle Creek Mining & Timber Co. RR
- Thread starter HOexplorer
- Start date
Railrunner130
Well-Known Member
Feel better soon Jim!
HOexplorer
Well-Known Member
Thanks guys, I just got back from Urgent Care and they said Diverticulitis. What I can say that it HURTS and would not wish it on anyone. Jim
Last edited by a moderator:
Fifer
Member
Feel Better soon and I know what it is and NOT FUN is it !!!!Thanks guys, I just got back from Urgent Care and they said Diverticulitis. Whatever I can say that it HURTS and would not wish it on anyone. Jim
Mike
HOexplorer
Well-Known Member
Thanks Mike. Better than gout or kidney stones but not by much!
Gang, I've not forgotten that I promised "Tunnels" as major topic. I wanted to have it for you for Christmas, but I'm still sick with little energy. BUT something interesting happened last evening during a 'good' spell. I planted this tree, the first time I've been able to enter the trainroom since Thursday.

Notice that I only had the energy to 'plant' one tree and notice how I propped it up over night so it would be sitting straight in all aspects. I love WS Foam Pins. They are very versatile. Also grabbing anything handy to further insure a straight tree is acquired. Adding this one tree however, got me thinking in yet another night of tossing and turning. Namely, why did I feel last evening that I simply had to plant it? It got me thinking of why I may build the way I do, back to front and from one side of the layout to the other, when all books and writings on the subject generally say otherwise. Philosophy alert: My wife thought I was crazy plant the tree when I could barely stand up. I'm sure the answer goes something like this: For me building is a means to an end. The end is taking photos and starting over. I need to see the scenery as I build, as it is the most important aspect of my building. I know nothing about 'trains' or real railroading and I'm too old to give a hoot.
While my photos lately show a layout that looks finished obviously it isn't. This is it so far. Sure the subroadbed and piece of plywood is on the left side of the layout waiting for me to build according to the rules. This is basically build the benchwork, build the subroadbed, and lay your track and run trains to see if they can actually go around your layout. You all probably did it that way and the beginning I did it too. From my first bedroom layout in 2006:

Here I've built my first layout according to the 'rules.' What I discovered building the 'correct' way was I never seemed get done! In other words, doing it by the book, to me, seems like you have to build your layout over and over again. After your benchwork, it may take years for the average modeler to even get to the plaster cloth stage. My next layout after this one I began building from left to right and it came out quite good. Subsequently all the layouts have started at one end and ended finished at the other. I think my personality plays a part in this. I want, I need, to see some finished product. Simple as that. So away I go following my pencil plan and keep moving from one end of the layout to the other. SO, I planted the tree last night because I had to. For some reason I planted the tree for no other reason than I have to keep going. Look at the layout photo and see where I planted the tree. It is only 9 inches from bare plaster cloth. Yep, right to the limit. Same process I used in climbing mountains and sailing around the world. One goal/day at a time and you eventually get done.
To sum this up I think this way. Some layouts are never 'finished' because traditional thinking on layout building doesn't translate into speed or simply getting the layout done it any meaningful time frame. I like to build fast so I've evolved to my process one foot of progress at a time building the layout only once because I appreciate my progress and work and get to see the finished product as I go along.
So if you are having problems finishing or even starting I recommend the road less traveled. It may help you in this great hobby. Jim") (back to bed)
(back to bed)
Gang, I've not forgotten that I promised "Tunnels" as major topic. I wanted to have it for you for Christmas, but I'm still sick with little energy. BUT something interesting happened last evening during a 'good' spell. I planted this tree, the first time I've been able to enter the trainroom since Thursday.
Notice that I only had the energy to 'plant' one tree and notice how I propped it up over night so it would be sitting straight in all aspects. I love WS Foam Pins. They are very versatile. Also grabbing anything handy to further insure a straight tree is acquired. Adding this one tree however, got me thinking in yet another night of tossing and turning. Namely, why did I feel last evening that I simply had to plant it? It got me thinking of why I may build the way I do, back to front and from one side of the layout to the other, when all books and writings on the subject generally say otherwise. Philosophy alert: My wife thought I was crazy plant the tree when I could barely stand up. I'm sure the answer goes something like this: For me building is a means to an end. The end is taking photos and starting over. I need to see the scenery as I build, as it is the most important aspect of my building. I know nothing about 'trains' or real railroading and I'm too old to give a hoot.
While my photos lately show a layout that looks finished obviously it isn't. This is it so far. Sure the subroadbed and piece of plywood is on the left side of the layout waiting for me to build according to the rules. This is basically build the benchwork, build the subroadbed, and lay your track and run trains to see if they can actually go around your layout. You all probably did it that way and the beginning I did it too. From my first bedroom layout in 2006:
Here I've built my first layout according to the 'rules.' What I discovered building the 'correct' way was I never seemed get done! In other words, doing it by the book, to me, seems like you have to build your layout over and over again. After your benchwork, it may take years for the average modeler to even get to the plaster cloth stage. My next layout after this one I began building from left to right and it came out quite good. Subsequently all the layouts have started at one end and ended finished at the other. I think my personality plays a part in this. I want, I need, to see some finished product. Simple as that. So away I go following my pencil plan and keep moving from one end of the layout to the other. SO, I planted the tree last night because I had to. For some reason I planted the tree for no other reason than I have to keep going. Look at the layout photo and see where I planted the tree. It is only 9 inches from bare plaster cloth. Yep, right to the limit. Same process I used in climbing mountains and sailing around the world. One goal/day at a time and you eventually get done.
To sum this up I think this way. Some layouts are never 'finished' because traditional thinking on layout building doesn't translate into speed or simply getting the layout done it any meaningful time frame. I like to build fast so I've evolved to my process one foot of progress at a time building the layout only once because I appreciate my progress and work and get to see the finished product as I go along.
So if you are having problems finishing or even starting I recommend the road less traveled. It may help you in this great hobby. Jim
(back to bed)
Last edited by a moderator:
Man, does THAT make a lot of sense!
In computers there are two concepts, Breadth-first and Depth-first. You have just described the depth-first process -- find the first answer by drilling down and when you get to the bottom, back up slightly and drill down again.
The breadth-first is more like: first all contours, then all plaster cloth, followed by color, then add..... No wonder it feels like progress is slow.
HOexplorer
Well-Known Member
Thanks Walt, The more I read this the more it does make sense. Still sick. Back to bed. Jim
Still sick. Back to bed. Jim
Last edited by a moderator:
HOexplorer
Well-Known Member
Fellows, I'm still sick, still in bed most of the time. Going to the doctor again Fri. AM. Jim
Major bummer !!
HOexplorer
Well-Known Member
Back from the doctor; colonoscopy in the very near future! Jim
Last edited by a moderator:
Major bummer !!
Got it in 1 Sherrel.
Railrunner130
Well-Known Member
Back from the doctor; colonoscopy! Jim
Ouch! I hope all went well.
A few months back I took the dog to the vet, where they promptly shoved a rectal thermometer in. He took it well. But as soon as it was out, he was very quick to back himself into a corner. You could tell he was thinking "You're not doing that again!"
DairyStateDad
Mumbling in the corner
No question that they are no fun. That said, DSM's 3 years ago probably saved her life, when she didn't even know it was in danger.
Back from the doctor; colonoscopy in the very near future! Jim
Colonoscopy's not bad .. It's the prep (24 hours prior) that is a nightmare!
Here's hoping that it's a good read.
HOexplorer
Well-Known Member
Feeling a bit better. It seems the antibiotics are making me sicker. The original pain is gone now. No news on the colonoscopy yet.
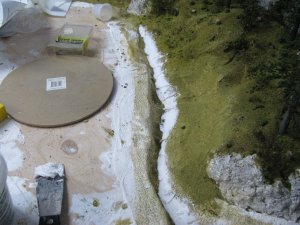
Remember back in post 1846 I showed a fill in job for WS Foam Putty? If not check out the photos there. Next up is the dry creek bed. Notice I've added ground cover to the slope now. In the creek bed I have again used Foam Putty.

After a day of drying I mixed up some base color and painted the creek bed. Notice I scribed the sides to create the rising of water and water flow erosion. I then added a mix of 'Low Desert Soil' from Arizona Rock & Mineral Co. and WS Fine Earth. This allows me to spray glue this mixed on without covering the scribes too much.

I'm not sure I've convinced about the color of the creek bed. I may have to remix color and spray a new color on, we'll see. Back to resting now. Jim
Remember back in post 1846 I showed a fill in job for WS Foam Putty? If not check out the photos there. Next up is the dry creek bed. Notice I've added ground cover to the slope now. In the creek bed I have again used Foam Putty.
After a day of drying I mixed up some base color and painted the creek bed. Notice I scribed the sides to create the rising of water and water flow erosion. I then added a mix of 'Low Desert Soil' from Arizona Rock & Mineral Co. and WS Fine Earth. This allows me to spray glue this mixed on without covering the scribes too much.
I'm not sure I've convinced about the color of the creek bed. I may have to remix color and spray a new color on, we'll see. Back to resting now. Jim
Attachments
Last edited by a moderator:
HOexplorer
Well-Known Member
Happy New Year! Hard to believe this thread is two years old today. Thanks to all the semi-regulars and lurkers we now have over 175,000 views! That is a pretty impressive number, but the only stat I care about it the one where someone takes knowledge from these pages and uses it on their own.
To start this year off I'm giving you all a chance to give input into how this next section of the layout is to be built. In this photo you see two circles. One is 8" the other 10". I'm obviously thinking of a turntable.

The other choice is a simple two or three track yard.

This photo shows an 8" disk simulating a turntable. I need 10" for my 2-8-0. I like the 8" look better. This turntable will represent and 'old' style flat table that was pushed by hand or horse back in the day.

So let me know what you all think about the yard vs turntable. Jim
To start this year off I'm giving you all a chance to give input into how this next section of the layout is to be built. In this photo you see two circles. One is 8" the other 10". I'm obviously thinking of a turntable.
The other choice is a simple two or three track yard.
This photo shows an 8" disk simulating a turntable. I need 10" for my 2-8-0. I like the 8" look better. This turntable will represent and 'old' style flat table that was pushed by hand or horse back in the day.
So let me know what you all think about the yard vs turntable. Jim
Last edited by a moderator:
Manitobamodeler24
Member
Do the 10 because you'll rgret it if you dont
