A great method for lightly used sidings too, (or abandoned) I suspect.

You are using an out of date browser. It may not display this or other websites correctly.
You should upgrade or use an alternative browser.
You should upgrade or use an alternative browser.
Building the Pinnacle Creek Mining & Timber Co. RR
- Thread starter HOexplorer
- Start date
HOexplorer
Well-Known Member
Thanks for the reminder Toot. Yes indeed, I forgot about sidings abandoned or otherwise. I've used this technique on sidings myself. So this is pertinent for all of us.
One of the things I've noticed through the years is a lack of detail on sidings and many passing tracks. This 'burying' technique is perfect for that siding along side some run down or abandoned building. Just like real life. Today even more so. Money is short and companies seldom have there sites cleaned and spruced up the way they did in the past. So this works on modern layouts as well. Jim
One of the things I've noticed through the years is a lack of detail on sidings and many passing tracks. This 'burying' technique is perfect for that siding along side some run down or abandoned building. Just like real life. Today even more so. Money is short and companies seldom have there sites cleaned and spruced up the way they did in the past. So this works on modern layouts as well. Jim
HOexplorer
Well-Known Member
A couple of pages ago I post a photo showing a piece of plywood filling a gap. Here is a photo of the completed scene. I've left out some bigger bushes and of course, trees. Still have work to do on the new bridge and more scenery behind this scene. If you followed along since the beginning you know how this scene was done. Jim")

Last edited by a moderator:
This is one of those instances where an alteration has not only enhanced the operating features and capability but also the visual appeal. That bridge is going to be a major focal design element.
HOexplorer
Well-Known Member
Thanks Toot, this is the idea. Speaking of the bridge in the background.
I don't have many model railroad friends, they seem missing in my area. That said, I do get out on open house weekends and see other's work. I went to one fellows and he looked like a MicroMark catalogue store. He probably spent $10000 on tools alone. While his work was not completed on the layout what he finished was very good.
On a section he had not finished were some very expensive clamping devices. He, like me, builds his bridges in place beneath the track. It is trickier, but very rewarding when you look at the completed project. That said, I thought I would post an informative photo that show how I do my clamping, and propping up.

Here we see the poor man's clamps and props. On the left a stick from the park across the street to hold the log in place. Next is a chip clip device that holds the wood to the track while the glue dries. In the middle is a glue bottle for weight, on the right is a small shaker bottle to prop up the upper log and hold the log beneath the bridge.
What I'm getting at is the necessity is truly the mother of invention. Give your layout construction the "McGyver" treatment. Save some money and have a feeling of satisfaction you may not get from some $14 clamps. Jim
I don't have many model railroad friends, they seem missing in my area. That said, I do get out on open house weekends and see other's work. I went to one fellows and he looked like a MicroMark catalogue store. He probably spent $10000 on tools alone. While his work was not completed on the layout what he finished was very good.
On a section he had not finished were some very expensive clamping devices. He, like me, builds his bridges in place beneath the track. It is trickier, but very rewarding when you look at the completed project. That said, I thought I would post an informative photo that show how I do my clamping, and propping up.
Here we see the poor man's clamps and props. On the left a stick from the park across the street to hold the log in place. Next is a chip clip device that holds the wood to the track while the glue dries. In the middle is a glue bottle for weight, on the right is a small shaker bottle to prop up the upper log and hold the log beneath the bridge.
What I'm getting at is the necessity is truly the mother of invention. Give your layout construction the "McGyver" treatment. Save some money and have a feeling of satisfaction you may not get from some $14 clamps. Jim
Last edited by a moderator:
Railrunner130
Well-Known Member
I know what you mean. When I was doing the model railroad thing as a kid, I used little, wood blocks that were left over from when my parents had their carpets cleaned. The blocks had been used to hold furniture off the wet carpet. Those were the most versitile "tools" ever! I've been using blocks of 2X4s and it's just not the same....
Yes it's good to have all the right tools, and there are instances where a job can't be done without them, but lateral thinking saves a lot of money on 1 off purchases.
HOexplorer
Well-Known Member
Thanks fellows.
Next I've decided that since I modeling some or part of a mainline I had better put some roadbed under the new track addition. However, I did not use HO roadbed. Here's why. At best this is a Class 3 or worse mainline I'm modeling. HO roadbed is too wide, and too high for this class of railroad. So I'm using N scale roadbed. I had it laying around so why not?
I split it down the middle and spread it out to meet my predrawn track lines. There is not much separation maybe a 1/16" or so. When I put the ballast on it the small gap will fill. You can also see I beveled down the end of the roadbed.
Jim
Last edited by a moderator:
HOexplorer
Well-Known Member
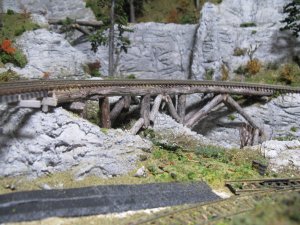
You've had some sneak peeks of the new bridge. Here's the finished product. As usually since it is on private land out of control of 1931 Alaskan regulators is it built from logs by the miners and lumberjacks themselves. This one is more involve, but I know it will hold up the 'load!'
The bridge from the tipple will be a more typical trestle bridge because it crosses over a mainline track. Jim

This one is from another angle. Notice the trees are magically reappearing. Jim
The bridge from the tipple will be a more typical trestle bridge because it crosses over a mainline track. Jim
This one is from another angle. Notice the trees are magically reappearing. Jim
Attachments
Last edited by a moderator:
Railrunner130
Well-Known Member
Very cool!
Now I'm trying to figure out how to add a bridge like that into my layout. My to-do list grows every time I look at photos like these....
Now I'm trying to figure out how to add a bridge like that into my layout. My to-do list grows every time I look at photos like these....
You'd better make sure that twig supplying tree in the park across the road gets watered and fed and generally well looked after, Jim. Can't be too many that grow such scale model railroad specific twigs like that.
HOexplorer
Well-Known Member
Thanks fellows. About the twigs. You are correct they are plentiful and perfect for model railroading. They have 'bark' and are the most realistic I've found and only 100 feet from our property. I live just outside of San Diego across the street from Mission Trails Regional Park. Actually I think this park is one of the largest parks inside a city limit (San Diego) in the US at 5900 acres. It is in a semi-desert environment while San Diego is a Mediterranean climate.
Toot, I'm betting this plant is in Australia somewhere.
Joe, Follow the whole thread you can come very close to this modeling I'm sure. Jim
Toot, I'm betting this plant is in Australia somewhere.
Joe, Follow the whole thread you can come very close to this modeling I'm sure. Jim
Trussrod
Well-Known Member
You've had some sneak peeks of the new bridge. Here's the finished product. As usually since it is on private land out of control of 1931 Alaskan regulators is it built from logs by the miners and lumberjacks themselves. This one is more involve, but I know it will hold up the 'load!'
The bridge from the tipple will be a more typical trestle bridge because it crosses over a mainline track. Jim

Say HO EXP,
I'm curious about the switch/turnout shown in the picture. It appears to be some type of stub switch yet it shows the Left hand stock rail carrying through and connected to the outer Left hand rail as well as the Right hand Stock rail which also carries through to the Right hand stock rail and connected to it forming an auto derail?
Was this intentional as I don't see any points in this turnout but it doesn't look like a working stub switch either but they were used in logging quite a bit as no points were required.
Last edited by a moderator:
HOexplorer
Well-Known Member
David, Thanks for the question. This turnout like almost all the rest on the layout had to be #4's because of the room size. The regular track is all Atlas Code 83. The only #4's I could find were Peco 100 insulfrogs. Package numbers are 91 and 92 for left or right.
I've never modeled HO before so I made the best use of what I could find available. This is DCC and these insulfrogs do just fine for me.Also since this photo highlites the bridge the turnout does in fact join a thru track that is not present at this time. Hope this answers your question. Again, thanks for the visit, Jim
I've never modeled HO before so I made the best use of what I could find available. This is DCC and these insulfrogs do just fine for me.Also since this photo highlites the bridge the turnout does in fact join a thru track that is not present at this time. Hope this answers your question. Again, thanks for the visit, Jim
Last edited by a moderator:
Lionel fan
Enthusiast
Nice work.
HOexplorer
Well-Known Member
Thanks, Lionel fan.
Here is the finished trestle work (nearly finished!) to the ore tipple. Scenery is back in place and the corner of the nearly destroyed ore tipple is put back together.
Photography is a very effecient way to check your work. I checked the trestle bents a number of times to see if they were correct. This 'checkup' photo shows they are not. One piece failed to connect and slid down its hole. Don't know how I missed it??
Now I know what is wrong and I can fix it in 30 seconds. I'm glad some sharp eyed guest didn't notice it this weekend. Jim
Apart from the little "hiccup" you've pointed out (may not have even noticed) that is another fantastic scene. One of the things that makes it look so real is the treatment you have given the timbers of the tipple, the colors just are so right.
HOexplorer
Well-Known Member
Thanks Toot, All is repaired now. As for the tipple. All the wood was dyed with weathering solutions. After that some wood would get an extra dip. Some would get a light brushing of brownish color. I assembled the tipple with no regard as to color.
The miners would have picked the next board off the wood pile and so did I. After the glue has dried I would add a touch up of weathering powders here an there. I happy you like what you see. Jim
The miners would have picked the next board off the wood pile and so did I. After the glue has dried I would add a touch up of weathering powders here an there. I happy you like what you see. Jim
