Building the Pinnacle Creek Mining & Timber Co. RR


Next up: About Laser kit building.

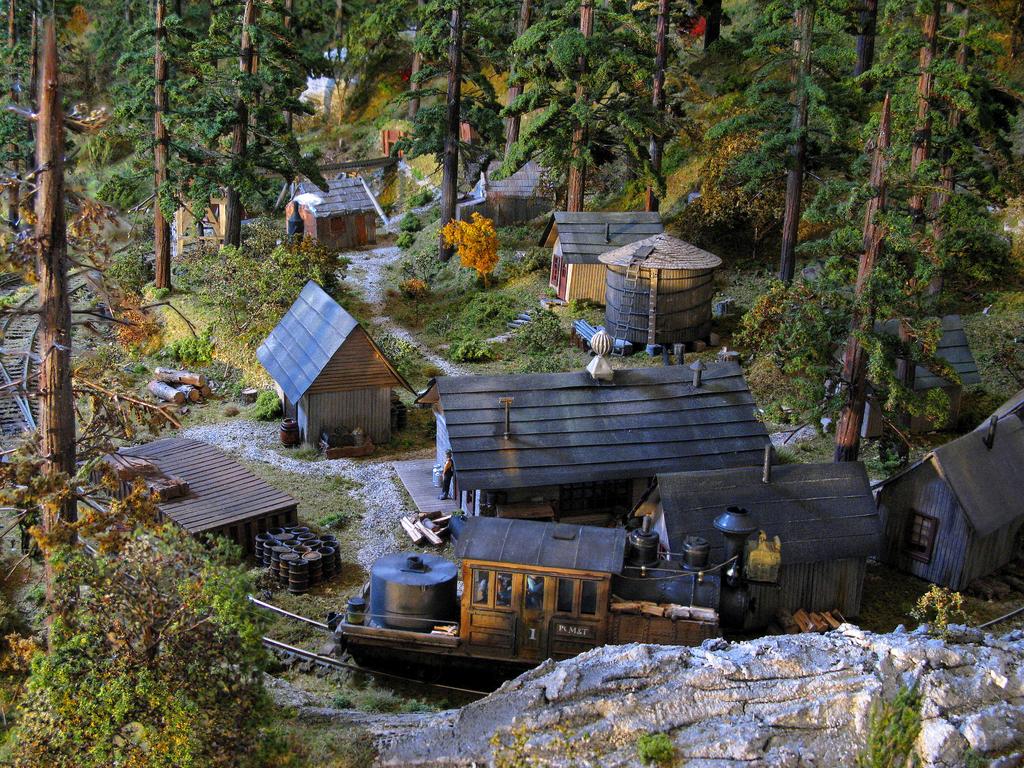
Below is a photo of the only laser kit building I have on this layout. I will say that laser kits are one of the most innovative and timesaving things to appear in my fairly short modeling career.

I am a big fan of these kits. They give fairly easy stuctures to assemble that would be beyond the scratch building capabilities of most of us. They are handy and best of all priced about right for what you get. If you've never tried one get a small kit and follow the directions. Simple. After you've finished you can weather or paint them anyway you want.

If you are going to stain the wood before hand you should let the wood dry under something to keep the wood from warping. One way to keep wood from warping is just stain one side. Heck with the insides, no one can see in there anyway! I recommend painting for insides if you must. Paint is thicker and less prone to soak the wood. Don't over due the paint or the stain. The reason for staining or painting before assembly is to have a more even color on your building if some glue leaks out. Paint or stain won't penetrate your wood glues.

Here is a trick for those who do stain after assembly. If you have an inadvertent glue drip, you can try to snip it off with your rail nippers or your #11 blade. If this doesn't work stain on the inside of the building and soak it enough to let the stain work its way under the glue glob.

In this kit you may notice the window is not quite up to plastic insert standards. You can leave out the frame and substitute a plastic window frame or paint the wooden frame. I left this window untreated so you can see what it looks like originally.

Lastly, some folks who are careful with their gluing will swear that they can make a credible laser or even scratch built model. I agree. I put glue on with a tooth pick and sometimes stain last. If I'm modeling a broken down old building I like to do the stain last. The wooden walls get a slight warped look which is appealing. If this may be your first attempt at scratch or laser buildings staining first is the best way to go. Notice the wood shed. Simple scratch building next time. Jim:)

smdXdbD.jpg
 
Last edited by a moderator:
pacbelt, You are probably not alone concerning laser kits. Time to start! I envy you in 35 years of modeling. I've got about 7 I think. Never had the lifestyle that would permit a hobby. Good on ya. Jim:)
 
Great work Jim , I just got a Campbell engine house and sanding facility but do not know when I will start them. While they are not laser cut they do go together very well stick by stick.
Mike
 
Mike thanks. You bring up a good point I forgot, namely craftsman and other non-laser kits.

If any of you are new to kits you may want to avoid purchasing a "Craftsman" kit first thing. For the most part all the stuff is in the box and sometimes the directions are skimpy. I did the logging camp one in N scale (JV Models?) not sure who made it but it was a fun kit and my results weren't to bad for my first kit. Good luck. Jim:)
 
About Scratch Building: This is my favorite type of building technique. I don't consider myself an expert, but for the type of modeling I'm doing on the PCM&T it is passable. Look back to the engine house photo and you will see the sides of the building.

I use scissors, Exacto knife, CA gel, sometimes Elmers yellow glue and of course wood and plastic windows and doors. Don't forget to stain first. For the mining camp, pictured below, I simply cut out the floor area of each building. I started with the miners cabins on the right. There are three of them, all the same. As for interior studs etc. not too much. No one will handle or sit on these buildings so why waste time? Cut out the window and door openings and put in the window and doors. Don't forget the glass. Plastic strips from packaging. Slap the four walls together around the floor and use thin wood or cardboard for the roof. Remember I use the fine construction paper for tar paper from Micheals and purchase 'shake shingles' from my LHS.

The next larger cabins (2) are for the foremen. There is a supply shed and the largest is the the kitchen and dining room. All of these buildings are fun and simple to make. Because I wanted to model 4 or 5 year old buildings made them easy. I put it smoke stacks in each building. Some as simple as a round piece of plastic or brass tubing.

If you want old dilapidated buildings then the fun really begins. Leave out boards, more weathering, shingles missing that sort of thing. If you are modeling modern cities, (ala Rod Stewart) or simply a modern factory or supply house the principles are the same. So to last 'building' picture>>

Here you see the scratch building results in the mining camp. The layout is almost finished now. Enjoy. Jim:)

6hp9r65.jpg
 
Last edited by a moderator:
About Scratch Building: This is my favorite type of building technique. I don't consider myself an expert, but for the type of modeling I'm doing on the PCM&T it is passable. Look back to the engine house photo and you will see the sides of the building.
I disagree , I think you are an expert!

Mike
 
Thanks Mike you are too kind. What you see in the mining camp photo are buildings that are within the capabilities of virtually all of us. It is not hard to glue four walls together. I'm thinking the obstacle here is taking that first step. So good luck to all. Jim:)
 
Before I forget here is a photo of the finished dock and ore tipple scene. The "water" is dry and the crane has been added. Enjoy, Jim :)

o6p4MXF.jpg
 
Last edited by a moderator:
This all looks really good, but the water is just incredible! Even in magazines, I've never seen water that looked that realistic.
 
Thanks fellows. It is nice to see new group members visit and actually make a comment. If you can learn something all the better for your modeling.

As far as the 'water' goes. Yep, it looks good in the photo. Actually, it looks good in person. I've given the easy steps to create it so now it is your turn. If I was modeling a river with fast current or even this scene with higher waves I would lightly dry brush some white acrylic paint to show whitecaps or current ripples. Lot's of ways to do all these scenes.

I'm not much of video guy. I have my phone, but that's about it.:eek:

Thanks again. Jim
Thanks for all of the posting Jim. For all of my video I use a Nikon CoolPix L22 and they can be had for about 99.00 or so and will do HD AND some nice pics.
Thanks Jim , Mike
 
Thanks again Mike. I'm so out of it I forgot I have a perfectly good video in my own camera! Maybe I'll give it a go.

About Bridges. Next let's take a look at the 'theory' of bridges. I generally make most of my bridges. I've always made all of my wooden bridges. I've used styrene on some and built a couple of brass kits (nice). One of the issues I see with bridges is that they are, for the most part, built "too well." By this I mean take your basic logging or mining layout, like the PCM&T layout, and see a couple of Campbell bridge kits or some wooden bridge purchased from epay there.

Nothing wrong with these bridges of course but, would they be correct for some backwoods operation far from the Federal rail inspector's eyes? Since all my layouts have been Class 3 roads or worse I figured that building my own bridges would simply "look" more realistic for the settings. ie. Not perfect by any means. My philosophy is to build the way the railroaders would have done it by themselves in the boonies. This serves two purposes. First, I'm able to hide my modeling shortcomings, and second, my buildings look legitimate in their settings.

Since the PCM&T is up an Alaskan fjord in 1931 you can bet that for this small mining operation everything had to be done by the railworkers and miners. All the buildings, possibly track design, and of course, bridges and tunnels. The tunnel on the PCM&T is short and could have been realistically blasted through the rock by the workers. Bridges are the same way.

This first bridge is a simple trestle bridge. While the timber is strong enough for the loads, it still looks frail and maybe "not quite right." This is intentional. This is the way it would have been built in this time frame and local. These mines would soon be played out and the company would pick up sticks and move on to the next site. The PM&T is a more perminent local than most logging sites but even so time will come to move. The theory of mines and logging was that they won't last forever so why waste money building too good a bridge or camp?

IMG_1264.JPG


In this next photo you see the only concession to state of the art on the PM&T. Steel truss bridge. The reasoning here was the span is too great across Pinnacle Creek and if I built it of wood then there would be little variety among all the bridges. So this works. Above you see the ubiquitous log bridges. It would look 'wrong' to build a log bridge in this setting. I think I found this bridge on the junk table at my LHS for $5.

IMG_1605.JPG

Lastly, my favorite bridge: The Cliff Bridge. Later I will explain how and why this bridge is built this way. I has to do with layout philosophy and design. Until then enjoy. Jim:)

cliff bridge shay.jpg
 
Last edited by a moderator:
Nice! I think it's awesome that you build all your bridges and structures yourself. It makes them unique.

And I love that caboose in the last picture!
 
Lionel fan, Thank you. As for making most of my models myself, yes, that makes them unique in a sense. I'm trying to convey, of course, that this uniqueness can be shared by all. One of my little crew quarters houses on the above photo probably cost less than fifty cents to build. You could purchase a kit and each building would cost about five dollars.

Money is tight for most of us these days and I'm simply showing an alternative to 'buying'. If I was rich I probably would still do this scratch building my way. Probably!:eek: But I'm not, so scratch building is my way to go. The whole object is make progress on our layouts.

I suppose the lack of funds fits into the type of model railroading I do. 1931, and money was scarce. Lucky, and this is no joke, I'm really happy that 1931 small railroads is my niche and I'm not stuck in modeling Big Boys and Challengers or today modern equipment. There's room for every 'niche' in our hobby and that is good thing. Jim:)
 
...

I'm really happy that 1931 small railroads is my niche and I'm not stuck in modeling Big Boys and Challengers or today modern equipment. There's room for every 'niche' in our hobby and that is good thing. Jim:)

I'm kinda the same way, Jim. While I do have two big articulateds, I didn't spend that much for them, in fact, my biggest, an Akane Allegheny, was a gift from an old friend (RIP Roy), and the other had a damaged mech I was able to easily repair, so it only cost me $200. (IIRC)

Anyway, on mine the 2-8-0's, and 4-6-0's out number the Pacifics, Mikes, and Santa Fe's almost 2-1.
 
Carey, Lucky you! If I only had the room for all those bigger locos I could still model steam and 1931, with just a more than scratch built buildings and such. I'm DCC, but no sound on my locos. I did spring for a 4-4-0 with DCC and sound. I'm hooked. Can't really run in the layout, just back and forth, but I am studying an addition to the left of the ore tipple dock scene that will allow a 'loop'.

I see you are an NMRA lifer. Good for you. I'm not a member but I do give the occasional scenery clinic for the San Diego Division. In fact on April 14 I will be hosting an NMRA layout open house so the locals can see this layout. Only layout shown in April. Just adding finishing touches now .I checked out your site. Nice! Jim:)
 
Last edited by a moderator:
Time to get down to the nitty gritty or About Scenery.

We all have our different perspectives on scenery. We all have our different skills vis-a-vis scenery. We all have our hopes and asperations about scenery. And, we all have our 'own' ideas about what is acceptable to us in our scenery endeavors.

While I may do it my way and be happy about it I don't pass judgement on others who don't quite reach my ideas of acceptable scenery. We all have different skills and goals. I envy those modelers that can make a layout full of operations and figured out the wiring and all that stuff. I'm barely adequate electrically. So If my thread about building the PCM&T is going to be a use scenery-wise then here is another look at the scenery issue through my eyes.

Check this photo out.

scenery3.jpg

I've said before that there is no "3 foot" rule on the PCM&T. As this photo is shot from about 12 inches away you may agree. Now let's see this photo from 6 inches away.

scenery333.jpg

To me this is what scenery should be all about. Look closely. I mean closely. What do you really see compared to, possibly, your scenery? I have to go play senior softball in a few minutes so take your camera and go to your layout or module and take a photo of your 'best' scenery spot. Later today maybe we can compare notes? Later, Jim:)
 
Last edited by a moderator:
Well...Wow! I just came over here from your photo post. The combination of excellent and innovative work with attention to fine detail, sets your layout as a benchmark for us all (The problem I have with your work is it makes me want to go out to my layout and see what I could do better :D.) I am at the stage where detail is just now being applied and I will certainly think about your work each step of the way. Thank you for sharing your excellent craftsmanship.
 
Last edited by a moderator:


Back
Top