bklynman01
Active Member
I do want to start off by saying that my time to work on this is limited, so this thread may take a while to complete, but I want to not only show you guys what I did, but also track my progress. If anyone sees any room for improvement or has any good tips, please do feel free to post them! With that out of the way...
I drew up some plans for a truss bridge. The length is about 12.5" in length and only stands about 3 inches tall at the most. You can see the general design in the sketch shown in the first picture. If anyone wants, I can scan my plans and make them available for someone else's project. I studied the NY&StL truss bridge standard of 1908, and came up with my own design. My bridge does resemble the standard very closely, but there are some modifications. The plans all came from information I gathered through this thread: http://www.modelrailroadforums.com/forum/showthread.php?33860-HO-Wooden-Truss-Bridge-Plans
After making the design, I went and purchased the wood - Bass wood to be specific, and a package of bamboo cooking skewers. I'm using the skewers because bamboo is much stronger than bass wood, and I not only want this bridge to look good but also structurally support a moving train. Hopefully it works! Since this is my very first scratch build, I also needed paint and painting supplies. Liquitex brand had an awesome starter set in their BASICS line of products. It came with 24 different acrylic paints and was $34.95 at Michael's and I was able to use a 40% off coupon from the internet. Worth it. The brushes were $5 and the container doubles as a pallet for the paint. The work surface was $17.99 at JoAnne Fabrics after a 40% coupon, and the wood was about $4 total. The picture shows a bottle of liquid matte medium. I will be returning this as water is the perfect medium, no need for an expensive bottle of it.
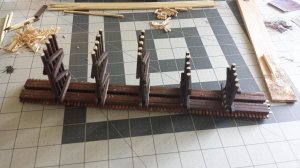
Using an Xacto knife, I cut all the pieces to size and laid them out first. I built the two largest piles first as I figured the larger the pieces, the easier to work with. The smaller ones will be next. For color, I mixed ~4 parts black, ~2 parts burnt sienna, ~2 parts water. I kept a small amount of yellow paint on the side also, randomly touching my brush to it. I found the yellow gave a toned look to the wood after it dried (hard to see with the pictures). The bass wood sucked up the paint, so the coat was a little thick. The bamboo needed two coats, as it didn't seem to absorb any paint on the first pass. After painting, I put small grooves into the wood with the Xacto knife (again, can't see in the pictures) to give it an aged wood look.
As I said, a dry run to make sure it looked right. Then, leaving the round piles on the mat, I placed dots of wood glue on the piles and stacked up all the pieces for one side. After it was dry, flipped it over and repeated for the pieces on the other side. After sitting for about an hour, the pieces seemed to be pretty solid.
This is where I'm at right now. The smaller pile bents will be constructed during the week. I'll be sure to keep this thread updated as I move along. Questions/comments/tips/critique are welcome!!


I drew up some plans for a truss bridge. The length is about 12.5" in length and only stands about 3 inches tall at the most. You can see the general design in the sketch shown in the first picture. If anyone wants, I can scan my plans and make them available for someone else's project. I studied the NY&StL truss bridge standard of 1908, and came up with my own design. My bridge does resemble the standard very closely, but there are some modifications. The plans all came from information I gathered through this thread: http://www.modelrailroadforums.com/forum/showthread.php?33860-HO-Wooden-Truss-Bridge-Plans
After making the design, I went and purchased the wood - Bass wood to be specific, and a package of bamboo cooking skewers. I'm using the skewers because bamboo is much stronger than bass wood, and I not only want this bridge to look good but also structurally support a moving train. Hopefully it works! Since this is my very first scratch build, I also needed paint and painting supplies. Liquitex brand had an awesome starter set in their BASICS line of products. It came with 24 different acrylic paints and was $34.95 at Michael's and I was able to use a 40% off coupon from the internet. Worth it. The brushes were $5 and the container doubles as a pallet for the paint. The work surface was $17.99 at JoAnne Fabrics after a 40% coupon, and the wood was about $4 total. The picture shows a bottle of liquid matte medium. I will be returning this as water is the perfect medium, no need for an expensive bottle of it.
Using an Xacto knife, I cut all the pieces to size and laid them out first. I built the two largest piles first as I figured the larger the pieces, the easier to work with. The smaller ones will be next. For color, I mixed ~4 parts black, ~2 parts burnt sienna, ~2 parts water. I kept a small amount of yellow paint on the side also, randomly touching my brush to it. I found the yellow gave a toned look to the wood after it dried (hard to see with the pictures). The bass wood sucked up the paint, so the coat was a little thick. The bamboo needed two coats, as it didn't seem to absorb any paint on the first pass. After painting, I put small grooves into the wood with the Xacto knife (again, can't see in the pictures) to give it an aged wood look.
As I said, a dry run to make sure it looked right. Then, leaving the round piles on the mat, I placed dots of wood glue on the piles and stacked up all the pieces for one side. After it was dry, flipped it over and repeated for the pieces on the other side. After sitting for about an hour, the pieces seemed to be pretty solid.
This is where I'm at right now. The smaller pile bents will be constructed during the week. I'll be sure to keep this thread updated as I move along. Questions/comments/tips/critique are welcome!!