Building a Wooden Truss Bridge


bklynman01

Active Member
I do want to start off by saying that my time to work on this is limited, so this thread may take a while to complete, but I want to not only show you guys what I did, but also track my progress. If anyone sees any room for improvement or has any good tips, please do feel free to post them! With that out of the way...

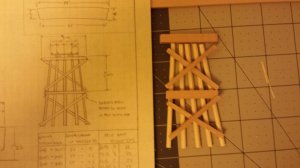
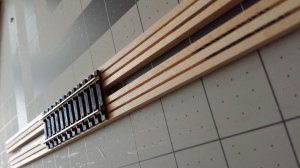
I drew up some plans for a truss bridge. The length is about 12.5" in length and only stands about 3 inches tall at the most. You can see the general design in the sketch shown in the first picture. If anyone wants, I can scan my plans and make them available for someone else's project. I studied the NY&StL truss bridge standard of 1908, and came up with my own design. My bridge does resemble the standard very closely, but there are some modifications. The plans all came from information I gathered through this thread: http://www.modelrailroadforums.com/forum/showthread.php?33860-HO-Wooden-Truss-Bridge-Plans

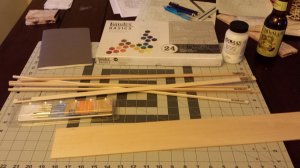
After making the design, I went and purchased the wood - Bass wood to be specific, and a package of bamboo cooking skewers. I'm using the skewers because bamboo is much stronger than bass wood, and I not only want this bridge to look good but also structurally support a moving train. Hopefully it works! Since this is my very first scratch build, I also needed paint and painting supplies. Liquitex brand had an awesome starter set in their BASICS line of products. It came with 24 different acrylic paints and was $34.95 at Michael's and I was able to use a 40% off coupon from the internet. Worth it. The brushes were $5 and the container doubles as a pallet for the paint. The work surface was $17.99 at JoAnne Fabrics after a 40% coupon, and the wood was about $4 total. The picture shows a bottle of liquid matte medium. I will be returning this as water is the perfect medium, no need for an expensive bottle of it.

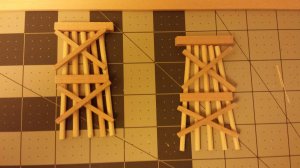
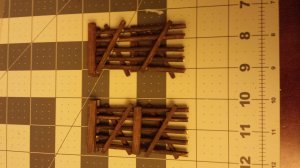
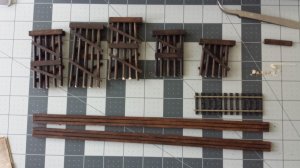
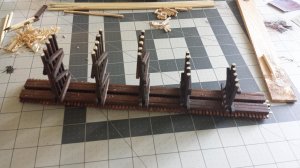
Using an Xacto knife, I cut all the pieces to size and laid them out first. I built the two largest piles first as I figured the larger the pieces, the easier to work with. The smaller ones will be next. For color, I mixed ~4 parts black, ~2 parts burnt sienna, ~2 parts water. I kept a small amount of yellow paint on the side also, randomly touching my brush to it. I found the yellow gave a toned look to the wood after it dried (hard to see with the pictures). The bass wood sucked up the paint, so the coat was a little thick. The bamboo needed two coats, as it didn't seem to absorb any paint on the first pass. After painting, I put small grooves into the wood with the Xacto knife (again, can't see in the pictures) to give it an aged wood look.

As I said, a dry run to make sure it looked right. Then, leaving the round piles on the mat, I placed dots of wood glue on the piles and stacked up all the pieces for one side. After it was dry, flipped it over and repeated for the pieces on the other side. After sitting for about an hour, the pieces seemed to be pretty solid.

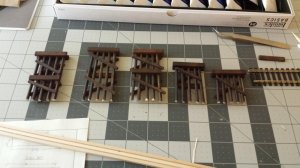
This is where I'm at right now. The smaller pile bents will be constructed during the week. I'll be sure to keep this thread updated as I move along. Questions/comments/tips/critique are welcome!!
20140216_175534.jpg

20140216_184046.jpg
20140216_185317.jpg
20140216_222808.jpg
 
Looking great so far. It will look even better when the bents are tied together. Are you building the stringers the same way? There is a guy on Youtube named Lex Parker that has a killer video on this. Have you seen it? Regardless you are off to a great start and moving along at a good pace. Good job!

Now, you asked for some tips...

Depending on how much detail you care to add to this, you can buy NBW's (nuts, bolts, washers) from a few manufacturers to really set these off.
http://www.blackbearcc.com/nbw_pack_n.shtml
http://www.caboosehobbies.com/catal...1_282&osCsid=5453b771fa7884018d69716a9cff57ef

If you install these make sure to rust them up real good and remember the rust will run down the bent (chalks work great for this effect). After final assembly I would probably use a gray chalk to age everything. You could even use cigarette ash. A light dusting will make everything look really old and weathered. All of this aging depends on how old you plan the bridge to be. For example, if you are modeling the early 1900's and this bridge was built in 1910, it doesn't need to appear very old. Just some thoughts. Hope this helps in some way or another.
 
Kevin, I have seen Lex Parker on youtube. He does have some great videos, but they seemed almost too professional. I watched about 5 episodes then decided that I would build this one, and rewatch his series.

I thought about the nuts and bolts and washers. My original thought was to just touch some rust colored paint in the areas, as to make it look like nails were used. At the same time, my period is early 1900s so I don't want it looking too old. I may only add the nail rust on the rail spikes. We'll see when we get there.

You spoke about chalk to age the piece. I was looking for them at when I bought the paint, but couldn't find any. Where do you find chalks for this? I have some other items that I want to age and was kind of disappointed I couldn't find chalks.
 
The chalks Kevin is talking about are plain artists pastels.

Since building a trestle is just a series of repetitive steps, why don't you build a jig to make building the bents easier? They are simple and almost guaranties that all of the bents would be exact copies of each other.

Here is a link to building a trestle, and about halfway down page 1 is a simple bent jig.

http://hrmlasermodels.com/tips/Building a Trestle in HO scale.pdf

Hope that this helps.
 
Last edited by a moderator:
CJ, I had seen your post when you first put it up, but I already had 2 bents built, and only needed 3 more. If I were building a longer bridge (maybe the next layout?), then I would absolutely make a jig. I had seen a few places online that had them for sale too. It may sound strange, but I sort of like the inconsistent look that the non-jig method gives, at least for a small bridge like this. Longer, larger bridges would need a jig. Just my $0.02. I did take some advice from the pdf link about the stringers. I like the idea of putting a 1/32" piece between each stringer to give that gap. So I did exactly that, and I'm very happy with the result. The only thing I screwed up is not painting them first. I paid for that mistake.

With the pile bents all complete, and stringers ready, all I need is railroad ties. I do want to give the ties a different color. Sitting in my basement left over from projects past is a can of dark oak wood stain. My idea is to put the ties in a small container (that I would plan to send to the trash when complete) and let them soak in stain for a little bit (30 mins?). Then strain, separate to keep from sticking together, and let dry. I'm not sure how bass wood will look with this stain, so I'll do a test piece first. I had seen the blackbearcc.com site, and it looks amazing. The ties on there are fairly easy on the pocket too, but I don't need 500 (minimum I noticed) since I'm only laying ties on this bridge and one other. It would also be my first stab at laying my own track. For this, a jig WILL be used!

Anyway, here are some pictures. I have been keeping a small piece of track on the table as a reference. Any feedback/critique/advice is welcomed!
20140223_104708.jpg20140223_105600.jpg20140223_114631.jpg
 
You can go to any hobby store and find artist pastels. Make sure you are buying a box of chalk though. Because I had picked up a box I thought were chalks and when I opened it I noticed they were oils. Luckily I did this in the store.

I take my chalks and grind them on a sheet of 400 grit sandpaper.

You can also buy weathering chalks. Search on ebay. These will come in powder form. I like grimy black, white, burnt sienna, and raw umber for most everything I do. You can mix these and come up with a variety of effects. You can also mix them with paint for a textured effect.

Everthing is looking great so far. Thanks for sharing!

Sent from my SPH-D710BST using Tapatalk
 
Okay, so I will be traveling for work from tomorrow through next week Sunday. That being said, this will be the last post for a while. Glad I put the disclaimer in the first post!

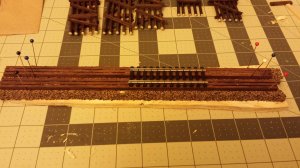
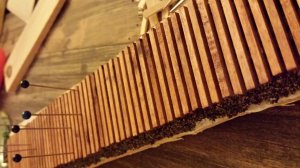
I built the stringers and was getting ready to put down railroad ties. Since I still have some basswood left, I tired cutting out my own but they looked horrible. Now, I'm waiting for a bag of ties to be delivered (will likely happen as I'm walking out the door for the airport). Not completely dead in the water though - I set everything up so that when the ties come in, I can stain and build. I placed the stringers on some cork glued to a piece of wood and kept them in location by putting pins around the edges (the wife's hobby is sewing, so colorful pins are in abundance in our house). Once the ties are ready, I can simply glue them in place. The plan is to lay one at a time using a gap gauge (just another piece of wood) between them as I go.

As always, feedback welcome!

20140223_203459.jpg
 
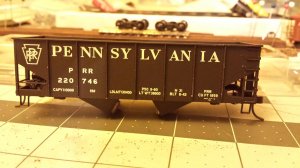
Oh yeah, also I tried the chalks for weathering. I need to get some clear coat for the air brush to protect the chalk, but below are some pictures of my first attempt. I think it looks good, but still need to figure out the whole rust look. I couldn't find a good way to get a nice clean rust spot on the rivets. After watching videos online, I noticed a lot of people use oil paints with wash liquids mixed in for the runny look. I only have a set of acrylic paints right now.

Anyway, I don't want to start a new thread within this thread, so here's a picture of what I have. After the bridge is done, I'll get going on a weathering project...

20140223_213931.jpg20140223_215452.jpg
 
That looks great. Are you planning on weathering the trucks?

A good clear that I use is Krylon Matte Finish. You can buy the stuff from just about anywhere.

I start out with a coat of the matte finish then I hit it with a hair dryer to set it really quickly. Then I start with the paints and rust it up. Then another coat of matte and back to the hair dryer. Then I use my red and brown chalks to blend it all in. I cover that with matte and repeat until I get the look I want. The last thing I do is a light dusting all over with an off-white chalk to make the piece look dusty.
 
Hey guys! Sorry for being in hiatus for so long - I had a work trip to Japan in the beginning of March, so I was not able to get any layout work done for about 2 weeks. Of course, after I got back, we had to finish prepping a room in the house as our nursery, and to make life more fun, we decided to redo our kitchen in the middle of it. Luckily, it is all done now and I can get back to more important things - like modeling!

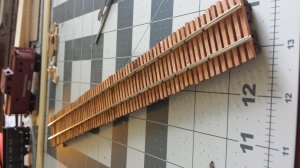
To keep from telling all of you about my personal life, I'll get right to it. In my last post about the bridge, I had the stringers pinned in place on some cork. I took the ties and put what I thought would be enough to span the bridge in a small disposable cup. Then filled to above the height of the ties with Dark Mahogany penetrating wood stain. I let them sit in there for about 5 minutes, then took them out and laid them separately so they wouldn't stick together. After drying, it was off the work station. I used Elmer's Glue-All (school glue) to put the ties to the stringers. I applied the glue to the tie very sparingly and placed the tie down. The "spacers" I used were scrap pieces of 1/16" bass wood. I just cut up the strip nice and small so they were easy to put in between each tie, but big enough to remove later. I only had about 15 spacers, so I would work until I ran out, then break for about 5 minutes, remove the spacers and repeat. Unfortunately, I never stopped to take a picture in the process. I did get a picture of when I ran out of the first set of ties. As I said before, I only stained as many as I thought I would need - actually, I needed about 7 more to finish. So the last seven one side are a slightly different tone than the rest. Not noticeable unless you knew to look for it though.

20140316_220017.jpg

After getting all the ties down, I let it sit overnight for the glue to cure. Yes, its school glue and it was probably fully cured in 30 minutes, but it was late when I finished, so this worked. The next day, I had ties on stringers and was ready for some rails. I simply took a piece of flex track and cut the appropriate length needed. The stringers are each 3 pieces of 1/8" square bass wood with 1/32" square pieces between. I placed the ties with the stringers so that the rails would lay on top of the center 1/8" piece. So, when laying the rail, I laid one entire rail first, following the center of the stringer all the way down. When laying the second rail, I placed it using the gauge, then spiked one side. Check with the gauge again, then spike the other side. Check with the gauge again. I did this about every 10 ties all the way down. Then, went back and did it again, about every 10 ties offset 5 from the first round, each time checking with the gauge. There were a few times where I had to take the spike out and redo it. After all of this was done, I had the two rails in place and was ready to assemble the trusses.

20140405_144629.jpg

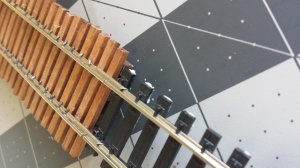
Or so I thought. One thing I almost forgot was the rails that go inside to prevent derailments (don't know the name of those, I'm sure there is a technical term for them). So, first I assembled those. In an attempt to plan ahead, I thought it would be a good idea to get the rail joiners on these rails now so that I can spike the rail all the way to the end. I saw on a couple of how-to posts to leave the last few ties worth of rail without spikes so that it is easier to join the next piece of rail. So, instead I put the joiners on and spike it all the way. I am able to do this mainly because the rail is not in place on either side of the bridge yet, so I can simply run the line from the bridge on either side. When putting the joiners on, I used a scrap piece of track (3 inch piece I had laying around) to join to while spiking the rail. This was to ensure it would actually join when it comes to laying the track on the layout.

20140406_122656.jpg
 

Attachments

  • 20140406_133816.jpg
    20140406_133816.jpg
    165.1 KB · Views: 164
I just went back and looked at the last post and saw that most of the pictures are rotated 90 degrees. Sorry guys, took the pictures with my phone and held the pone upright instead of on it's side. Also, not sure why that last picture is attached...

So after the rails were all done, I flipped the road bed assembly upside down and glued the pile trusses in place. Since I'm not exactly following any science for all of this, I simply laid them at ABOUT the distance apart they need to be by eyeballing the placement to the work mat, every 2 inches (scale would be 1.9 inches for the 14' spacing they would have in real life).

View attachment 42901

I waited about 35 minutes for the glue to dry, then applied a very small amount to the point where the pile truss meets the stringer along the entire length. Since the glue dries clear, I figured it was better to be sure the glue made a true bond instead of hoping the initial amount was enough. After this second round was dry, I just had to see what it would look like in place.

View attachment 42902

View attachment 42903

I still need to add the pieces that link the pile trusses. I'll do this after the bridge is installed on the bottom. This way I know that is where it will stay.

Small bridge, I know, but this is the first model I have every scratch built, so I'm more than happy with it. A seasoned veteran may be able to point out 20 things to make it better. Now its time for adding some scenery below! I have plans for what the river will look like, should be nice when I get to it.

As always, your comments are much appreciated!!
 
Your bridge is looking great! I bought the JV Model trestle and haven't started building it yet, what your doing is giving me inspiration and motivation to start though.


Back
Top