Build your Own Turntable


beiland

Well-Known Member
I've been making some repairs to my 'estate acquired' Diamond Scale turntable, and in doing so I needed to build a whole new turntable pit. I will be covering that shortly.

But in the meantime I have realized a mistake I made long ago when I was building my first turntable for my Central Midland layout, so I thought I would start this subject thread out with that bit of knowledge that I think MANY of us first assume when we look at such a project.

Connecting Drive Shaft to Turntable Bridge

As I have been rebuilding my Diamond Scale turntable, I've discovered an important feature they possess that should have applicability to turntables in general. The connection between the drive shaft and the bridge structure should NOT be a rigid one,...not an absolute rigid affair.

This is particularly clear as we consider larger/longer TT bridges. As our bridge decks become ever longer it becomes a problem to have them contact their pit rails at BOTH ends simultanousely, while also being pushed up by their center drive shaft. We need to 'uncouple' this drive shaft's vertical motions, while still retaining its very positive rotation motions.

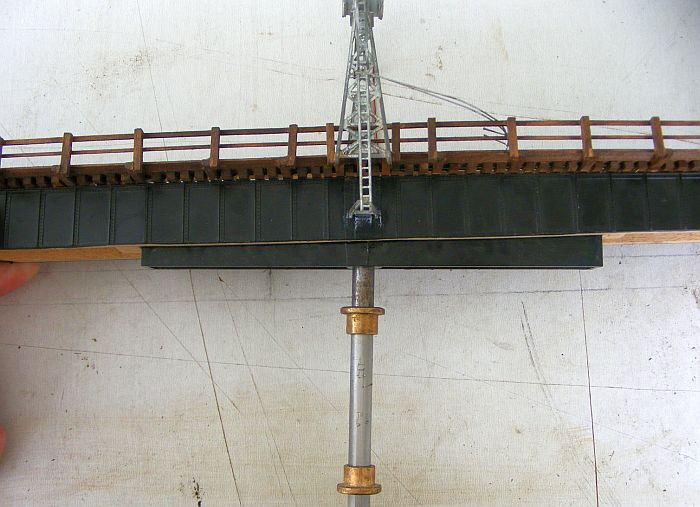
Diamond Scale accomplished this quite nicely by gluing a rectangular block of plastic onto the upper end of their drive shaft,.... then providing a slot in the underside of the the bridgedeck for this rectangular block to ride in. This uncouples the strictly rigid connection.

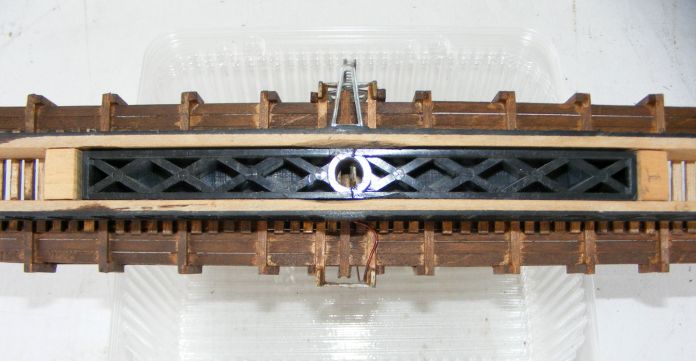
Here is the black piece of plastic stuck on the centering/rotation shaft,..and the slot in the bottom of the bridge deck into which it fits,..
1589832834675.png


1589832864928.png


DSCF5351.jpg


(btw, there is a crack across that hole where the center shaft fits. Mine developed that crack somewhere along the way, and I had to glue it back together.)


Here is that bridge deck partially set down on that black plastic block. You can see by these 2 photos that the bridge itself is free to dip either of its ends to meet the pit rails at either end,..
DSCF5352.jpg


DSCF5353.jpg


Yet the solid block of plastic keeps the bridge deck under absolute rotation control.


Another nice feature of this arrangement is that a person can lift the entire turntable bridge deck up and off the layout without have to remove the turntable assembly itself !!
 
Last edited by a moderator:
I thought it was also,..a clever solution. I recall trying to get the shaft PERFECTLY perpendicular during my first build, and then the bearings lined up so my deck swung EXACTLY parallel to my pit and pit rails.

This solution solved those problems.
 
So lets construct a turntable pit in a little different manner.

I spend a fair amount of time thinking about how I might construct a new pit for my turntable. The two primary pieces would be the pit floor itself, ...then the pit wall. One thing for sure I was NOT going to utilize plaster. So here is what I came up with.


Pit Floor:
Good grade ½” to 3/4” thick plywood was a top choice in my mind, painted to limit any moisture absorption and look like concrete.

I happen to have a nice square piece of 1/2” thick piece of black Sintra board (cellular PVC) I had collected up from the scraps being discarded by a local sign shop. Why not experiment with this first, ....then I can always return to the plywood alternative if this didn't work out?. I decided my pit wall was going to be 1/4” thick material ( several different options), and bent into a circle to fit the round trench I would cutting into the floor.

I got out the router, installed a ¼” dia bit, and cut my 'trench' into the flat floor board.
DSCF5338.jpg


DSCF5340.jpg

Here I will note that I had 2 options,..cut that 'trench' (partial depth into the floor pit),..or just just cut all the way thru the pit floor piece forming an inner disc, and an outward retaining hole in that square floor piece of PVC. Either way, both methods would support my ¼” thick vertical pit wall.


Pit Wall:
I had another scrap piece of the black PVC that was 1/4” thick 9” wide, and about 5' long. I needed a strip of it about 1+3/8” wide for the full length of 5' to bend around to form my 'pit wall'. At first I thought about cutting it with a saw, but on second thought, why not use a sharp razor/ box cutter type device making multiple passes,...much cleaner operation.

That relatively thin strip of plastic would be flexible enough to bend into a radius to fit into my trench, but I wanted to trial run it several times, so several in and outs, plus final gluing. I figured it was going to be easier if the strip of 'pit wall' material had somewhat of a 'preset bend'. I clamped it around my old pit wall casting, and got out my heat gun. Bravo, nice preset bend. Finally I glued in place with PVC cement.


DSCF5341.jpg

test fitting


DSCF5342.jpg

test fitting


DSCF5354.jpg

....final pit wall installed


Once all glued into the trench everything became quit rigid, very happy with result.


Now I just have to cut some more of that 1/4” thick PVC (maybe the white stuff this time) to make a 'shelf' onto which to glue down the pit rail with its ties,...something like shown in the mock-up I did before I started the router cutting.
DSCF5331.jpg


I can use the same router dimension plate to cut the hole in my main plywood deck that this turntable assembly fits into.


ADDED NOTE:
I am now firmly convinced that I would NOT utilize that black sintra board as a pit floor material if I were doing it anew,...it seems to be prone to warpage more readily than the white cellular PVC. And of course there is the good old reliable 3/4" plywood.
 
Pit Wall alternatives
There were several other materials I considered making the pit walls of:

a) 1/8" thick PVC window blinds (a neighbor had been ready to discard these items, and I saved them just in case). Two of them could have been bent around that trench, then had their tops sheared off level with the plywood train deck.
DSCF5346.jpg


DSCF5348.jpg


b) I could have also utilized 2 pieces of 1/8" thick cellular PVC , rather than the 1/4" I used.

All of these materials were PVC, so cheap PVC glue was used ti glue things together.
 
I went to drill out my center hole to place the bushing bearing in for the center shaft. WOW ! I discovered I screwed up somehow, the pilot hole was off center by 1/16" or a bit more. Can not figure out how this happened ??

I was real upset with myself the other day when I found that my center hole was not centered properly.

At first I though I might just scarf in a new piece of that black PVC material into the center area of the pit, then locate and redrill a proper center hole. But first I thought I would try drilling out the larger FULL size hole needed for that brass bushing at the pit level, and relocating the center of that larger hole to its proper center. This was NOT acceptable, as it left that hole too large to properly retain the brass bushing in a snug, secure manner (oblong hole).

But it did led to another idea,...why not some sort of small thin metal plate glued to my pit floor that would snugly keep the brass bushing in its centered position. After all this upper brass bushing's primary job is keeping the turntable deck in a perfectly centered position. And since the brass bushing has a flange on its one end, it will fit perpendicular to that metal plate, that will in turn sit flat on the pit floor. So the turntable shaft will end up very perpendicular, particularly when the lower shaft bushing is located on center 2-3 inches under that upper bushing.

That led me to a drilled out 'fender washer' to support that upper bushing.


Here are a few photos of that fender washer/bushing centering piece. The white ring inside the pit wall is 1/4" thick piece of PVC that will support the pit rail track. The pale white appearance over the whole pit area is piece of white tracing paper that was cut and laid in there to help locate the exact center in which to glue down that fender washer. Bushing sitting there (upside down) waiting to be installed.
DSCF5358.JPG


DSCF5359.JPG


When I cut out those pit rail foundation rings I ended up with some circular sections that matched the radius of my pit wall. I decided to add those scrapes onto the outside of my pit wall, as I need an additional 1/4" pad/spacer between the bottom surface of my plywood train deck and the base plate of my turntable pit.


DSCF5360.JPG


(turntable drive shaft waiting to be installed)
 
This was my older 'drive box' from my Diamond Scale TT. I cut it off of the bottom of that pit floor, and sanded it level to mount on my new pit floor.


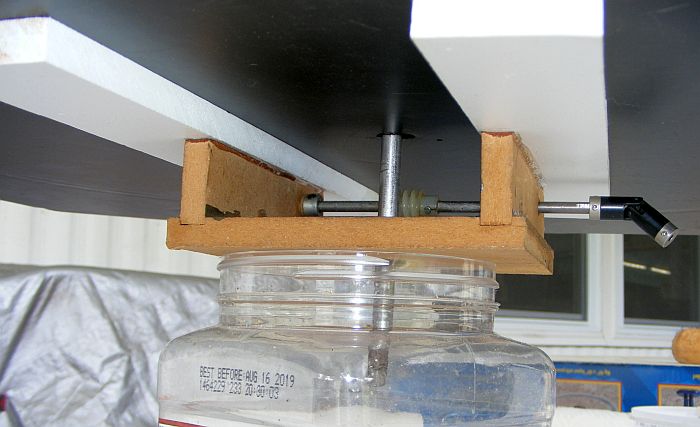
However I thought I might want a little extra height in there to both make getting at the set screws on the gears and bridge shaft a bit easier, AND to make the distance between the upper shaft bearing and the lower one a bit longer to help with any misalignment. So I fashioned a couple of 'PVC feet' (white feet) to space the drive box about 1/2" lower. (those feet also act as stiffeners for the pit floor plate)


(that's a plastic bottle under there to shelter the extra long drive shaft)


Used both epoxy cement and PVC cements to glue things together. Had to play around with getting that drive box and its spacer exactly positioned such that the bridge drive shaft was perfectly perpendicular and free to rotate the turntable bridge with NO friction.


Have not yet placed the gears back in the drive box yet.
 
Pit Rail


Got that pit rail done today. Decided to cut an ordinary piece of track down between the 2 rails to get my single rail with its ties already mounted. Turns out it couldn't be cut right down the center as the rail itself needed to 1/2" in from the inner wall of the pit. I lined the rail up along the side of a piece of my work bench plywood top in a manner that I could use the edge of that plywood as a guide for my dremel tool disc.
DSCF5381.JPG


DSCF5382.JPG


Finally I glued that track down with superglue working around the perimeter in sections
 
My First Homebuilt Turntable

Not too long after I was first getting back into the hobby, I acquired an unfinished Atlas plan 'Central Midland'. The stock plan did not have a turntable, but it did have a spot inside a big loop of track that was prime for such a structure. Since this layout was only going to be a short term experiment for me, I was willing to experiment with building a turntable for it,...rather than purchasing a commercial one.


My first thoughts turned to what item I might use for the turntable pit? Alum baking pans seem like a natural. Concurrently, what item might I use for the bridge deck,...some sort of existing bridge structure? I had very early on discovered the Atlas/Roco 'curved cord bridge'. It had a very nice open girder base structure that was also very stiff in strength, and it might be utilized with or without the upper portions of the superstructure.


I recently found one of those baking pan models I started out experimenting with, along with some photos of the Atlas/Roco bridge parts,...
DSCF5392.JPG


DSCF5393.JPG


DSCF5395.JPG


DSCF5394.JPG


DSCF5396.JPG


Those base structures are stiff enough to be used 'unassisted' by any substructure. If so desired there could be a couple of steel rods of metal glued into the bottoms of this base structures lined up end-to-end. BTW, those bases are 9" long in HO size, so 2 of them give one an 18" long turntable bridge,...plenty long for most steam engines.


My next thoughts turned to how I might provide a more prototypical truss member for the TT bridge. The Atlas plate girder bridges, turned upside down sure looked to be the ideal item,...and they are the same 9" long,
DSCF5397.JPG


DSCF5398.JPG


DSCF5400.JPG


BTW, I utilized that same bridgedeck construction for my first turntable experiment, but I did not use the baking pan here,..
https://model-railroad-hobbyist.com/node/31007?page=0#comment-298489


Brian
 
Pit Wall Tweaking


Yesterday I decided to attack a little problem in the final 'adjustment' of my turntable installation. I had previously laid down most all the tracks that would be accessing the turntable,...as you can see quite a few...


image%28279%29.png


image%28280%29.png


When I first mounted my new pit up into its cut out hole I had noticed some slight discrepancies in the track heights between the bridge tracks and the adjoining tracks. At that time I just ignored the problem and figured I would attack it with shims when the final adjustments came due.


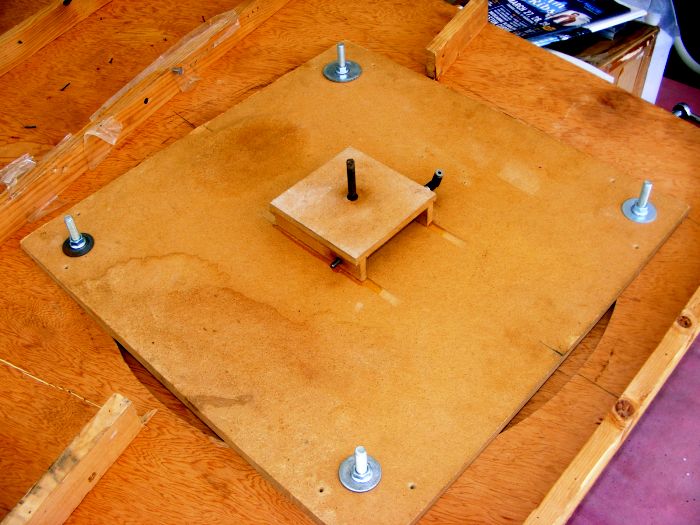
Well those final adjustments are now due, and I decided that rather than correct each adjoining track with minute shimming, I should first check out the consistency of my pit-wall's height. I guess I shouldn't have been surprised that it was a little inconsistent around its circumference. No problem,.... loosen the four screws/bolts that hold the pit in place and take the whole pit out onto my outdoors work bench. At first I thought about making various measurements around the circumference, then attempt to sand the high spots down. Wait a minute, why can I just rig up some sort of fixture that I could move around the wall and file the wall down on the high spots.


At first I chose a relatively fine file, but I could see this was going to be VERY time consuming, and to what advantage? I got out my trusty course rasp and made relatively quick work of the job. Then I finished it off with some sand paper.


image%28281%29.png


image%28282%29.png


Here you can see that the pit wall is higher than the 3/4" plywood deck is. The pit wall needs to be filed down to be flush with the deck it is installed in,.....so the height of the turntable bridge tracks will match the height of the stub tracks off the turntable.


image%28283%29.png


image%28284%29.png


BTW, I am VERY happy with my turntable's pit construction. It is very stiff and EXTREMELY light weight. I tried weighing it on a bathroom scale and could not even get a reading. It must be only 1 lb or so,.....the whole pit !!
 
Weight of that TT Pit


Wish I had a better scale to establish the weight of the pit structure. These photos are the best example I can provide at the moment,..and they are self photos, so my arms are only so long,...


image%28285%29.png


image%28286%29.png


image%28287%29.png


This shows the pit installed up under the deck,..
image%28288%29.png
 
Couple of New Problems

I reinstalled my turntable pit into its hole in the deck, then added back in the bridge portion.
Oops,... a couple of new problems;

1) the tracks on the bridge all appear to be over-height compared to the stub tracks.

2) there appears to be some sort of rocking motion of the bridge deck at various positions around the circumference.

My initial thought is that it might have something to do with the central shaft/ plastic piece holding the bridge structure up to high.
https://modelrailroadforums.com/forum/index.php?threads/build-your-own-turntable.32492/#post-480718
…..But the rollers wheels on those trucks at the outer ends of the TT bridge appeared to be resting on the rim rail of the pit.


That is when I noticed the shims that were installed under those bridge trucks,..
image%28289%29.png


image%28290%29.png


Those shims almost appeared to be an included item of the stock turntable. When I looked up a parts diagram for the TT, I did NOT find such an item. I took them out and the track heights appeared to line up much better. (I can only surmise that the original owner of this TT installed those shims?).


Height problem solved.


Next, the rocking motion
 
Rocking Motion of TT Bridge


My initial thought was is there something wrong with the true flatness of my pit,....that might allow the pit rail to become distorted. This was primarily a very slight side-to-side rocking motion. The analogy that comes to mind is like a 4-leg stool with slightly unequal legs. Could the 4 rollers/wheels of the 2 bridge trucks be the culprit?


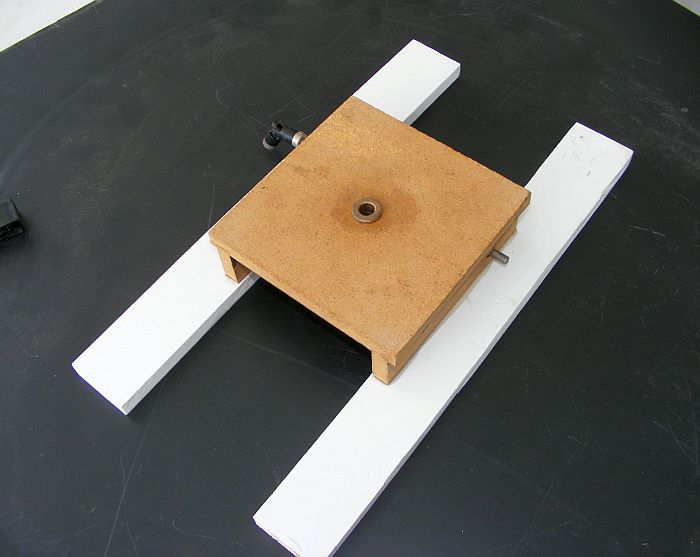
I got out a very flat piece of white painted plywood, onto with I placed 2 long very flat alum square tubes. I then placed the TT bridge across that span....
image%28291%29.png


image%28292%29.png


image%28293%29.png


With a little tweaking of the fit and tightness of those 2 trucks at the ends of the TT bridge, I got the bridge to be rock solid with no rocking motion


In a proper world with this TT design, the bridge rotates around supported ONLY by those 4 rollers/wheels of the trucks. And being aligned properly there should be absolutely no rocking of the bridge?
 
Arch Structure


BTW I did some temporary repairs to that arch structure on the bridge,...make it look a little more presentable until I can get a new one. The old one fell apart when I tried to resolder it awhile back. Seems as though someone had tried to make repairs before and I had not noticed how many smaller pieces had been pieced together.


First engine on the TT
image%28294%29.png


image%28295%29.png


Good track mating
image%28296%29.png


Diesel helper waiting
image%28297%29.png


Back
Top