You are using an out of date browser. It may not display this or other websites correctly.
You should upgrade or use an alternative browser.
You should upgrade or use an alternative browser.
BN 972673 Jordan Spreader.
- Thread starter rlundy90
- Start date
rlundy90
Armchair Engineer
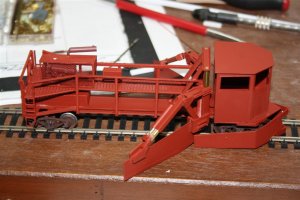
After installing the handrails, I built the oil tank and air tank. Then everything went downstairs to get primed. Everything looks different when it is all one color. Starting to look like something even though this is just primer.The paint is faded on the prototype and after testing out some colors last night I have it looking really close.
I was at Dollarama yesterday to get some 5 min epoxy and CA. I found some double sided foam tape in with the glue. It comes in a 15'x3/4" roll for $1. This stuff works great for holding small parts for painting or even larger parts like the body of the Jordan Spreader. I cut about 20 pieces of roughly 1/4" x 1/4" and stacked them on top of each other. I then stuck them on the bolsters and stuck the whole thing to the workbench. It held the spreader steady and about 1/2" off the bench so it was nice and easy for paint. The pic shows how handy this works for painting tiny things like stanchions.
I was at Dollarama yesterday to get some 5 min epoxy and CA. I found some double sided foam tape in with the glue. It comes in a 15'x3/4" roll for $1. This stuff works great for holding small parts for painting or even larger parts like the body of the Jordan Spreader. I cut about 20 pieces of roughly 1/4" x 1/4" and stacked them on top of each other. I then stuck them on the bolsters and stuck the whole thing to the workbench. It held the spreader steady and about 1/2" off the bench so it was nice and easy for paint. The pic shows how handy this works for painting tiny things like stanchions.
rlundy90
Armchair Engineer
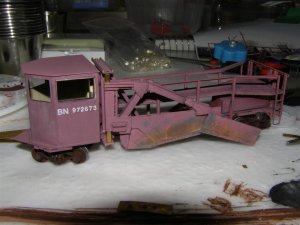
I had to trial fit some parts before getting ready to paint the cab and parts. Then everything comes apart again and I will start on some of the weathering while it is pieces. Also have to add details to the wings yet. This gives you an idea of how the completed model will look.
After putting on the wings I found a few tiny problems I will have to fix. First the front blade is way too long, so I will have to trim it down to size. Also the wings now catch on the handrails. Both are an easy fix and will be added to the to-do list. Other than that, so far everything seems to be going together very smoothly. Now I have to figure out the arms and get the cab and wings painted.
After putting on the wings I found a few tiny problems I will have to fix. First the front blade is way too long, so I will have to trim it down to size. Also the wings now catch on the handrails. Both are an easy fix and will be added to the to-do list. Other than that, so far everything seems to be going together very smoothly. Now I have to figure out the arms and get the cab and wings painted.
Attachments
rlundy90
Armchair Engineer
Been waiting the last few days for the weather to warm up so I could do some painting. The basement gets too cold to paint when it gets down below
-30. In the meantime thought I would try to make an interior for the spreader. Just didn't look right with nothing inside the cab. Started by building up the floor. Then the rest was done with styrene sheet laminated to the approximate thickness I needed. Still some more to do on it, but here's how it looks so far.
-30. In the meantime thought I would try to make an interior for the spreader. Just didn't look right with nothing inside the cab. Started by building up the floor. Then the rest was done with styrene sheet laminated to the approximate thickness I needed. Still some more to do on it, but here's how it looks so far.
rlundy90
Armchair Engineer
Thanks Plowguy. That old wooden plow turned out pretty good. It was my first scratchbuild. The plow section is board on board scale 2x2s. If I was to build anther one I would do a lot of things differently and correct a bunch of things I don't like about it. But it turned out looking pretty good and won best in show at my local club annual model contest. This model is going to be much more detailed and I think more to scale than the wooden plow. Once it is painted I can start weathering and assembling it. Then the final detailing can start. I am hoping with what I learned building the first plow and a few other kits, I will be able to produce a pretty accurate model of this spreader.
I haven't been able to do much modelling the last little while. Been putting in a lot of overtime and just been too busy. Did get a little detailing done on the wings and front plow, though. I made the blades and add-ons out of brass sheet and made the rivets using a staight edge and a pounce wheel. Took a bit if practice to get the lines straight. The wheel doesn't like going where you want it to. Here's a few pics of the wings. Hope to get it painted tomorrow.
I haven't been able to do much modelling the last little while. Been putting in a lot of overtime and just been too busy. Did get a little detailing done on the wings and front plow, though. I made the blades and add-ons out of brass sheet and made the rivets using a staight edge and a pounce wheel. Took a bit if practice to get the lines straight. The wheel doesn't like going where you want it to. Here's a few pics of the wings. Hope to get it painted tomorrow.
rlundy90
Armchair Engineer
Thanks Plowguy. Haven't had a whole lot of time for anything and still too cold in the basement to paint, but hoping to paint the spreader this weekend. It is supposed to warm up a fair bit. In the meantime I have been doing what I could in the time I have had. All that I have done is a bit more detail on the front blade and wings. Here's a couple of pics.


Just have to clean up a little excess glue and ready for paint.
Hopefully this week I can get everything weathered and partially together.
Just have to clean up a little excess glue and ready for paint.
Hopefully this week I can get everything weathered and partially together.
rlundy90
Armchair Engineer
Sorry Plowguy. Nothing new to report. I just haven't had the time to get it painted. Once that is done I can continue with the rest of the build. Before it was too cold to paint in the basement and I have seen sick with the flu for the past week or so. I am hoping to continue this week. Ron.

rlundy90
Armchair Engineer
Hey PlowGuy. How's it going? Boy you sure know how to dig up some old threads. I was trying to find this thread but couldn't seem to find it when I looked. Funny you should show up. My friend Rico and I were just mentioning you today and I just started working on the spreader a few days ago as well. It is now sitting in pieces on the workbench. It has been painted, decaled and partially weathered. It will be going back together soon. I will then post some new pics. Thanks for finding the thread for me.
PlowGuy
Member
LOL, glad I could be of assistance. Looking forward to seeing the finished product!!!
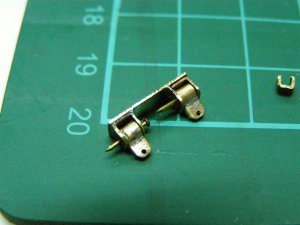
I searched for this post as I have started another spreader myself.... I have been building these with custom spreader side wing pistons to make it fully functional, however It still needed more as I hated how I couldnt lower the blades. I wanted to be able to get some photos with this thing actually in action so.....
I came up with a system consisting of a sliding block in a channel with pins that extrude out to attach the side wings too. This enables me to raise and lower the side blades as well as swing them out. Still havent been able to make them tilt down as its already fragile as is.... Here is what it looks like:
Steve
rlundy90
Armchair Engineer
.JPG")
.JPG")
.JPG")
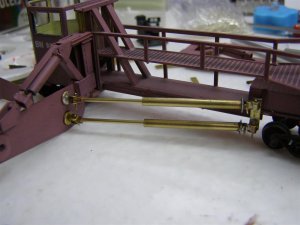
Hey Plow Guy. Here's how I did my blades. They are fully functional in all ways. They swing out, move up and down as well as tilt up and down. I made mine out of square brass tubing and they are very sturdy. Just have to figure out how to mount the front blade, to move up and down. If you want more pictures, just PM me and I will send more details. Ron.
That is heckitechnical.
rlundy90
Armchair Engineer
I finally had some time to work on this after a long time off. Got the body painted and partially decaled. Cut and installed some of the glass. Then got to the pivots for the arms, hydraulic cylinders, ect. I was having a hard time finding a way to make pivots for the hydraulic arms on the wings. After a lot of failures, I finally found something that worked. Took a lot of tinkering, but now the blades work like they should. Here are a few pics of where it is at. Still have to install the arms for the rear part of the wing, before this part is done.
View attachment 55571View attachment 55570View attachment 55569View attachment 55568
View attachment 55571View attachment 55570View attachment 55569View attachment 55568
Attachments