Blue Line Layout - Comments/Suggestions Please!


paper-tiger

Member
http://www.paper-tiger.org/2014/12/09/riverside-blue-line-layout-rethink/
Apologies for the remote link for image and further verbosely extended description. The forum apparently does not play well with attachments from iPads and my family is monopolizing the desktop...

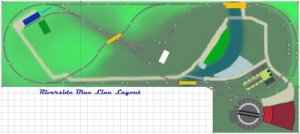
Hello there! This is the layout that I'm currently attempting to (re)start in the basement. I have a son who LOVES model trains and whose favorite thing is to watch the wheels run at about eye level. The layout I have here is 39" deep and 135" long with an extra little 21" L on the bottom. I have discovered that it is exactly wide enough for a single complete turnaround loop of HO EZ Track (my only available weapon at this level) and have been trying to come up with an idea that incorporates lots of continuous running with the potential to switch things up (literally) and a few spurs to suggest legitimacy.
The weird shape is because I'm trying to recycle as much of my bench work from the last colossal failure as I can. I know I have plenty of space for the 'big' run up on the right, but I'm wondering if I'll be too cramped for space coming back down the front edge. I don't plan on running any more than 4 or 5 cars (we don't even have that many at the moment) and unless there is an incredibly simple and intuitive way to convert steel EZ Track to DCC, this will be a DC layout.
Any thoughts or suggestions would be most welcome! Thank you!
(Assembled with AnyRail and Photoshop)
 

Attachments

  • image.jpg
    image.jpg
    26.4 KB · Views: 296
Nice starter plan! How old is your boy? I started my Model Railroading career 58 years ago and the hobby still makes me as happy as I can be. Good luck and rely on all the talent here on the board. There is a wealth of knowledge available for the asking.
 
My real enthusiast is 6 but the 5 year old and 2 year old also like to watch and 'play'. Needless to say, once the base scenery is done, plexiglass walls are going up around the low spots!
 
I can't tell for sure but do you have a reverse loop in your track plan?

If I understand correctly what a reverse loop is, I have a possibility of two utilizing the same bit of track, going opposite directions, both on the left side off the layout. The place where the tracks cross in the middle left is an overpass. Will that create a +/- voltage problem, do you think?
 
If I understand correctly what a reverse loop is, I have a possibility of two utilizing the same bit of track, going opposite directions, both on the left side off the layout. The place where the tracks cross in the middle left is an overpass. Will that create a +/- voltage problem, do you think?
Yes. If the train can reverse directions by doing down a segment of track it is a reversing loop situation. Yes you have two. Easy enough to fix, you will just need to use insulated rail joiners (or just remove the joiners and have gaps) on both sides of the reversing section. Then you connect it with wires through a a direction switch called a double pole double toggle (or DPDT for short). That way the switch can be aligned to match the polarity of the track the train is coming from and going to. A second DPDT switch will need to be put on the main so its polarity can be switched while the train is crossing the reversing section.

Repeat for the other reversing section, and your done. The second reversing loop does not need a 2nd switch on the main. One is a plenty.

Exactly which section is the formal reversing loop will depend if you are looking at this as an oval main line with reversing through the center or if you are looking at it as a figure-8 main line with outside cut offs.
 
Last edited by a moderator:
unless there is an incredibly simple and intuitive way to convert steel EZ Track to DCC, this will be a DC layout.
The incredibly simple way to convert to DCC would be to replace the current DC controller with a DCC one. The only concerning part there is the steel. Since it is steel I might suggest at least second set of wires to the rail across the layout from the existing but....I am guessing it would work without it. To make operation simple the DPDT switches (from the prior post) could be replace with DCC automatic reversers.

I did not realize that Bachmann made so many different pieces of track in the steel variety, nor that they made a turntable.
 
The incredibly simple way to convert to DCC would be to replace the current DC controller with a DCC one. The only concerning part there is the steel. Since it is steel I might suggest at least second set of wires to the rail across the layout from the existing but....I am guessing it would work without it. To make operation simple the DPDT switches (from the prior post) could be replace with DCC automatic reverser.
I have a Bachmannn EZ-Track DCC controller on my wish list but couldn't believe that it would be so simple as to just switch the controller. After reading your suggestions, I'm sure it wouldn't be! For my existing EZ-Track, I plug the controller in to ONE terminal rerailer, and the entire thing either works or doesn't work. I have some black(steel) rail and some grey (nickel/whatever) that seem to work together well enough. There is no supplemental wiring whatsoever, so I'm not actually sure what

I did not realize that Bachmann made so many different pieces of track in the steel variety, nor that they made a turntable.
Hah, I've been thinking that there isn't much of a variety of turnout angles available. The turntable is an imaginary extension that fits in the space. The internet thinks they start at about $130 - which makes them completely imaginary for the purposes of this layout! It's more likely that area will turn in to nonspecific farmland until I have a space or my trains that I really own.
 
Yes. If the train can reverse directions by doing down a segment of track it is a reversing loop situation. Yes you have two. Easy enough to fix, you will just need to use insulated rail joiners (or just remove the joiners and have gaps) on both sides of the reversing section. Then you connect it with wires through a a direction switch called a double pole double toggle (or DPDT for short). That way the switch can be aligned to match the polarity of the track the train is coming from and going to. A second DPDT switch will need to be put on the main so its polarity can be switched while the train is crossing the reversing section.

Repeat for the other reversing section, and your done. The second reversing loop does not need a 2nd switch on the main. One is a plenty.

Exactly which section is the formal reversing loop will depend if you are looking at this as an oval main line with reversing through the center or if you are looking at it as a figure-8 main line with outside cut offs.

To be honest, I'm completely lost. As I mentioned in my last post, the EZ-Track connects on its own - I don't have to individually wire each section. And so, I'm not sure if it's even possible to connect supplementary wire as you suggest. Perhpas it's just that this complex a layout is not possible with EZ-Track! I have managed to have a double loop with two spurs run on the steel EZ Track, but this is a level or two beyond what I've tried in the past.
 
There should be a section of track where the wires from the transformer plug into the track. Although I'm not completely familiar with the black EZ track or the Bachmann DCC system, if the DCC system uses the same style plug to plug into the track, as the DC transformer, you should be able to switch them. Only thing is when you switch to DCC, your locomotives need to have DCC decoders. Also, your trackplan does have reversing loops, so you will need some sort of insulated section of track, along with proper electrical switches to get the polarity of the track right. If you go DCC, I think at least one company makes a 'reversing section circuit,' that automatically switches the polarity, as the train goes thru the reversing section. You might ask over in the Electrical section of the forum for more help regarding your electrical questions.
 
To be honest, I'm completely lost. As I mentioned in my last post, the EZ-Track connects on its own
Well then I have made it sound too complicated by being too specific. It is really easy. Looking at the end of a piece of EZ-Track there is the big plastic hook and then a metal part that sticks out beyond the end of one of the rails. That is the rail joiner. To make a gap one would remove that rail joiner from each side being connected. Or one can get plastic joiners to replace them with. The advantage of a plastic (insulated rail joiner) is that it has a tiny piece of plastic through the center that prevents the rails from accidentally touching each other. I digress.... On your track plan you would have to remove the metal joiners in 4 different places to isolate those reversing sections.

I don't have to individually wire each section. And so, I'm not sure if it's even possible to connect supplementary wire as you suggest. Perhpas it's just that this complex a layout is not possible with EZ-Track! I have managed to have a double loop with two spurs run on the steel EZ Track, but this is a level or two beyond what I've tried in the past.
True, it is up one level of complexity, but not beyond reason. You would have to do one of three things.
1. Find some way to include an extra terminal track into the isolated sections. Like these -
http://www.amazon.com/Bachmann-Trains-Snap-Fit-Straight-Terminal/dp/B0006N7414

2. Replace a set of joiners on each isolated section with joiners that have wires on them. Like these -
http://www.amazon.com/Nickel-Silver...keywords=rail+joiner+wires&pebp=1418272806102

or 3. Solder wires directly to a section of the nickle-silver track in each isolated section.
 
Last edited by a moderator:
OK pictures really help and doing this showed me you need an extra set of insulation between the tracks.

The heaver red marks are where you would have to remove joiners for gaps or insulated joiners.
That would form the two independent section marked with thin red and blue lines.
To get power to them you could replace the sections marked in yellow with additional "terminal" tracks.
This assumes the original terminal track is somewhere like where I marked on the bottom in orange. The orange track at the top is where I would add a 2nd terminal track for DCC input.

riverside2.jpg

Insulated joiners - http://www.amazon.com/HO-C100-Insul...&sr=1-3-spell&keywords=insulated+rail+jioners
 
Last edited by a moderator:
OK pictures really help and doing this showed me you need an extra set of insulation between the tracks.

The heaver red marks are where you would have to remove joiners for gaps or insulated joiners.
That would form the two independent section marked with thin red and blue lines.
To get power to them you could replace the sections marked in yellow with additional "terminal" tracks.
This assumes the original terminal track is somewhere like where I marked on the bottom in orange. The orange track at the top is where I would add a 2nd terminal track for DCC input.

View attachment 46944

Insulated joiners - http://www.amazon.com/HO-C100-Insul...&sr=1-3-spell&keywords=insulated+rail+jioners

Iron Horseman,
That is significantly more understandable! Thank you! I do happen to have another rerailer and was planning on having one in the bottom left and one in the top right, just because that back corner is a real pain to reach! From the way you described it, wiring them both up to the control box and isolating the tracks ought to solve it! (I hope.) Some time in the next few days, as soon as my inclines arrive on what is apparently a slow boat from China, I'll try it out.
The attachment is telling me it's an invalid file type. Did you save it as a bmp, png, jpg, gif, or whatever-all is accepted?

otiscnj,
As soon as I have all my track pieces and can do a useful test run, I'm going to start the troubleshooting process. (Hopefully I won't have to, but I'm kind of a pragmatist.) I have, as far as I know, a plain 'ole DC locomotive, so the DCC conversion will be in the future a couple hundred dollars. If it really could be that easy, though... *whistles* Thank you!
 
I HAVE MADE FIIIRRREEE!!!!
Or, at least, got the outside loop satisfactorily graded and track laid all the way around and in working (albeit not pretty) condition. Thank God for Woodland Scenics. My last attempt at creating a grade, I was literally trying to shave my foam base in to a happy grade with a wood-shaver-thing and an electric carving knife (hey man, you've gotta do what you've gotta do!). I made it to 'successful loop' this time. :D
*victory dance* First lap! Yay, me!
Thank you guys for your enormously helpful advice. I would have connected that first reversing loop, it would have died (which it did - I had to try it) but I wouldn't have had any idea what to do next without the expert pre-emptive troubleshooting.

Still need to order another Right turnout, two curved rerailers, six 18"30 curves and four 9" straights before I can complete the whole track and start scenery, but getting close! The boy will be thrilled to see it go!
I think it will work best to use an EZ Track auto-reverser for the reversing loops, since my primary 'engineer' is a kindergartner. (Still trying to figure out if I'll need one or two, though! Big cost difference. Not having any luck finding an instruction manual from Bachmann or anyone actually installing it on an EZ-Track system, yet, though.)
 
I think it will work best to use an EZ Track auto-reverser for the reversing loops, since my primary 'engineer' is a kindergartner. (Still trying to figure out if I'll need one or two, though! Big cost difference. Not having any luck finding an instruction manual from Bachmann or anyone actually installing it on an EZ-Track system, yet, though.)
If for a while you are only going to run 1 train, you could get by with only 1. As soon as you add the 2nd train, you will have to have two.

Bachmann's units are expensive but have the advantage of using the Bachmann wiring plugs and would require no soldering (if you use two).


These MRC units are cheap because they have a mechanical relay instead of 100% electronic, but they work - MRC AD520
 
Last edited by a moderator:
SAM_1166.jpgSAM_1167.jpg
I'm so proud of myself! The colossal mess you see before you is none other than my Riverside Blue Line layout, coming to life! I decided to tack a 1x6 on to the forward side because my locos were biffing it if they took the top curve too fast, and recruited my husband to help me secure it well enough. He got interested because I had a hot razor and power tools, and we spent most of the evening after the kids went to bed, assembling the underlayment. It works! (Well, I had to disconnect the balloon track to make it work, since I don't have the reversers yet, but...) We tested all the grades and my poor, abused little engine can make them all. I was going to start tacking down the crumpled paper, but the masking tape had congealed in to a sticky blob in the garage. Gotta pick up some more, tomorrow! Would it be ironic to use my Walthers Flyer to fill in some of the gaps? I've already run out of newsprint. -.-
 
Tiger,

Like the photos! I can't quite tell from the photos, but it looks to me that the track that goes over the one diagonal track, has a very steep grade from the switch at the end of the curve, to where is goes over the other track. Probably most of the section of track from the switch to the overpass, needs to be on a grade of some sort. The way it looks, I think the engine will 'bottom out,' on the track, due to the current rapid change in elevation of the track. Just wanted to point this out, in case you weren't planning to do more with this section of track.

Otis
 
You have plenty there that you can reuse and even add onto. I would get rid of that type of track and go with flex track and work on a new plan like a twisted dog bone as it looks like that's what you were attempting on this first layout which strangely enough looks like my first layout. If you were to keep this setup you will not have a continuous run without having to throw dpdt toggles for the reverse loops. Good plan for the eye level for the youngster and as he grows and says hey dad I feel like I'm looking down at the layout you will be ready for the next layout. If you have room I would consider an around the wall layout as well especially if you can get 2 4 foot ends on it.


Back
Top