ModelRailroadForums.com is a free
Model Railroad Discussion Forum and
photo gallery. We cover all scales and sizes of model railroads. Online since 2002, it's one of the oldest and largest model railroad forums on the web. Whether you're a master model railroader or just getting started, you'll find something of interest here.
Hi
After lots of questions, listening to advise on this forum, the build has finally commenced, my layout is going to be based on an iron ore mine with a train load out and car dumper (hopefully operational) plus a few additional infrastructure. I would like a conveyor to connect it all up, but there might not be enough room.
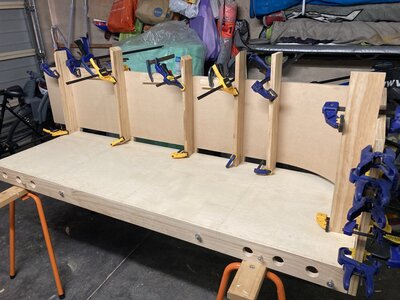
So far I have the frame work up. Just need to put down the plywood top, foam and backboard.
I was going to use cabinet connectors to secure the four modules together, on the off chance I need to put it apart. However, I'm not sure if I should have edge protection for the foam at the joints.
Thought about using either a piece of 3mm ply or extend the edge piece of 19mm pine, if that makes sense.
Turned out a lot bigger than on the plans.
Cheers
Turned out a lot bigger than on the plans.
View attachment 159126
Cheers
Kind of wierd how that happens, isn't it?

Hi
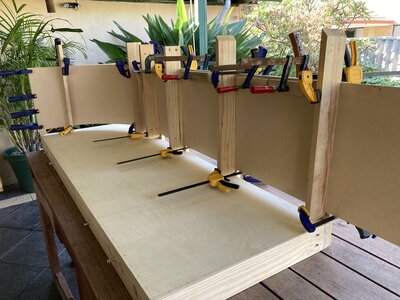
Been working on the backdrop side of things, was hoping to have it finished for the weekend but the nail gun packed itself in.
These are the sides, just have to the middle and I can start on the XPS foam base. The backboard is 3mm MDF, it's 400mm high plus I raised it another 25mm of the base since the XPS foam is 50mm thick. The corners have a 400mm radius, I wanted 300mm but it just felt too tight.
I try to get a tighter radius by kerfing the MDF and it looked promising until that finally little bit before the MDF shat itself.
-
IMG_8047.JPG
478.1 KB
· Views: 188
-
IMG_8061.JPG
520.9 KB
· Views: 182
The baseboard and backdrop are finished, primed the backboard with British Paints 4 in 1 Primer (water based).
Getting closer to laying track.
I would suggest putting tape on the floor signalling when to stand up, handy with a duck under. What will you be doing on the backdrop? I know what you mean with the bending the mdf ( we call it hardboard over in Canada) , I used it on my fascia.
Good idea on the tape, not looking forward to the day I can't duck under any more.
As for the back drop, the sky colour I have Ozone Blue, which I'll transition from white at the horizon. As for the landscape I have a few pictures that I was going to use, but I thought I may wait until I have some track down just to see how it feels.
Mat Cutter, so handy for cutting cork road bed. Set the width and don't forget to rotate the sheet on every second cut.
This took 20min to cut up a sheet of 900 x 600mm
Mat Cutter, so handy for cutting cork road bed. Set the width and don't forget to rotate the sheet on every second cut.
View attachment 161071View attachment 161072This took 20min to cut up a sheet of 900 x 600mm
Nice,I don't have one of those, so I just bought the pre cut rolls of cork from fleaBay
As for the landscape I have a few pictures that I was going to use,
Western Oklahoma, or Texas Pan Handle?
Northern Pacific history enthusiast
They had an iron ore mine in Birmingham Alabama, closed in 1975; otherwise need to go to the Great Lakes to find the stuff. How prototypical do you want to be?
It's the Pilbara that I'm trying for. I think I'll have to do some practice before I start on the backboard
Northern Pacific history enthusiast
Australia? Those backdrop pics look pretty close, wonder if you will be using US trains?
Yes, I think most of the locos are from the US with just a different paint job and a few mods.
I mainly have Dash 9's, SD90MAC and ES44AC
Hi
Well the baseboard is finally finished, now to transfer over the track plan and start putting it all together.
Cheers
Hi
Well as I was trying to figure our the scenery with my buildings when I have found a mistake with the layout. I can get into my servicing area but I can't get out without reversing back onto the main line.
I have tried to base it on the time saver just to give it some interest, I need some fresh eyes since I'm not feeling the love.
Cheers
Well as I was trying to figure our the scenery with my buildings when I have found a mistake with the layout. I can get into my servicing area but I can't get out without reversing back onto the main line.
View attachment 162455
First, real railroads have to reverse back onto the main line lots of times, so that is not necessarily a bad thing.
Second I am not certain I am following the issue. Are trains to enter from the wagon storage track? They could run around and leave the same.
It looks to me like the tail track on the switchback from the main to just below the fuel farm is too short. Should be long enough for a loco and at least one car. Switchbacks are nefarious space wasters because of that reason.
The whole thing runs from right to left, the wagon store siding is terminated (not sure if that's the right terminology) off to the right, so you can only access it from the servicing area.
Ah, seems I have a few more issues to sort.
Had another crack at it, any criticism would be appreciated. It's a shame I can't seem to fit any roads about it.
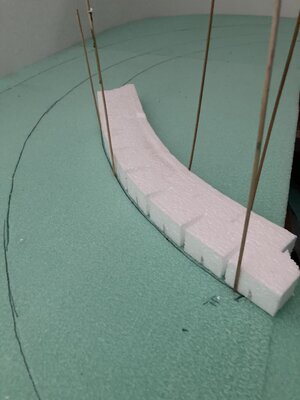
I'm having a go at making my own inclines and risers with batters using XPS foam. I first thought to try it out using polystyrene foam.
So to make it easier to line up the centrelines on the layout, I'm doing them in two halves. So for the test the riser will be 30mm high and 80mm wide so I can fit the 1 in 1.5 batter.
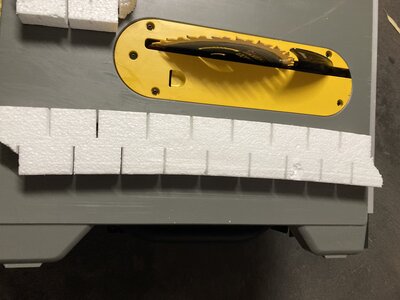
The weapon of choice was a table saw. As I was going around a radius I kerfed the piece at 50mm centres, I cut in 35mm towards the centre, with a 3mm blade and staggered the cuts on both sides. I was able to match in all the radii I have except the 600mm radius which broke, but with some care I managed to get it but it did feel tight (the pic is on the 600mm radii) so may have to go to 40mm centres.
As for the cutting the batters on the table saw, first time I experienced kick-back, didn't think foam would fly that quick. Anyway the batters didn't come very good, so I might just a jig-saw or cut the the batters first then cut the curves. Here are a few pics, so it makes a bit more sense.
Cheers
-
IMG_8139.JPG
361.9 KB
· Views: 142
-

IMG_8140.JPG
421.8 KB
· Views: 144
-
IMG_8141.JPG
350.3 KB
· Views: 135
i used a home made hot wire table to do the same job ,,, fast and no mess ..

Affiliate Disclosure: We may receive a commision from some of the links and ads shown on this website
(Learn More Here)


