
You are using an out of date browser. It may not display this or other websites correctly.
You should upgrade or use an alternative browser.
You should upgrade or use an alternative browser.
Atlas Switch machines Pros and Cons
- Thread starter Odyknuck
- Start date
OgreMike
Active Member
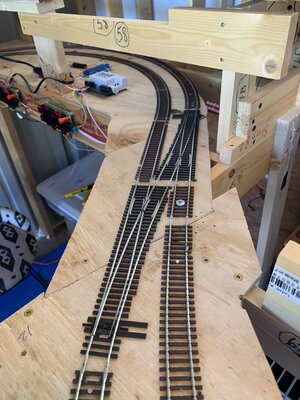
Will have to fill in some ties underneath the areas where I had to trim them off to make ends meet. I guess that’s the small price you pay when fitting in complex turnouts and track. By the way, the Atlas rail joiners work fine with Peco as long as you tighten them a bit with a pair of needle nose pliers to grip the thinner rail footing of the Peco rails. 


OgreMike
Active Member
Ok, so I cut off the metal throw rod on the Peco PL1000 motor a little too much. But the rod extends all the way thru the machine and has a couple inches available on the under side. Question: how do you release some of the low end slack on the underside of the motor and use on the top side on the switch throw bar?? Anybody? Thanks. Mike
OgreMike
Active Member
Ok, so the learning curve continues for this relative newbie . . . I tried in vain to see if I could extend some of the lower end “slack” of the PL-1000 motor’s metal actuator rod up to the topside of the motor, since I had mistakenly cut a bit of the excess topside rod off. By cutting off too much, the actuator rod was only barely high enough to stick up thru the small hole in the center of the turnout’s throw rod. This, unfortunately, caused some of my turnout actuations from the remote control box to “miss” with the result that the turnout would no longer throw properly upon command at the control panel. I emailed tech support at Peco, and regrettably, I was informed that there is no “slack” available on the lower end of the PL-1000 metal turnout actuator rod that can be utilized to extend back up thru the unit to the topside in the case that one cuts too much of the topside rod off ( as yours truly dumbly did). Hoooo boy . . . Stupid is as stupid does as I believe Forest Gump might’ve said. LESSON LEARNED: If you are using the PL-1000 on the BOTTOM side of your layout, DO NOT cut off too much of the topside actuator rod, or you’ll end up with a perfectly fine PL-1000 motor which can no longer function from the under side of your layout!Ok, so I cut off the metal throw rod on the Peco PL1000 motor a little too much. But the rod extends all the way thru the machine and has a couple inches available on the under side. Question: how do you release some of the low end slack on the underside of the motor and use on the top side on the switch throw bar?? Anybody? Thanks. Mike
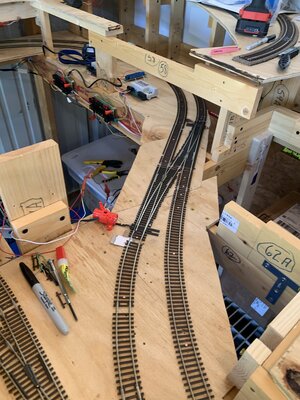
But, the HAPPY news is that the unit also comes with a plastic extender rod which, when easily attached to the turnout’s throw rod, allows one to use the PL-1000 ALSO in an ABOVE BOARD configuration to throw the turnout ON TOP of the layout, similar to how Atlas switch machines do the job! So I was saved by Peco’s engineering! I now have the same PL-1000 operating topside, so I’m ok! And because the turnout is on the lowest level of the layout which will be eventually “buried” by the layout above and scenery, etc., it won’t otherwise be visible! So happy day!
 . I’ll send along some pictures in awhile, but I presently have to go walk my little doggie
  Mike
Mikegoscrewyourselves
I'm the one
The Surface Mounted Peco machines are called PL11's - they sound like the ones you want and needOk, so the learning curve continues for this relative newbie . . . I tried in vain to see if I could extend some of the lower end “slack” of the PL-1000 motor’s metal actuator rod up to the topside of the motor, since I had mistakenly cut a bit of the excess topside rod off. By cutting off too much, the actuator rod was only barely high enough to stick up thru the small hole in the center of the turnout’s throw rod. This, unfortunately, caused some of my turnout actuations from the remote control box to “miss” with the result that the turnout would no longer throw properly upon command at the control panel. I emailed tech support at Peco, and regrettably, I was informed that there is no “slack” available on the lower end of the PL-1000 metal turnout actuator rod that can be utilized to extend back up thru the unit to the topside in the case that one cuts too much of the topside rod off ( as yours truly dumbly did). Hoooo boy . . . Stupid is as stupid does as I believe Forest Gump might’ve said. LESSON LEARNED: If you are using the PL-1000 on the BOTTOM side of your layout, DO NOT cut off too much of the topside actuator rod, or you’ll end up with a perfectly fine PL-1000 motor which can no longer function from the under side of your layout!
But, the HAPPY news is that the unit also comes with a plastic extender rod which, when easily attached to the turnout’s throw rod, allows one to use the PL-1000 ALSO in an ABOVE BOARD configuration to throw the turnout ON TOP of the layout, similar to how Atlas switch machines do the job! So I was saved by Peco’s engineering! I now have the same PL-1000 operating topside, so I’m ok! And because the turnout is on the lowest level of the layout which will be eventually “buried” by the layout above and scenery, etc., it won’t otherwise be visible! So happy day!
")
Smudge617
Well-Known Member
The Peco PL1000 is a twistlock under the board point/switch motor. You'll have the same problem with any under board motors if you cut the actuating bar too short which @OgreMike has done, and now the bar won't throw the switch properly, so he is now using it as a surface switch motor, it's designed to be used as either above or below your boardThe Surface Mounted Peco machines are called PL11's - they sound like the ones you want and need
The Peco PL 11 are surface mounted only
Peco PL1000
goscrewyourselves
I'm the one
Sorry, didn't realise that ...
Smudge617
Well-Known Member
Took me a while too, so many different ways of throwing a switch it's mind numbing sometimesSorry, didn't realise that ...
OgreMike
Active Member
Hey Wombat and Smudge! Thanks for chiming in! And thanks greatly for the superb photo of the PL-1000, SmudgeTook me a while too, so many different ways of throwing a switch it's mind numbing sometimes
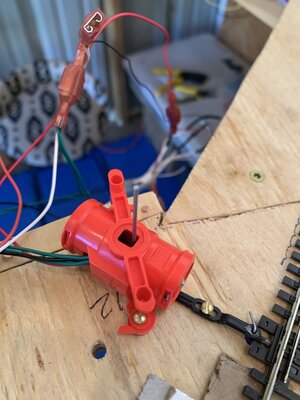
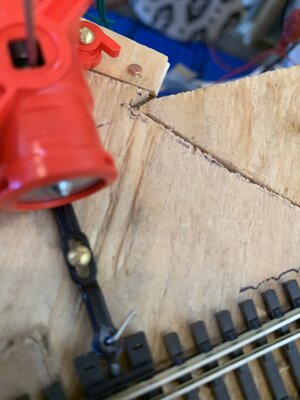
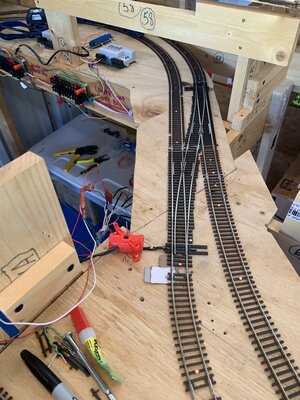
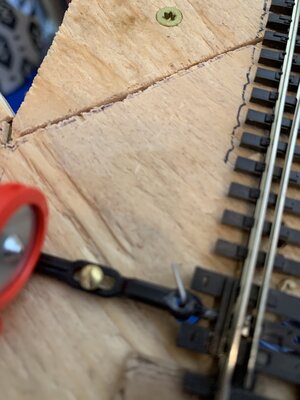
A picture is worth a 1000 words, and the photo shows us exactly how the actuator throw rod/bar extends all the way thru the unit and has seeming “slack” on both the top and bottom ends. However, as I noted in my earlier post, you only have what they give you on the top side to work with! If you cut off too much, the top side rod won’t extend far enough through the underside of your layout to go through the little hole in the turn out, throw rod, and you’ll get into the situation I found myself in having cut off too much of the actuator rod!But as you can see from my photos, it is now mounted top side along side, the turn out. The photos show the plastic actuator rod which is included with the motor and which can be easily attached to the motor and the turn out throw rod. The only problem I found was that my particular turn out, that you will 8361 #6 RH, does not come manufactured with a tiny little pig or stud on either of it ends. There is only a small hole in either end of the turn out throw rod. And you somehow have to link the plastic extension that Peco supplies you to the turn out throw rod. The hole in the end of the throw rod is so tiny, that I wasn’t quite sure what I would use as a linkage pin in the end, I found that a small piece of soldering wire, fit the bill perfectly! the soldering wire that I sniffed off from my roll of it fit easily through the extender bar and then also through the very small hole in the turn out throw rod. Also, the soldering wire wall solid is very flexible so it can be bent very easily into a suitable linkage. I’ve tried to illustrate that with the photos here. I hope this helps anyone who might be thinking of using the Peco PL-1000. In the end, I have found it to be a very versatile unit! Very pleased with the purchase of all of this equipment!
Attachments
-
 63DC9BEE-DB15-456A-AB1B-E1DC5A277970.jpeg337.7 KB · Views: 48
 -
 A3A94722-FE23-4083-939F-1666EF7AE1D2.jpeg264.4 KB · Views: 56
 -
 E0DBBD89-C021-48B8-A05D-2C81468FC588.jpeg469 KB · Views: 49
 -
 8A160CCB-C726-4199-B55C-133D1D235740.jpeg519.4 KB · Views: 52
 -
 6F4BA272-57BB-4FC2-BA38-33205302CD24.jpeg330.9 KB · Views: 48
 -
 C02DE5CB-E854-41BD-A58F-0187F4BE9EC1.jpeg286.1 KB · Views: 49
OgreMike
Active Member
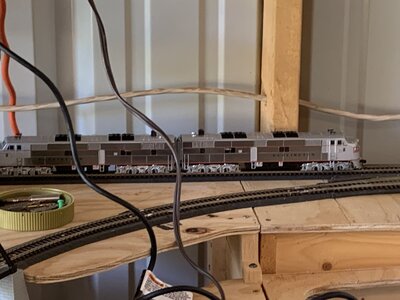
Forgot to mention that my biggest locomotives are shown here. They are a pair of E7s in consist back to back. Both of them possess two 3-axle trucks which, when following each other thru a tight turn crossover such as this, make them ideal candidates for possible derailment. But because Peco makes such good and forgiving equipment, derailments are now NOT HAPPENING! 

Smudge617
Well-Known Member
Peco do make some great stuff as you've found out, at some point I need to dump all my Hornby (code 100) track, and replace it with Peco.Hey Wombat and Smudge! Thanks for chiming in! And thanks greatly for the superb photo of the PL-1000, Smudge
But as you can see from my photos, it is now mounted top side along side, the turn out. The photos show the plastic actuator rod which is included with the motor and which can be easily attached to the motor and the turn out throw rod. The only problem I found was that my particular turn out, that you will 8361 #6 RH, does not come manufactured with a tiny little pig or stud on either of it ends. There is only a small hole in either end of the turn out throw rod. And you somehow have to link the plastic extension that Peco supplies you to the turn out throw rod. The hole in the end of the throw rod is so tiny, that I wasn’t quite sure what I would use as a linkage pin in the end, I found that a small piece of soldering wire, fit the bill perfectly! the soldering wire that I sniffed off from my roll of it fit easily through the extender bar and then also through the very small hole in the turn out throw rod. Also, the soldering wire wall solid is very flexible so it can be bent very easily into a suitable linkage. I’ve tried to illustrate that with the photos here. I hope this helps anyone who might be thinking of using the Peco PL-1000. In the end, I have found it to be a very versatile unit! Very pleased with the purchase of all of this equipment!
Something you might consider if your going to fit another motor like the TwistLock, something a gentleman some years ago taught me.
If you place the turn out on your board where you need it, tape the throw bar so it sits in the middle of the switch, and mark the board through the center of the throw bar, using a thin implement, I used a track screw and cut the head off.
Remove the turnout, and where the mark is drill a 8mm (5/16ths) Then using something like a small piece of dowel, I used styrene, drill a hole thro the center of the dowel (or whatever your using), and put the dowel in the hole you've just drilled.
From underneath feed the motor rod through the dowel rod and center the motor, screw in place.
From the top remove the dowel/styrene and place the turnout over the throw rod, and into place, cut the throw rod last.
You now have a perfectly centered switch
Last edited:
