Crazy idea what do you think


Awsome! I wish I could tunnel through the walls attaching my layout room to my bride's (of 46 years!) study. But she won't give me trackage rights! ;)
 
Awsome! I wish I could tunnel through the walls attaching my layout room to my bride's (of 46 years!) study. But she won't give me trackage rights! ;)

If she's got boxes of stuff in her office, offer her a storage rights deal under the layout.
 
If she's got boxes of stuff in her office, offer her a storage rights deal under the layout.

Unfortunately that won't work as I already have just about the entire underside of the layout full of storage drawers full of model railroad stuff that doesn't fit on the layout. (Been in the hobby off and on for 50+ years, and have a LOT of stuff! :rolleyes: )
 
por1ho.JPGpor2.JPGpor3.JPGpor1.JPG

This time of year my attention turns towards my old cars and classic car shows. But on my way home from a car show on Saturday, on Rt 15 through Maryland and northern Virginia, I decided to take a closer look at the tunnel at Point of Rocks, Maryland. There are no tracks anywhere in the county I live in just across the river in Virginia, so this tunnel, clearly visible from the Rt 15 bridge across the Potomac River, is the closest spot to my house where I can see the rails. I've always liked this spot because I figure its fairly unusual to see two parallel tracks with one going trough the hill and one going around it. I have decided to recreate a similar scene on my layout just before the track goes through a future hole in the wall into the next room. A few hundred yards from the tunnel, is the Point of Rocks station. I always liked this station and its position between the tracks where the two parallel lines diverge to go their separate ways. But, at this point I don't have any plans to incorporate that station arrangement on my layout.
 
Hey Jim,

Where you at with this stuff? I checked our your whole thread after reading about it in the bedroom one started today.

Thanks a ton for including the beginning "train of thought" and your rough workings. Great imagination and patience!!!


Thanks again, logandsawman
 
Hey Jim,

Where you at with this stuff? I checked our your whole thread after reading about it in the bedroom one started today.

Thanks a ton for including the beginning "train of thought" and your rough workings. Great imagination and patience!!!


Thanks again, logandsawman

Thanks for your interest. The layout is a wintertime project. In April, work on the layout stalled. Now that winter is back, I will start work on the layout again. Possibly might be able to start working on it again tomorrow since rain today, means it will be too wet to rake leaves tomorrow.
 
Seeing we're now getting into summer over here I thought you might like this I spotted at a local Servo (gas station) a couple of days ago

CloudsampRanchero015_zps430a6e66.png

CloudsampRanchero016_zps7a1ea107.png

CloudsampRanchero017_zpsa20ad5ae.png

Good shot of the old and the new Aussie Utes together.
 
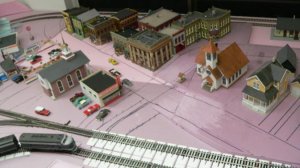
Very nice 57 Ranchero. Thanks for sharing the pics. I don't recognize the newer Ute.

I thought it was one of the newer Ford Falcon utes but in fact it's a GM Holden (they look pretty much alike, I had to compare tail lights to tell)
 
I hadn't touched this layout since last winter. Now, this winter is half over, and I finally took a little time to work a bit more on the layout. Everything on this layout is still merely just test fitted in place. The pink foam is not yet glued into place and the track is not attached to the layout yet.
I bought two additional 48" high x 11 1/2" deep x 19" wide Ikea Ivar shelf units. I made these two pieces free standing so that I can use it to support two removable sections of the town in the blue room. These were permanant parts of the original layout, but would be completely in the way for guests using the guest bed underneath. After considering several options, I decided this was the best way to support the two sections, and have them completely removable when the space was needed. I intend to install a mirror along the wall from the hill in one corner to the corner past the second removable section to the right.

In the first picture, everything past the angled building in the foregrond will be removable. In the second picture the schoolhouse property to the right of the bridge will be removable.
 

Attachments

  • liftout1.JPG
    liftout1.JPG
    41.9 KB · Views: 192
  • liftout2.JPG
    liftout2.JPG
    48.2 KB · Views: 189
Last edited by a moderator:
Today was a big day for this layout. I finally stopped procrastinating and went ahead and knocked two holes through the wall between the two rooms. Finally, the track is connected from one room to the next. The trains not running yet, but if powered, I could now run two trains at once through both rooms.
So now I know for sure that the track lines up from one room to the next.
Don't worry about the wallpaper in the one room. That will all be hidden by a backdrop and scenery.
 

Attachments

  • holes1.JPG
    holes1.JPG
    35.5 KB · Views: 172
  • holes2.JPG
    holes2.JPG
    66.1 KB · Views: 175
  • holes5.JPG
    holes5.JPG
    48.5 KB · Views: 164
  • holes3.JPG
    holes3.JPG
    51.2 KB · Views: 174
Last edited by a moderator:
My next task is creating a liftout in this town. The actual hole would be just under 2' square and would extend from behind the gas station (far left) to the brick church and would include the used car lot. It would extend from just inside the tracks against the wall (top of the picture) over to the spur on the lower left in the picture. The problem with this is that the edge of the liftout will cross Main Street and will go down the street between the brick church and the used car lot. The gap will be impossible to hide. Since the entire area sits on two layers of 1 1/2" pink foam, I am considering another alternative. I'm thinking about making the liftout hole on the bottom layer of foam only. Then the top layer could be made as one piece. I could make the entire town between the tracks removable. That would make it easier to build and detail the town. But on the (hopefully) rare occasions when access is needed, I would need to remove all buildings and vehicles and anything else not glued down before gaining access to the opening.
In this case it will still be difficult to hide the break between the liftout town and the permanant part of the layout where the streets cross it, but its better than having a fault line bisecting the town.
After that, then it will be time for mirrors and backdrops on the wall, and then it will finally be time to start putting the foam together permanently and actually laying track and wiring, and...
 

Attachments

  • liftout3.JPG
    liftout3.JPG
    54.9 KB · Views: 174
Last edited by a moderator:
You think you've got problems with holes in walls? have a look at this video (from 2:51-5:20) of the home of one of Aussies favourite TV presenters and her husband's O guage layout.

http://www.youtube.com/watch?v=rRtrrNNxWew

Definitely a nice layout, but I'm not quite ready to run a train through the foyer. And how do you keep bugs and critters out if the train goes through holes in the wall out to the back yard?
 
OK I'm saving that one to show the wife when she complains about my craziness.

Jim, overlay the top layer of the liftouts scenary to hide the split lines. I'm doing the same on one of mine. Not finished, but looks pretty good.
 
Thanks Gary. The overlaying will likely work for some natural appearing scenery, but I'm not sure how it will work for streets and pavement. I will be trying that anyway. I'm likely going to use solid pieces of plastic or illustration board for the streets. Using any kind of Hydrocal or plaster derivitive to model the roads on a removable section is asking for trouble.

As I mentioned, this section of the layout sits on two layers of 1 1/2" foam on top of the wood Ikea shelving and framework. I decided to try having the entire top layer of foam for the townsite removable to avoid fault lines running through the middle of town for the removable hatch. That way, I can remove the town structures and loose pieces, remove the base the town sits on, and then expose my 22" x 18" access hole in the lower layer of 1 1/2" thick foam. This was my project today. The access opening ended up being smaller than anticipated, but I think it will work well. The only difficult part for hiding the removable town section will be about an inch before the town streets cross the tracks in three places. One of those places will be far from being easily seen, but two will be in the foreground. I think that overlapping the street material in those areas will work well.
 

Attachments

  • town hole 1.JPG
    town hole 1.JPG
    35.3 KB · Views: 241
  • town hole 2.JPG
    town hole 2.JPG
    32.7 KB · Views: 233
  • town hole 3.JPG
    town hole 3.JPG
    39 KB · Views: 240
OK I'm saving that one to show the wife when she complains about my craziness.

I found a better interview which answers more questions and provides some quite startling insights, so much so that I reckon this woman's blood needs bottling and cloning to be transfused into every other man's wife. Train bit starts at 1:08 to 4:05, but listen at 2:28 about the kitchen and later about the pool. The cries of envy from MRR's should echo round the world.

http://www.smh.com.au/lifestyle/hom...rianne-and-john-kennerley-20131021-2vwim.html
 
I think that overlapping the street material in those areas will work well

How about making the street sections to include the bits right up to the tracks, sort of like, tabs, so there's no break in the road surface.


Back
Top