Weathering Rolling Stock, a Continous thread

ModelRailroadForums.com is a free Model Railroad Discussion Forum and photo gallery. We cover all scales and sizes of model railroads. Online since 2002, it's one of the oldest and largest model railroad forums on the web. Whether you're a master model railroader or just getting started, you'll find something of interest here.


Status
Not open for further replies.
I used craft enamel paint (gray) thinned with water to fade this Conrail car. Maybe a green or white thinned to give you a faded look.
IMG_4125.jpg
IMG_4391.jpg
 
I love seeing the transformation you achieve with your weathering.
Thanks Chris, I appreciate the comment. It doesn’t take much before you have a change. That’s why less is more, easier to add but tough to take off once applied. It’s also the matching that is giving me fits on this guy. I have done greens before but much darker green then this 2 bay hopper.
 
Last edited:
I used craft enamel paint (gray) thinned with water to fade this Conrail car. Maybe a green or white thinned to give you a faded look.View attachment 151052View attachment 151053
Tom, That looks super. Thanks for showing it and the spray suggestion.

I mixed 80% IPA with 20% Tamiya x-2 white and sprayed it. I will post pictures later. Generally the x-21 flat base does the fade for me but this green is stubborn. After 2 applications of the flat base I had to spray it. I still want a good green showing but definitely on the lighter side.


This is an old beater craigslist pickup so I'm not too concerned about it one way or another. I sprayed it with Model Master flat clear lacquer first, then used chalks for the rust and a bit of coal dust. Not as easy as y'all make it look but I'm pretty pleased for my first attempt. Constructive feedback welcomed!

The observant will notice that in fact the "before" picture is the unweathered side of the car, but my actual before pictures turned out poorly so this will have to do ;)

hopper_before.jpg

hopper_after.jpg
 
Last edited:
Vince-RA welcome aboard to the continous thread. Sorry, I stayed away as I was working on other thing. We have all been there on first attempts and I deleted the pictures of my 1st attempts. You shared yours, kudos to you!

Glad you used a flat clear to give some grip for the chalks. I missed that my 1st time. But chalks and Pan Pastels are very forgiving.

I find the camera to be very helpful as I weather, paint or build a structure. That lens seems to catch the stuff my eye misses.

IMO, It looks good overall. Maybe a bit thinner rust lines across the ribs and rivets. But I have never found a great way other then taking that brush and stroke it as steady as possible. The chalks I have had issues with. I could not get them applied in a straight line and they were tough to hi-lite with. Try a thinner brush with the chalks as that has helped me using Pan Pastels. Over all though the fade looks good and the rust color looks good.There are also some good effects on the discharge chutes. The biggest thing is you have started weathering with now the first time behind you.

I am still learning this! Find a way to steady your brush. Often I will prop up on a sandbag my right hand to steady it. Not really the hand but near the wrist. Maybe I can have the wife take a picture. If the brush is already steady it may not be needed for you.

Keep going and remember if you don’t like it, start again. If you like/love it, that is all that matters.

enjoy the day
 
Thanks for the kind words, and the advice! I have another side of this one and a few other old wrecks of cars I will keep practicing on. A smaller brush is definitely a good idea.
Best way to work is on the older stuff. I had 4 Athearn Blue Box 40’ Baby Hi Cubes from the 70’s and I practiced on those. 2 of them were in the background of a car I was trying to sell. Guy on FB asked if I would sell them and I sent him more pictures. These were my practice cars and he made an offer I couldn’t refuse. I still practice on the baby hicubes I have remaining. You never know.

you are heading in the right direction! Have fun


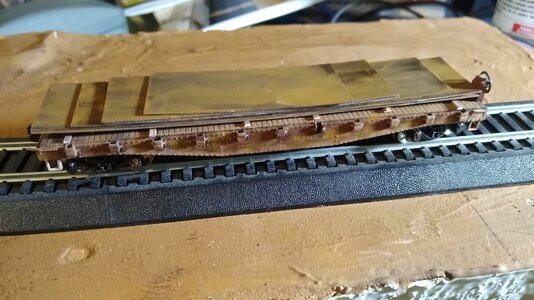
First attempt at weathering with some pan pastels. Still need to finish it up so open to recommendations. Need to add another set of dunnage between the different lengths of steel. Also some strapping is in the mail hopefully gets here next week.
 

Attachments

  • IMG_20220908_160810175.jpg
    IMG_20220908_160810175.jpg
    376.5 KB · Views: 200
First attempt at weathering with some pan pastels. Still need to finish it up so open to recommendations. Need to add another set of dunnage between the different lengths of steel. Also some strapping is in the mail hopefully gets here next week.
Bigfoot13 welcome to the Continous thread…

First! I like the weathering on the flat car. I don‘t know if you used a prototype picture of a flat, but that looks very good and real. Good color and varied coverage. Less is more is difficult to achieve as we start out but IMO you nailed it. A bit more rust coverage needed on the left still showing white stirup. Did you use a sponge to apply the Pan Pastels? For the stirup I would suggest a brush, especially if you just want a light coating?

Looking at the flat sheet load… the coloring is right. No one can say if the pattern of rust on the sheets is right or wrong. I have seen sheet in yards or on flat cars that are all over the map. The patterns of rust maybe from moisture on the sheets and possible air movement of the moisture on the sheet during car movement. Streaks of rust and a few inches over still the sheet color from the plant. The edging could use a bit of color, just eliminate the clean edge. Those of what I have seen are usually more rusted then the flat of the sheets. It depends on how long since the sheet came off the production line, but there always seems to be some rusting.

I have used Pan Pastels (PP) on styrene made to look like sheet steel. I have applied with the foam sponge 🧽 a light coating of umber. Then when I like it, sprayed it back then with Testor DullCote in the can. (For the last month and a half I am using VMS’s matte varnish). I then took multi colors of PP and stippled it on with a brush. Overlapping each stippling mark as I saw fit. Sprayed again with Testors DullCote. I apply the stipple of PP or a sponge with enough pressure I have not had a drastic loss of color or the PP themselves when a clear cote has been added. When I have lightly stippled and sprayed clear, yes I have lost the color and effect! Experiment…your results are going to vary
2B9E22CC-6650-4567-96E4-81D21AB7D51A.jpeg


Wheelsets and trucks. After both have been cleaned to remove mold release compound or oils I have used PP for both to IMO mixed results. The trucks I have done was 2 fold after cleaning. Any dark brown PP heavily rubbed on and then a charcoal PP color lightly stippled and done with a brush. Wheel faces, I prefer Arcylic paints but did try it with a PP. I was told after posting they looked uneven and chunky. They did
The picture is Arcylic paint no PP

AAD53BC4-43EB-4E9B-B03D-F6D54A514949.jpeg


Strapping! What do you have coming? I use chartex tape
01C3E247-BCCE-4825-82B4-FC98025E428D.jpeg


Dunnage! New, old or why did they use that? I have seen any of it on flat cars both in person or more often the last 3 years online. I generally use 4’ as my spacing unless I found the requirements online. Or guesstimate if you know the length product being supported. I think you have plenty in the picture.

A good 1st start and hopefully others will check in and offer constructive criticism and suggestions.

Just remember, Pan Pastels are very forgiving and can literally be wiped off with a paper towel or even a soft eraser. But before adding a clear coat. Or if stubborn use a qtip/cotton swab with a touch of 70% isopropyl alcohol.

Have fun
 
Thanks @TLOC. No pictures other then my memory bank ask a kid being around a little bit of steel. Also a quick search that didn't give any results that I liked
Yeah I hadn't gotten to the trucks or wheels yet.

For the steel I used a styrene "for sale sign" and cut the sheets 8' x 40' or less. The signs are about 0.01" and 0.015". On some hand painted with some acrylic blackish sludge I had laying around and then applied PP with a sponge. The other I did a gray primer followed by black washes of Tamiya flat black and then PP. I've dull coated some with a Krylon rattle can but didn't like the final finish so dusted with a little more PP. Oh yeah the car had a very thin wash of the black before the PP.
 
Chart tape looks good for strapping but it's very difficult to secure in place. Yeah, the sticky side sticks for a while but after a few weeks its comes loose. I've tried glue but that doesn't stick because of the gummy glue on it.

 
Thanks @TLOC. No pictures other then my memory bank ask a kid being around a little bit of steel. Also a quick search that didn't give any results that I liked
Yeah I hadn't gotten to the trucks or wheels yet.

For the steel I used a styrene "for sale sign" and cut the sheets 8' x 40' or less. The signs are about 0.01" and 0.015". On some hand painted with some acrylic blackish sludge I had laying around and then applied PP with a sponge. The other I did a gray primer followed by black washes of Tamiya flat black and then PP. I've dull coated some with a Krylon rattle can but didn't like the final finish so dusted with a little more PP. Oh yeah the car had a very thin wash of the black before the PP.
Bigfoot13

remember it’s what you think looks right to you. Good choice on materials. Experiment with the process until you find a method that works for you and then continue to use it. I still am working on that. Keep posting your work

Tom
 
Chart tape looks good for strapping but it's very difficult to secure in place. Yeah, the sticky side sticks for a while but after a few weeks its comes loose. I've tried glue but that doesn't stick because of the gummy glue on it.
Ken, you are right about Chart tape. I have found a drop of Alene’s sticky glue, spread out with a tooth pick, on the backside of a load, wait about 30 seconds and then wrap. like the ties I showed above the tape does hold so far for me.

Thanks for the comment
 
Good morning. No, the 2 bay hoppers are not done and there are no other projects being done at the weathering bench. James was in no hurry and with the passing of his younger sister I stopped posting.

The 9 cars all are faded, the first 3 are almost ready for some publicity but not yet.

Between the weathering sessions I have been entertaining the wife and the now visiting sister. I also have been working on my layout. The September auto trip East is off even though we might still overnight to Grand Rapids, Mi. to visit the Gerald Ford Presidential Museum. All depends on my sister’s medical visits!

enjoy the day


We are in Grand Haven Michigan on the shore of the same named lake. Man this is nice. Tomorrow Grand Rapids to the President Ford Museum. So some trains in Wyoming, Michigan but we were going one way and the trains the other.

Terry has been driving which is why we took the SUV instead of my VW. Room for me in the backseat. Man, can my sister and wife talk…

A933F381-244D-4DD8-A415-CAB9B6EFA2A5.jpeg
 
Status
Not open for further replies.


Affiliate Disclosure: We may receive a commision from some of the links and ads shown on this website (Learn More Here)

Back
Top
