ModelRailroadForums.com is a free
Model Railroad Discussion Forum and
photo gallery. We cover all scales and sizes of model railroads. Online since 2002, it's one of the oldest and largest model railroad forums on the web. Whether you're a master model railroader or just getting started, you'll find something of interest here.
Now that I got myself in a predicament here with video taping the D&J Railroad empire, I can see that the interior of the tunnels take a significant departure from the scenery that I am developing.
The first thing that came to mind was to use the Woodland Scenics tunnel mold. I tried that and it would be great for a short tunnel just a few feet long, but in this case, I need to have access to the tracks for maintenance or to rescue derailed trains, if that should ever occur. What I have in mind to do is to build the tunnel walls with black card stock. I can get sheets of it at the local Hobby Lobby for about .29 cents each. I suppose the roof could be the same material and just lay on top of the side walls of the tunnel so it can be lifted for access to the tracks. I will add some edging to the roof plates that will hand down to cut off light from entering the tunnel for the benefit of video.
Anybody else worked through this kind of issue?
Gomez Addams
Staff member
A section of black ABS pipe would serve nicely as a tunnel bore. At least as long as the tunnel is straight.
The tunnels on this layout aren't straight. One of them is a large radii curve from portal to portal. The other one has two curves in it with an 8' straight section to it.
Well-Known Member
Staff member
Yeah, I do that on a professional level too. The videos that I post have a lot of footage that is never seen. It's called "the cutting room floor".
Here's a 20-year old shot of how I handled most of my tunnels during construction:

I made Woodland Scenics plaster molds of the interiors for one or two courses and then left the rest of the interior open for access. This means that for most casual viewing, there's an interior visible just inside the portal, but for serious derailments and such, you can still reach most of the track. The plaster also helps the sound-equipped locos echo as they enter the tunnel. I'm not a big fan of the smoke effects we see with current-generation models (not quite as good as John Allen hiding behind his layout and puffing cigarette smoke behind the loco, in my opinion) . In a few cases, I've added more crude cardboard covers and side baffles to the roadbed farther inside the tunnels, but my approach to video would be to do what railfan cameramen have done on the prototype -- when you enter the Moffat, Cascade, Siskyou, etc tunnels, you turn off the camera, and in editing you have just a brief fade to black.
Ken I'm just taking down a friend's layout who passed away and he lined his tunnels with black flex pipe, the kind you use for weeping tile.
He slit it down the centre, placed it over the track, and wired it in place.
I don't have a picture of it but if you need one another friend has.
It would have to be easily removable in the event a train has to be rescued. I considered using the flex tubing for water channeling and it's pretty hard stuff. I would think if I were trying to pull that off in order to get a derailed train and lost control of the flex tubing, it could do some serious damage to the rolling stock.
Thoughts besides, be careful?
Well-Known Member
Staff member
If you're intending to be prototypical for the insides, then sectional pieces, scenicked to suit, that can lift of, or probably better, having the back wall and roof fixed in place, with a removable side in sections. Whatever was done in that regard would need some method of disguising the joints (with laps?). Handles could be attached to each for easier manouvering.
I'll have to pick up some black card stock tomorrow and work on it then I'll post some pictures of what I think might work well and easily.
I saw an article about how to do this within the last 6 months. It was either Model Railroader or Model Railroader Hobbyist (free online). The fellow made took aluminum foil and pre-crumpled it and then made a form (I don't remember the details) and cast the crumpled aluminum foil in plaster (the outside of the foil). He then had the tunnel entrances back to sufficient distance in plaster. He painted them black and they looked great. If I can find it, I'll post a link.
I used an old black t-shirt to keep mine dark. You could use the tunnel mold till it's dark enough to make the switch.
Let the access side just hang down so you can lift it.
Thinking about it. The outside of curves where the video shows would be the only side needing attention.
Sorce
Black felt cloth being flexable it can be cut and glued so it give yhe cave like look
I'm a complete novice at this but have you considered black foam pipe insulation?
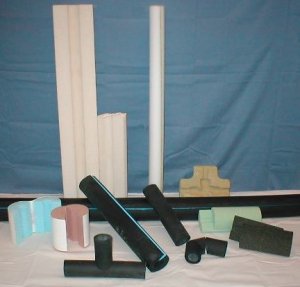
I found a place in PA that has it up to 22" id. I'm sure you could find it locally. Could cut it in half and slice the sides for curves then glue the cuts.
I've never tried it but seems feasible.
I will be watching to see what you come up with now that I have actually built my mountain. I wasn't going to worry about any tunnel interior, but now that it is built, seeing right into the void behind the wall is starting to bother me.
Check the most recent posts in my thread that is in my signature. I posted a video of a trip tbrough the tunnels.
Yeah, I do that on a professional level too. The videos that I post have a lot of footage that is never seen. It's called "the cutting room floor".
If it were me I would just do the beginning and the end of each tunnel and edit out the rest. On the other hand if it were me I would never have had the ambition to build such a grand railroad.
Another thing to consider is; when you have visitors do they watch live feeds from trains?
I like what you have done with your improvements so far. I don't like to see you have to do so much more extra work, but I believe it is a labor of love so that is good thing I suppose.
I am confident in that what ever you decide it will be great.
Once again thanks for sharing all of your work, it's fun to live vicariously through all this.
That's kind of why I put up all the drywall first, rounded the corners and painted it all sky blue before I started the benchwork. This is my life's dream of a model railroad.
Sorry for resurrecting this one but .... no one mentioned plaster molding the whole tunnel then with a dremel or similar cutting the side out and adding felt to cover the holes on your access side. This gives you a solid wall and roof all through and if you leave 1"or more of plaster this gives you side support while the felt on that side gives you access. Simply attach the felt above the cut hole and overlap the edges. Our layout as a child had dowel rods sewn into the base of the felt to give some weight to keep the passing train from moving the felt. If you cut several access points into a curved tunnel you can reach the derail with a few prices of felt flipped over the top of your molded plaster.
On a side note these can be installed after a layout is "finished" if there's such a thing
That's quite a bit of work for something that is mostly in the dark. I'm using black card stock for the tunnel walls and ceiling now. The ceiling can be lifted off from inside the mountain to recover derailed trains. Both tunnels are close to 20' long.

Affiliate Disclosure: We may receive a commision from some of the links and ads shown on this website
(Learn More Here)



