The new layout 2023

ModelRailroadForums.com is a free Model Railroad Discussion Forum and photo gallery. We cover all scales and sizes of model railroads. Online since 2002, it's one of the oldest and largest model railroad forums on the web. Whether you're a master model railroader or just getting started, you'll find something of interest here.


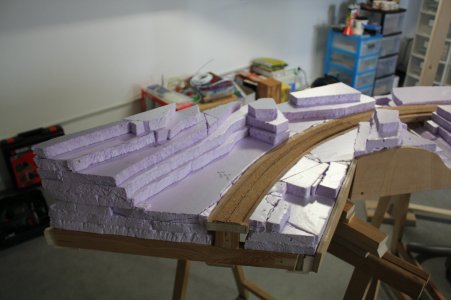
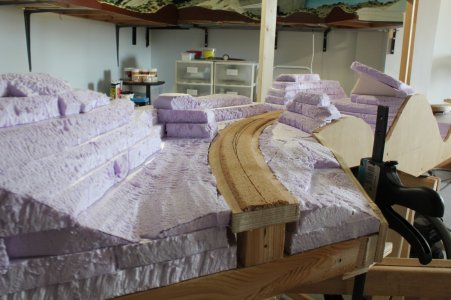
Frustrating setback. Gotta start over. New stuff won’t arrive until the weekend.

First, putting the plaster cloth on the foam was a mistake. That’s what they tell you to do. Why did I listen?

Second, glueing the cork to the plaster cloth worked, but painting the cork was a huge mistake. It caused the plaster cloth to lift off of the foam. Although I was careful with the contact cement, some did make its way to the foam and “melted” it.

So I ordered new risers and foam roadbed and their special glue.

Live and learn…the hard way…the way that costs money…☹️
IMG_9798.jpeg
 
Frustrating setback. Gotta start over. New stuff won’t arrive until the weekend.

First, putting the plaster cloth on the foam was a mistake. That’s what they tell you to do. Why did I listen?

Second, glueing the cork to the plaster cloth worked, but painting the cork was a huge mistake. It caused the plaster cloth to lift off of the foam. Although I was careful with the contact cement, some did make its way to the foam and “melted” it.

So I ordered new risers and foam roadbed and their special glue.

Live and learn…the hard way…the way that costs money…☹️View attachment 235178
That sucks but at least it happened now instead of when you were much farther along like with scenery and stuff put down.
 
Hi rgeiter.
I feel bad for you and I imagine your frustration. I hope this will help.

Personally I never used plaster cloth, so I can't comment, but why covering the foam with plaster cloth ? Just pile and glue foam to get
roughly the shape of the landscape you want, then use a wood rasp to refine that shape. Where you want rocks cover the foam with more or less
SLOW setting plaster, the batch should be mixed so that the plaster adheres even to vertical forms, use a small spatula.

Depending on the batch, room temperature and air moisture the plaster should be carvable after 8 to 9 hours, to be tested as it sets. Too wet
it'll be like hard mud, too dry impossible to carve.

For the rasped foam terrain, just spread with an old paintbrush ordinary white carpenter glue, then cover with different sizes of screened sand
and stones. Finish with the "classic" method of gluing like you would do for ballast.
Is there any reason to paint the cork ? I never did that, the ballast hides it.

I use the same carpenter glue to install the cork on the subroadbed, I hold it while the glue sets with thumbtacks. I also sand carefully the
cork "shoulders". I don't glue the track, I again use thumbtacks to hold it in place. After the glued ballast has set, it sure won't move.


284 and 312 : Same area before and during the raspind step.
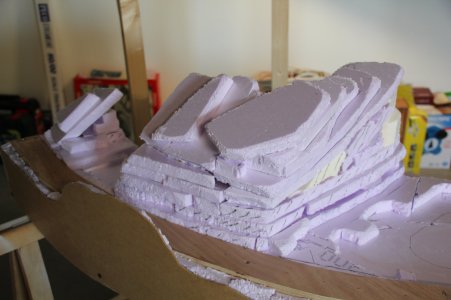
491 : Foam waiting for plaster to be carved.
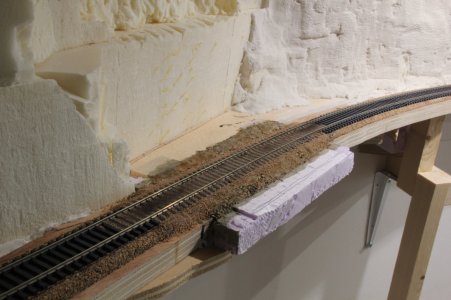
664 : Track hold by the ballast. The reason here is that I, later on, installed a rock shed. The track had to be ballasted and weathered before
proceeding.
 

Attachments

  • IMG (284).JPG
    IMG (284).JPG
    277 KB · Views: 109
  • IMG (312).JPG
    IMG (312).JPG
    352.3 KB · Views: 121
  • IMG (491).JPG
    IMG (491).JPG
    257.6 KB · Views: 119
  • IMG_(664).JPG
    IMG_(664).JPG
    356.1 KB · Views: 119


Hi rgeiter.
I feel bad for you and I imagine your frustration. I hope this will help.

Personally I never used plaster cloth, so I can't comment, but why covering the foam with plaster cloth ? Just pile and glue foam to get
roughly the shape of the landscape you want, then use a wood rasp to refine that shape. Where you want rocks cover the foam with more or less
SLOW setting plaster, the batch should be mixed so that the plaster adheres even to vertical forms, use a small spatula.

Depending on the batch, room temperature and air moisture the plaster should be carvable after 8 to 9 hours, to be tested as it sets. Too wet
it'll be like hard mud, too dry impossible to carve.

For the rasped foam terrain, just spread with an old paintbrush ordinary white carpenter glue, then cover with different sizes of screened sand
and stones. Finish with the "classic" method of gluing like you would do for ballast.
Is there any reason to paint the cork ? I never did that, the ballast hides it.

I use the same carpenter glue to install the cork on the subroadbed, I hold it while the glue sets with thumbtacks. I also sand carefully the
cork "shoulders". I don't glue the track, I again use thumbtacks to hold it in place. After the glued ballast has set, it sure won't move.


284 and 312 : Same area before and during the raspind step.
491 : Foam waiting for plaster to be carved.
664 : Track hold by the ballast. The reason here is that I, later on, installed a rock shed. The track had to be ballasted and weathered before
proceeding.
I read AND was told that this needed to be done for a “smooth” surface. Well, it looked nice but did not leave a smooth surface. Lesson learned. Go with your gut. Clean up will take a while but I’m confident I’ll be successful with the second attempt.
 
Good question rgeiter !
IMG_9802.jpeg

I did get the mess cleaned up. Had to use a heat gun to get the construction adhesive to soften so I could scrape it off of the plywood. Only took 2 1/2 hours last night, only! Waiting for the woodland scenics risers to arrive then we’ll be back in action!


View attachment 235325
I did get the mess cleaned up. Had to use a heat gun to get the construction adhesive to soften so I could scrape it off of the plywood. Only took 2 1/2 hours last night, only! Waiting for the woodland scenics risers to arrive then we’ll be back in action!
Yeah ! Construction of a layout is a long and wonderful journey with thousands of traps and thousands of problems to be solved.
But we love it !
 
All mainline track work is done. Going to power the mainline up later today and see what happens. I’m going to divide the main into two power districts. If that works then I’ll start the wiring. Won’t bore you guys with that though. Hopefully I’ll have a cab ride video to post later today.

Over 500 feet of track laid! Whew!😥

IMG_9824.jpeg
 
All mainline track work is done. Going to power the mainline up later today and see what happens. I’m going to divide the main into two power districts. If that works then I’ll start the wiring. Won’t bore you guys with that though. Hopefully I’ll have a cab ride video to post later today.

Over 500 feet of track laid! Whew!😥

View attachment 235892
Yeah I know what you mean. I laid more than 500 feet and I didn't take in count the length of double track or triple track portions.
 
Wow ! Impressive !
When I see your equipment I realize how poor my knowledge is concerning DCC.
After an extremely long hesitation I decided to stick with DC and using Blunami decoders.
I don't think I would have the willpower
( and the money ) to install such an equipment. Congratulation, I am impressed.
 
Wow ! Impressive !
When I see your equipment I realize how poor my knowledge is concerning DCC.
After an extremely long hesitation I decided to stick with DC and using Blunami decoders.
I don't think I would have the willpower
( and the money ) to install such an equipment. Congratulation, I am impressed.
Yes, but... you don't need that much equipment to run a small layout...
 
Yes, but... you don't need that much equipment to run a small layout...
You,re right, but mine is quite big, with 2 levels and about 550 feet of tracks including a helix and return loops. I decided to limit the expense. It's for sure easier to do when you come from a DC world.
 
You,re right, but mine is quite big, with 2 levels and about 550 feet of tracks including a helix and return loops. I decided to limit the expense. It's for sure easier to do when you come from a DC world.
I’m about at 525 feet. I split the layout in two, one booster for each section. I will use a third booster for the yard. The extra boosters will fill in as auto reverse boosters when I get there. When I see a digitrax booster come up on eBay, that works, and is under 100 dollars I try to get it. I like these older boosters and they have been really reliable.

Last night I won an eBay auction for a Digitrax DT400R (used) for about $52. Not bad! I always like to have extra throttles and boosters.


Should have a video out this weekend. I will also film a cab ride and post a link here.

I’ve been doing a lot of wiring these last couple of days. I was once told that I had to drop feeders every 3 feet. I saw this as ridiculous. So I asked my AI apprentice and this is the response. That’s more like it!
IMG_9869.jpeg


Affiliate Disclosure: We may receive a commision from some of the links and ads shown on this website (Learn More Here)

Back
Top