The new layout 2023

ModelRailroadForums.com is a free Model Railroad Discussion Forum and photo gallery. We cover all scales and sizes of model railroads. Online since 2002, it's one of the oldest and largest model railroad forums on the web. Whether you're a master model railroader or just getting started, you'll find something of interest here.


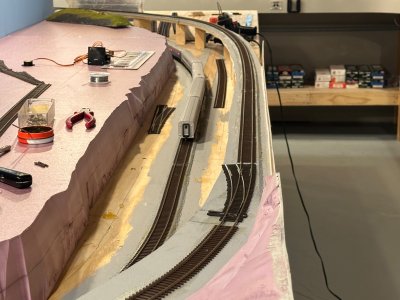
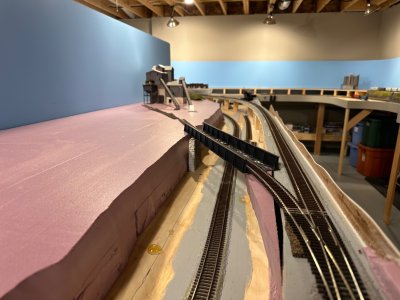
Soooooooo… was not a good night tonight. Had a lot of movement in/on the layout. Fixed about 12 kinks. One really bad one, three separate areas had to be cut and the rest were nailed back into place. Kinda wished I didn’t glue the tracks down. It’s a bugger to clean the adhesive under the track to get the track flat again. But I got it to where I’m content. And before you ask, the humidifier is working keeping the house and basement at 50% humidity.

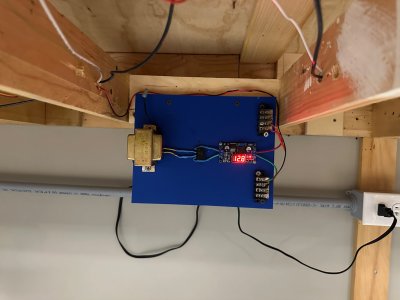
The next thing I learned tonight was how miserable it is to mount the Walthers switch machines under the layout. I only did two. It was a success but it was miserable. Connected my new touch toggles. I really like them a lot. (pics below)

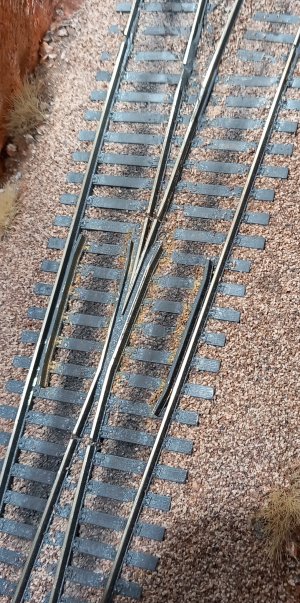
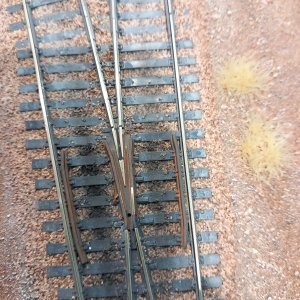
Now something else I did that I wished I didn’t do was spend a lot of money on the new Walthers switches/ turnouts. Yeah, the long continuous point rail look great, but they can bend really easy. I only got the #6’s and had to only “fix” one. I can’t imagine what a #8 or #10 would do. Also, the frogs are really rough. I’m going back to Peco and my ol’ go to, Atlas.

So that was my night. No derailments so I have that!😑View attachment 248578View attachment 248579View attachment 248580
Hi rgeiter !
Concerning kinks, I remember the point was discussed previously in your thread. Gluing or not gluing track to the cork layer ?
I chose to just hold it in place with thumbtacks, apply ballast, then glue the said ballast. This plus soldering joiners every two track lengths to
allow for expansion worked out well, no kinks.
BUT while building the helix and laying track I did make the mistake. In order to get the maximum clearance between laps I laid the track
directly on the wooden subroadbed, without ballast. For the same reason I used 12mm thick plywood instead of the 18mm used elsewhere on the layout.
I also made the subroadbed 8cm wide instead of the 6cm I normally use to get a bit more side clearance with due respect to the sharper
curvature, 84cm (33").
To hold the track I did put a couple tiny drops of CA glue every 2 or 3 feet. Bad idea, a few weeks later I noticed kinks appearing here and
there !
I used a fine blade and freed the track where it was glued, no more issues. Tiny pieces of fine double sided tape every 4 or 5 feet are
enough to avoid side moves, the tape is more forgiving and I didn't notice any kinks. I used the tape for the hidden retun loops and the lower
helix access.

Concerning turnouts I like Peco code 83, n°6, 8 and 7 curved. Since they are, in the visible portion, all accessible from the aisle, I just use
"finger nail activation" as I go with the train. At scale speed I have plenty of time to align or realign them.
I also have no big hidden staging yards, I activate manually, from the aisle, the two hidden turnouts for the lower loops with rods punching through the fascia.
Concerning the single upper loop, turnouts are installed in the visible part, one of them, partially hidden, at the entrance of a snowshed, but
accessible.
 
Soooooooo… was not a good night tonight. Had a lot of movement in/on the layout. Fixed about 12 kinks. One really bad one, three separate areas had to be cut and the rest were nailed back into place. Kinda wished I didn’t glue the tracks down. It’s a bugger to clean the adhesive under the track to get the track flat again. But I got it to where I’m content. And before you ask, the humidifier is working keeping the house and basement at 50% humidity.

The next thing I learned tonight was how miserable it is to mount the Walthers switch machines under the layout. I only did two. It was a success but it was miserable. Connected my new touch toggles. I really like them a lot. (pics below)

Now something else I did that I wished I didn’t do was spend a lot of money on the new Walthers switches/ turnouts. Yeah, the long continuous point rail look great, but they can bend really easy. I only got the #6’s and had to only “fix” one. I can’t imagine what a #8 or #10 would do. Also, the frogs are really rough. I’m going back to Peco and my ol’ go to, Atlas.

So that was my night. No derailments so I have that!😑View attachment 248578View attachment 248579View attachment 248580
Funny, my switches are also Peco (curved ones), although i still don't like the idea of electrofrogs (completely useless feature in my opinion). All others are good old Atlas, for reliability. I've had Shinohara switches, but i don't understand the oohs and aahs from some modelers about them, absolutely horrible design when it comes down to electric connectivity. Got rid of the Shinoharas as soon as i could. Haven't tried the Walthers, but will not need to since all my track is now in place.
 
Funny, my switches are also Peco (curved ones), although i still don't like the idea of electrofrogs (completely useless feature in my opinion). All others are good old Atlas, for reliability. I've had Shinohara switches, but i don't understand the oohs and aahs from some modelers about them, absolutely horrible design when it comes down to electric connectivity. Got rid of the Shinoharas as soon as i could. Haven't tried the Walthers, but will not need to since all my track is now in place.
I don't know if it's still the case, but if I remember well, years ago, Walthers and Shinoharas turnouts were the exact same products. That is
Shinohara built for Walthers.
I used Peco 83 electrofrog on the layout just because I prefered their appearance compared to insulofrog, no other reasons.
I modify them by soldering feeders on both sides from the point rail to the stock rail, then down through the roadbed.
I cut two new gaps behind the frog so I can use soldered metal joiners which are more reliable than plastic joiners.
The all frog portion isn't powered, I never had issues with 4 or 6 axles diesel locos, and now I install current keepers anyway. (Photo 1849).

While building the last part of the layout, n°6 unifrogs appeared, so I installed some with metal joiners and without any modifications, beside
my soldered feeders method.
Concerning their look I don't really like the visible cut in the frog tip, nor the ready hole for an eventual frog wiring, (Photo 1848). I plan to fill
these holes anyway. On the other hand the continuous point rails are a plus.
 

Attachments

  • IMG_(1849).jpg
    IMG_(1849).jpg
    750.4 KB · Views: 73
  • IMG_(1848).jpg
    IMG_(1848).jpg
    872.8 KB · Views: 71


Electrofrogs don't work well if you depend on the points to switch the connection to the frog. Many people do that, but I realized the weakness and paralleled them with the switch on the points motor
 
Electrofrogs don't work well if you depend on the points to switch the connection to the frog. Many people do that, but I realized the weakness and paralleled them with the switch on the points motor
I understand. I face no issues because I don't power the frog and I connect the point rail and the stock rail with the feeder. Personnal choice
since I don't use turnout motors.
 
Funny, my switches are also Peco (curved ones), although i still don't like the idea of electrofrogs (completely useless feature in my opinion). All others are good old Atlas, for reliability. I've had Shinohara switches, but i don't understand the oohs and aahs from some modelers about them, absolutely horrible design when it comes down to electric connectivity. Got rid of the Shinoharas as soon as i could. Haven't tried the Walthers, but will not need to since all my track is now in place.
I bought in to the “great and mighty” Shinohara myth back in the 90’s. They look nice, but as you stated, horrible electrical pick up design. Walthers improved on the pick up side, but those point rails concern me.
 
Last edited:
I understand. I face no issues because I don't power the frog and I connect the point rail and the stock rail with the feeder. Personnal choice
since I don't use turnout motors.
That is a flaw in the Shinohara type, that the point rails are connected together electrically. It's a whole different problem than powering the frog although the two are related.

Having said that, I had nothing but Shinohara turnouts on my first layout, and never had any issues with them. Again, if you expect the bare turnouts to do all the electrical switching, it is not the turnout's fault if they become intermittent. It is your wiring.

Insulfrogs can cause problems too, for the obvious reason that they don't conduct to the wheels that are over them.

The most reliable system, is point rails that are independently wired to the curved and straight stock rails, a powered frog that is switched at the same time as the points, via contacts on the switch machine, or otherwise controlled to the same effect. There is absolutely nothing that can go wrong there, and you always have 100% continuity to the wheels. Some turnouts might now be named, "electrofrog" that don't fully implement all of that...

Manual turnouts can work with that system... just need a slide switch mechanism. It's just one aspect of a larger system, there are many choices you have to make and whatever works for you, works.
 
Last edited:
Got a lot of little stuff done over Thanksgiving vacation. It’s back to work tomorrow. 😏

Finally cut in all my utility panels. Had an issue with a UP1. I think it was just tired. When I hooked up the power status leads, a few engines took off. Replaced it with a UP5 and all is well. Strange. Going to look in to that.

Installed another Walthers switch machine. Unfortunately I had to mount it 180 degrees because it’s right up against another machine. This causes a problem with the touch toggle. The way the toggles are made I cannot reverse the polarity and change the color. So this particular turnout will show red when it’s in the normal position and green in reverse. Going to call the them tomorrow and discuss my issue.

Permanently installed my accessory DC power supply. Got two 500 foot rolls of 14awg stranded wire to run. Probably will only need a little over 100 foot, but $78 for 500 feet wasn’t to hateful. I’m sure I’ll find a use for it somewhere.

Cut in another switch off of the main for the gravel company. I really didn’t give this area much thought and it has come back to bite me. Unfortunately it’s going to have short tracks. But I think I’ll be content… maybe. I glued two of the 3D printed bridges together and temporarily installed them and set some track and switches in place. Gonna play around with this a little until I’m satisfied with it.

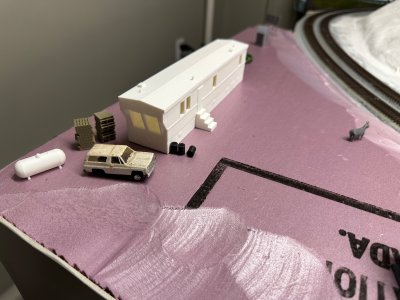
Found an old broken Chevy Blazer. Added it to Hee-Haw.

Check out my short video of running two trains. Took a while to adjust the speed of the two trains but all worked out well.


Attachments

  • IMG_0383.jpeg
    IMG_0383.jpeg
    768.9 KB · Views: 66
  • IMG_0399.jpeg
    IMG_0399.jpeg
    838.3 KB · Views: 62
  • IMG_0391.jpeg
    IMG_0391.jpeg
    739.7 KB · Views: 64
  • IMG_0400.jpeg
    IMG_0400.jpeg
    508.4 KB · Views: 67


Got a lot of little stuff done over Thanksgiving vacation. It’s back to work tomorrow. 😏

Finally cut in all my utility panels. Had an issue with a UP1. I think it was just tired. When I hooked up the power status leads, a few engines took off. Replaced it with a UP5 and all is well. Strange. Going to look in to that.

Installed another Walthers switch machine. Unfortunately I had to mount it 180 degrees because it’s right up against another machine. This causes a problem with the touch toggle. The way the toggles are made I cannot reverse the polarity and change the color. So this particular turnout will show red when it’s in the normal position and green in reverse. Going to call the them tomorrow and discuss my issue.

Permanently installed my accessory DC power supply. Got two 500 foot rolls of 14awg stranded wire to run. Probably will only need a little over 100 foot, but $78 for 500 feet wasn’t to hateful. I’m sure I’ll find a use for it somewhere.

Cut in another switch off of the main for the gravel company. I really didn’t give this area much thought and it has come back to bite me. Unfortunately it’s going to have short tracks. But I think I’ll be content… maybe. I glued two of the 3D printed bridges together and temporarily installed them and set some track and switches in place. Gonna play around with this a little until I’m satisfied with it.

Found an old broken Chevy Blazer. Added it to Hee-Haw.

Check out my short video of running two trains. Took a while to adjust the speed of the two trains but all worked out well.

Hello rgeiter.
Thank's for the photos and the video.
Seing the trains running well, proves that the trackage is very well laid and reliable. I know it is a very personal choice, but I find them running quite fast, or is the video somewhat accelerated ?
 
Nope not running fast.
Since I model HO mountain railroading, I am used to very slow scale speed, trying to match the real thing, the reason of my question. But you model the prairies if I remember well.
I even like to exagerate slightly in order to compensate for the usually too short model mainlines.
On the layout the visible mainline is 239 ft long, which is a 31 minutes run, going up or downgrade, I love it.
It takes 48 minutes to negociate the 359 ft continuous route via the helix.
 
Got a lot of little stuff done over Thanksgiving vacation. It’s back to work tomorrow. 😏

Finally cut in all my utility panels. Had an issue with a UP1. I think it was just tired. When I hooked up the power status leads, a few engines took off. Replaced it with a UP5 and all is well. Strange. Going to look in to that.

Installed another Walthers switch machine. Unfortunately I had to mount it 180 degrees because it’s right up against another machine. This causes a problem with the touch toggle. The way the toggles are made I cannot reverse the polarity and change the color. So this particular turnout will show red when it’s in the normal position and green in reverse. Going to call the them tomorrow and discuss my issue.

Permanently installed my accessory DC power supply. Got two 500 foot rolls of 14awg stranded wire to run. Probably will only need a little over 100 foot, but $78 for 500 feet wasn’t to hateful. I’m sure I’ll find a use for it somewhere.

Cut in another switch off of the main for the gravel company. I really didn’t give this area much thought and it has come back to bite me. Unfortunately it’s going to have short tracks. But I think I’ll be content… maybe. I glued two of the 3D printed bridges together and temporarily installed them and set some track and switches in place. Gonna play around with this a little until I’m satisfied with it.

Found an old broken Chevy Blazer. Added it to Hee-Haw.

Check out my short video of running two trains. Took a while to adjust the speed of the two trains but all worked out well.

Awesome run!
 
Nice to hear from Nova Scotia !
Back in early october 2024 I made a road trip following the coasts from Montréal to Gaspé then down through New Brunswick and around Nova Scotia with one of the stops in Halifax, great memories and amazing landscapes.
Hey I just did about the same thing this summer including PEI and Cape Breton.
Even got to tour Oak Island.
 
Nice to hear from Nova Scotia !
Back in early october 2024 I made a road trip following the coasts from Montréal to Gaspé then down through New Brunswick and around Nova Scotia with one of the stops in Halifax, great memories and amazing landscapes.
Sorry I missed you, you could have dropped by for a coffee or refreshment.


Since I model HO mountain railroading, I am used to very slow scale speed, trying to match the real thing, the reason of my question. But you model the prairies if I remember well.
I even like to exagerate slightly in order to compensate for the usually too short model mainlines.
On the layout the visible mainline is 239 ft long, which is a 31 minutes run, going up or downgrade, I love it.
It takes 48 minutes to negociate the 359 ft continuous route via the helix.
I model Central Pennsylvania. In some areas, the track speed is 50 mph for freight, 60 mph for passenger.


Affiliate Disclosure: We may receive a commision from some of the links and ads shown on this website (Learn More Here)

Back
Top