Starting a grade: Will this work?

ModelRailroadForums.com is a free Model Railroad Discussion Forum and photo gallery. We cover all scales and sizes of model railroads. Online since 2002, it's one of the oldest and largest model railroad forums on the web. Whether you're a master model railroader or just getting started, you'll find something of interest here.


DairyStateDad

Mumbling in the corner
I'll try to keep this short although it took me the better part of yesterday afternoon just to work out the idea.

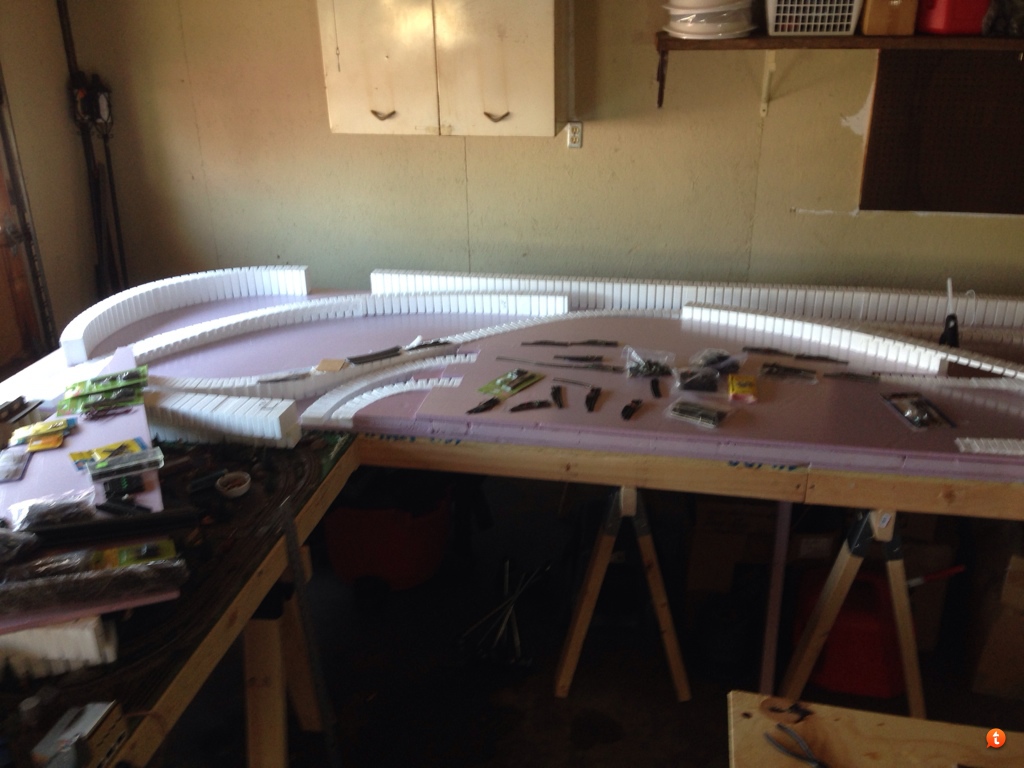
For several of my grades I plan to use the Woodland Scenics foam inclines. I bought starter sets for 2, 3, and 4% back just after Christmas. I expect to use the 2% mostly, maybe some of the 3%. If I can I will just use the starter sets, elevating them on pieces of cut foam when the elevations are higher.

But I'm trying to set up each beginning grade so that there's a foot of 1% before going to the 2% to create a vertical easement. So for that first foot the track rises just 1/8 of an inch.

I just don't have a steady enough hand to try to cut a 1/8-inch by 1 foot wedge out of the insulation foam I have. And cookie-cutter benchwork isn't an option for me.**

After a lot of mulling this over, I have come up with a way to create the 1% grade for that first foot. Originally I was going to use styrene but decided instead to use chipboard or posterboard. I would build up the grade with layers of posterboard/chipboard. The top layer would be the full length of the run (1 foot), and each successive lower level would be somewhat shorter. Like this:
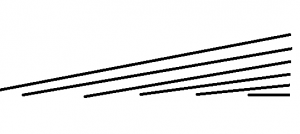
1% grade by layers.png

How many layers would depend on the thickness of the posterboard or chipboard. For 0.012 inch thick posterboard, I would need about 10 layers (+/-). I'd then start the WS incline at that point (cutting off start of the incline so that the new starting point matches the 1/8-inch height of the 1% segment I've made). I suppose I would use plaster or something like that to smooth the transition (Suggestions for specific products to use?) between the 1% segment and the 2% incline.

Cork roadbed would go on top of all of this, of course.

One thing I like about this idea is that it can be as wide or as narrow as I need depending on the number of parallel tracks being elevated.

I have worried a bit about whether moisture would affect the posterboard or chipboard. Right now, I'm figuring it won't be a serious issue, becuase it's a fairly small segment, and it will be covered over (foam on the bottom, cork on the top). I guess if it seems like a problem I could spray the whole thing with some kind of lacquer for paper before installing it.

So, what do you think -- is this going to work OK? Do you see pitfalls that I should watch out for? Is there another option that is easier?

**(Aside--one thing I would do differently if starting now is, instead of putting down a single sheet of 2-inch foam on the layout top, put down a sheet of 1-inch foam, then top it with another sheet of 1-inch-foam, which would be just tacked lightly at the corners; the upper layer would then be used to construct the cook-cutter roadbed. But that's water under the bridge now.)
 
I used the inclines from Woodland Scenics as well. I too did not feel comfortable with the transition from the flat surface to the incline. In my case, I was using a bucket of pre mixed DAP "Patch N Paint" Lightweight Spackling to fill in the openings in the inclines. So I just used the lightweight spackling to create a smooth transition from the flat surface to the incline. I didn't go out a foot, it was probably more like 8", but it made a big difference. At the top of the incline where it met the top of foam insulation board, I ended up sanding down the foam insulation board and the top end of the incline to make a smoother transition.
 
Wow, I am glad I asked! That sounds a whole lot easier (And cheaper!) than what I was contemplating! Thank you for that!

I used the inclines from Woodland Scenics as well. I too did not feel comfortable with the transition from the flat surface to the incline. In my case, I was using a bucket of pre mixed DAP "Patch N Paint" Lightweight Spackling to fill in the openings in the inclines. So I just used the lightweight spackling to create a smooth transition from the flat surface to the incline. I didn't go out a foot, it was probably more like 8", but it made a big difference. At the top of the incline where it met the top of foam insulation board, I ended up sanding down the foam insulation board and the top end of the incline to make a smoother transition.


I agree with Jim when using Woodlands Inclines. They are a good "start" but you need to smooth out the tops and bottoms of the incline by either using a filler, plaster (etc) or sanding to get good transitions.

One other option might be to use ply. Work out the height you need at the end of the incline and simply cur a piece of 1 X ? for the height and a length of the ply to act as the incline. Even if you did it this way, you'd still need to smooth out the transitions top and bottom.

Let us know what you decide and how you go.
 
I am also using the cork roadbed. To start my inclines from flat surfaces (from plywood or foam in your case), I used cedar shims. The skinny ends get pretty close and after putting the cork on it, the rails see very little in the way of transition. In one situation, I also used the shims in the same method you're speaking of; with one underneath another. This increases the grade gradually until you get to where you need.

Good luck. Let us know what you end up doing.
 
... I used cedar shims. The skinny ends get pretty close and after putting the cork on it, the rails see very little in the way of transition....

Good luck. Let us know what you end up doing.

I will take a look at the shims. I have some shims (I don't think they're cedar), but they're like 8 inches long and 1/4-inch thick at the fat end, which makes them I think about a 3% grade as it is! But we'll see what Home Despot has.

I'm likely to go with the Spackle transition that Jim described -- that was amazingly obvious and yet never occurred to me. I'm pretty much sold on the WS for the main grades.
 
If you are using a plywood roadbed surface, cutting the roadbed then bending it up and supporting it with uprights from the table structure will give you a natural transition from flat to grade.
 
If you are using a plywood roadbed surface, cutting the roadbed then bending it up and supporting it with uprights from the table structure will give you a natural transition from flat to grade.
Yeah, the advantages of cookie cutter roadbed were never so clear as now! Unfortunately I'm now well beyond being able to do that, given the two inches of foam I've already put down. The sectional nature of my layout also made using a heavy plywood top less appealing compared with foam. As I noted above, though, one thing I would consider doing differently if I were starting over is, instead of putting down two-inch foam, I might put down two layers of one-inch foam and use the top layer in a similar cookie-cutter fashion. But that's water under the bridge now.

I've been moving the incline sections around a bit in the area where the first set will be, and then tried draping cork over it as well. One thing that I'm seeing is that the cork alone seems to help soften the transition from flat to grade -- at least to my eye.

Another thing I'm seeing, though, is that the WS inclines are not entirely uniform one to the next, even if they're supposed to be the same gradient. This isn't a big deal, but where I do have some side-by-side inclines to support parallel rising tracks, I'm having to be sure that I choose two inclines that match perfectly.
 
Another thing I'm seeing, though, is that the WS inclines are not entirely uniform one to the next, even if they're supposed to be the same gradient. This isn't a big deal, but where I do have some side-by-side inclines to support parallel rising tracks, I'm having to be sure that I choose two inclines that match perfectly.


Make sure you aren't putting some of them down upside down. The side that is Not a 90 degree angle, from the tall end of the incline, is the side that the track lays on. With a 2% incline you may have to look close to see which side is "up".
 
Last edited by a moderator:
Yeah, the advantages of cookie cutter roadbed were never so clear as now! Unfortunately I'm now well beyond being able to do that, given the two inches of foam I've already put down. The sectional nature of my layout also made using a heavy plywood top less appealing compared with foam. As I noted above, though, one thing I would consider doing differently if I were starting over is, instead of putting down two-inch foam, I might put down two layers of one-inch foam and use the top layer in a similar cookie-cutter fashion. But that's water under the bridge now.

The grass is always greener on the other side - Because it's fertilized with Horse manure.
I'm building my layout now with the cookie cutter design and there are plenty of times where I wish I had the foam surface to work with. There are a number of inclines on my layout, and that is why I chose the cookie cutter method. But now that I'm at the point of installing bridges, there's twice as much work to install one because there is not surface to let it rest on. And so the landscaping and the track work must happen in parallel. I like to have the train running in it's loop while I work, to give the false sense of accomplishment while I work :D.

Please do let me know what you end up doing, as I've contemplated using the foam in some areas as construction continues. It would be good to see what you do here and how easy/difficult it may be for me.


The grass is always greener on the other side - Because it's fertilized with Horse manure.
I'm building my layout now with the cookie cutter design and there are plenty of times where I wish I had the foam surface to work with....

A good lesson, that! Reminds me of the Zen (?) saying that, if everyone in the world could hang their troubles on a tree and trade them off, they'd end up walking away with their own again :)... I don't think I completely agree with that, but it's definitely worth remembering...

Please do let me know what you end up doing, as I've contemplated using the foam in some areas as construction continues. It would be good to see what you do here and how easy/difficult it may be for me.

Will do! At this point I'm definitely using the inclines, at least for the first elevation I am planning. I got some cork put down in the level, hidden staging area over the weekend, but just got started on that. I'm working my way toward the first incline area, which also will be in the hidden section (but totally accessible from the side)... Pictures coming soon on my standing layout progress thread....
 
There are two methods I use for a smooth transition from level tracks to a consistent/average grade. First, using the cookie-cutter method of making 5/8" quality plywood bend naturally by fastening a suitably wide strip of it to the level grade of the sub-roadbed with several deck screws, and then bending it up until it rises at the grade I want. What lies between is what you want...that nice curve.

Alternatively, you can just start your grade (the less incline the better...) abruptly and let the flex track find its own curvature between the level portion and the main grade exactly as the plywood does. How do you support it? Fill in what you can with small wood block or whatever, and then let your ballast granules provide the rest of the support, just as the ballast does on a real railroad. So, I pin down the flex at both ends and encourage it to bend downward in the middle just a bit. I don't force it, just encourage it. I fill below it with ballast, even if I must apply a bit of weight in the middle of the 'sag' to help it all stay put. I glue the ballast and let it dry. I remove the weight, and the tracks should present your tractive power and rolling stock with a nice smooth transition.
 
I have read all the above & I am also in the process of starting my own newbie layout - one thing I am doing though is - I am using the woodland scenics, but on top that I am going cookie cutter method with 1/4" plyboard. This allows me to widen as necessary in spots, or two run two parallel tracks a bit wider than the single scenics foam would allow. I am not sure to call it cookie cutter, but I will be taping sheets of paper above all my curves & tracing them to use for a one piece template cut on the board vs. a bunch of little cut curves :-). Quite a project & I am very busy, but will post pics when I can. I am open to any & all suggestions. By the way - I am using N scale. :-) Have a good day all !
8abe2yza.jpg
veja9emy.jpg


Sent from my iPhone using Tapatalk
 
Hey guys - new here, but I just read your entire thread. Some good ideas :-). I am N scale & I have a somewhat different approach to this. I am using the WS risers & many of them - although they seem narrow to run a parallel track on. To overcome this - I have come to the conclusion after a few headaches :-), to transfer all my radius', jogs & straight onto 1/4 " plywood. I am going to cut as much of them out in one piece that I can & adhere them onto the risers with liquid nails. The risers are 2 1/2 " wide, whereas I will be laying 3" or 3 1/4" wide plywood on top. This will also help with my starters, height imperfections & I can cut the foam at the top of the incline before gluing the wood to give it the nice smooth transition. I am open to any & all types of opinions guys - feel free to say yay, or nay Lol.


Sent from my iPhone using Tapatalk
 
That sounds to me like it should work. You might also consider cutting the subroadbed from 1/2 - inch thick insulation foam. I've seen others here get that cookie cutter thing going that way.

From the DairyStatePhone
 
Not trying to sound naive, but do you mean - use that instead of the plywood ?
It would be easier & I wouldn't have to worry about it warping.


Sent from my iPhone using Tapatalk
 
Not trying to sound naive, but do you mean - use that instead of the plywood ?
It would be easier & I wouldn't have to worry about it warping.

That is exactly what I mean, but now that I see what you've got already, I think you might be better off with the plywood, for two reasons. First, is that it won't raise your track above the rest of the scenery as much; the 1/2-inch foam would be too much, and the 1/4-inch foam too 'floppy' I think. Also, with 1/4 inch plywood you'd have more clearance where there's track overhead--although you'll want to be sure that, even with the plywood, you have *enough* clearance.


As for me... I followed through on the suggestion from Jim 68cuda's advice and, instead of the elaborate 'leaf spring' set-up I started this thread by proposing, simply spread on the lightweight DAP spackling at the beginning of the grade, feathering it out about 6-8 inches.

There was a bit of a learning curve to using it. One trick is that after initially putting a glop of stuff on, I needed to trowel it very very *lightly* so as to get a natural, feathered grade down to the foam baseboard. Too much pressure and you end up just wiping half the stuff away! The other trick is, although the spackle's made so you can paint over it within an hour, if you're sanding it YOU MUST let it dry and cure for at least 18 hours and more likely 24 or more.

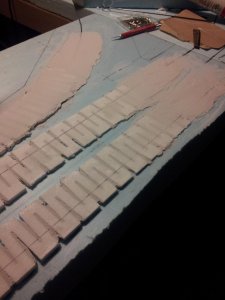
Here's what it looked like -- I'll admit the picture looks pretty rough, but it's quite smooth and even to the touch, and moreover, with cork on it, any imperfections seem to be completely eliminated.

20140509_075453.jpg


Affiliate Disclosure: We may receive a commision from some of the links and ads shown on this website (Learn More Here)

Back
Top