funnelfan
Member
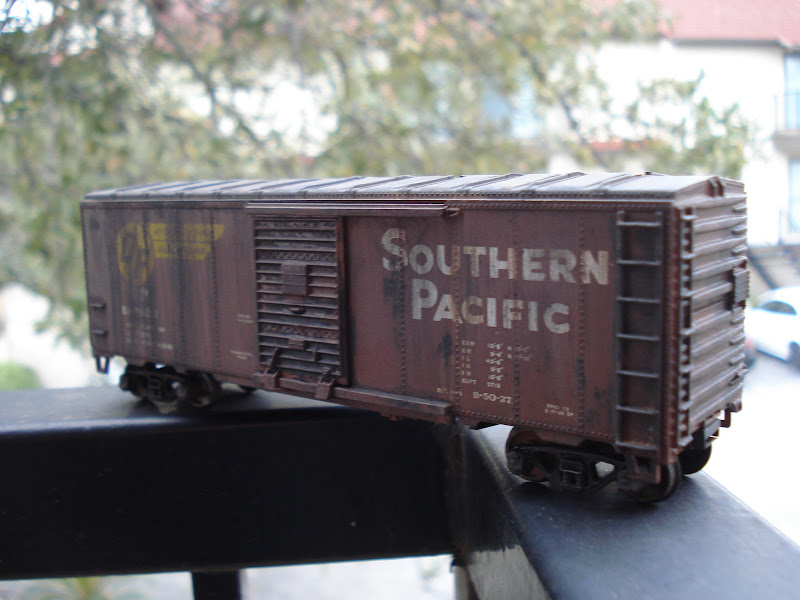
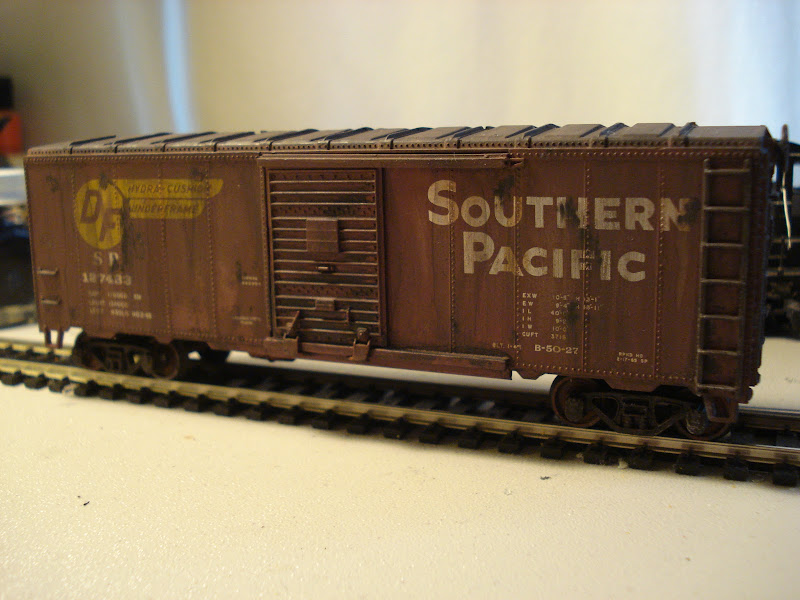
I've been working to redevelop my weathering techniques using common water based paints. I've had some success lately, and thought I would share. First off, the car is a Atlas Trainman car that I bought on the cheap. The cars are simple and durable, perfect for club use. I've seen these Greenville and Northern floating around in SRN patched reporting marks for a while, so making a model was a natural choice.
I found a good photo of the car I wanted to recreate, and used it as a basis for the weathering. First step was to cut down a salon nail board so it will fit between the ribs and lightly sand the lettering. I sand until the lettering is soften and faded, but still largely intact. (the effect is hardly noticeable in the photos, but apparent in person). Now using just two colors of acrylic paint from Micheal's and some rubbing alcohol, I was able to do all the weathering you see. The two colors were Black and Iron Oxide Brown. First I mixed a bunch of black with a touch of brown to create the large patches of dark rust (particularly on the roof), and I also dabbed small points all over the car for the various rust spots. And then I painted the truck sideframes. At this point I set the car aside for several hours to let those patches dry. Next I mixed a half and half mix of brown and black and then diluted it in the alcohol to create a wash. I washed over the whole car streaking downward. If the paint was too light, I'd dip the brush in the paint a little, and then a quick dab in the alcohol. If the paint was too thick, I swirl the brush in the alcohol. Either way, it was easy to maintain a consistent wash over the car. The alcohol dries quickly and the resulting flat finish is durable and will stand handling. The wash will somewhat erode the dark patches from before, but creates much more realistic look in the process. After a basic wash, I start apply streaks of rust in logical places using a less diluted version of the wash. Where the water collects and runs down the side of the cars is where you want to apply the streaks. Also apply streaks from the bottom of the dark patches toward the bottom of the car. Using prototype photos helps a lot in this regard. Finally comes the dry brushing. By dabbing the brush in the straight iron oxide paint, and then brushing most of the paint off on a paper towel. You can then use the mostly dry brush to highlight details. Try the trucks first, and highlight the springs, bearing caps, and other features the stick out. Next dry brush a tad of fresh rust in the dark patches, and around details that stick out. Using photos will help you understand the nature of the rust. You'll get the hang of it in no time, but always remember to not over do it. It's way too easy to go way too far in weathering a car. Use photos to gauge your progress. Next I will need to do the SRN patch.
I found a good photo of the car I wanted to recreate, and used it as a basis for the weathering. First step was to cut down a salon nail board so it will fit between the ribs and lightly sand the lettering. I sand until the lettering is soften and faded, but still largely intact. (the effect is hardly noticeable in the photos, but apparent in person). Now using just two colors of acrylic paint from Micheal's and some rubbing alcohol, I was able to do all the weathering you see. The two colors were Black and Iron Oxide Brown. First I mixed a bunch of black with a touch of brown to create the large patches of dark rust (particularly on the roof), and I also dabbed small points all over the car for the various rust spots. And then I painted the truck sideframes. At this point I set the car aside for several hours to let those patches dry. Next I mixed a half and half mix of brown and black and then diluted it in the alcohol to create a wash. I washed over the whole car streaking downward. If the paint was too light, I'd dip the brush in the paint a little, and then a quick dab in the alcohol. If the paint was too thick, I swirl the brush in the alcohol. Either way, it was easy to maintain a consistent wash over the car. The alcohol dries quickly and the resulting flat finish is durable and will stand handling. The wash will somewhat erode the dark patches from before, but creates much more realistic look in the process. After a basic wash, I start apply streaks of rust in logical places using a less diluted version of the wash. Where the water collects and runs down the side of the cars is where you want to apply the streaks. Also apply streaks from the bottom of the dark patches toward the bottom of the car. Using prototype photos helps a lot in this regard. Finally comes the dry brushing. By dabbing the brush in the straight iron oxide paint, and then brushing most of the paint off on a paper towel. You can then use the mostly dry brush to highlight details. Try the trucks first, and highlight the springs, bearing caps, and other features the stick out. Next dry brush a tad of fresh rust in the dark patches, and around details that stick out. Using photos will help you understand the nature of the rust. You'll get the hang of it in no time, but always remember to not over do it. It's way too easy to go way too far in weathering a car. Use photos to gauge your progress. Next I will need to do the SRN patch.