ModelRailroadForums.com is a free
Model Railroad Discussion Forum and
photo gallery. We cover all scales and sizes of model railroads. Online since 2002, it's one of the oldest and largest model railroad forums on the web. Whether you're a master model railroader or just getting started, you'll find something of interest here.
Northern Pacific history enthusiast
THANKS Johne, I will be working on scenery for the transition and then putting the whole thing together. Still a couple weeks of work to accomplish that.
Nicely done David,
I've watched both videos and saved it for when I do mine, thanks
Now the refining part is to make everything match your layout, the detail part
Nicely done Dave. I really like the difference that it has made. I had seen these backdrops a few years ago but I would need about 75 feet of it for my layout and decided to keep my old Walthers Instant Horizons. being that I had worked my hardshell scenery into the backdrop was one reason. The other was the cost.
Northern Pacific history enthusiast
Thanks, Chet, Lloyd: I spent a lot of time studying the options and was successful at matching up the scenes pretty well:
1) The cloud scene was purposely placed on the left side because rising elevations with the burned over area and rock cliffs would be the skyline and therefore not have any hill or landscape features behind them.
2) There is a pond and stream in the center of the "landscaped" portion of the layout and that coincides with the low spot in the backdrop, where the stream would be emptying.
3) There is something of a grassy area on the far right, by the maintenance shed, and this fits in with the small yard being a dead end in a relatively wild area. A hill will show up behind them (not finished yet) which geographically blocks the yard from having been constructed any larger
4) The transition between the clouds and landscape will include a rise in elevation and scenic trees to effectively block and flow into the wooded area on the backdrop.
I evaluated some of the other scenes on the market, including other manufacturers, and nothing else fit in very well. I considered a more industrial type scene for next to the industry area, however my industries are "edge of town" pertinent and having all the tracks run along a ridge and between a couple industrial areas, as well as the water feature, did not look good.
Anyway, we will see how it comes together when all the scenery is done!!
Dave excellent progress. The backdrops really amplify the quality of work you have done on the layout! Thanks for posting!!!
Northern Pacific history enthusiast
THANKS, Yannis. Getting back to the Super Trees, when I got to the bottom of the box I found a different set of instructions and a method with way fewer steps to make the trees.
It is simply soaking the twigs and sprinkling the leaf material over the wet twigs. I painted my stems first but you could probably paint them later, I will be touching mine up:
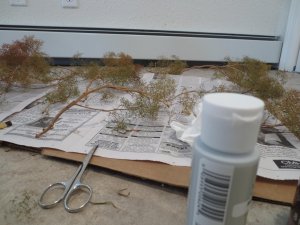
First I trimmed the branches and painted the stems. I did not use hair spray in this method:
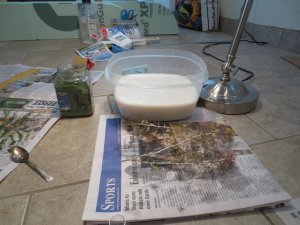
Then I soak them in this matte medium solution (7:1) and sprinkly on the leaf material, then hang them to dry:
I also posted a 4 minute video in the Video section and you can see how easy it was!
The other method (outlined several posts back) worked but this one was far more streamlined!!
Well done Dave, like your video.
Looks very simple, will be trying this later
Thanks
Good video David and some nice looking trees , I ordered a box of these to try out . I am also trying some of Chets sagebrush trees . I will see which method I can make work the best . When you painted the trunks did you just try not to spray the leaf area to much or did you make a paper mask to block overspray or is it something you don't even need to worry about?
Good stuff Dave,
Do you reckon that parts of these supertrees could be used in order to have detailed foreground foliage like bushes and small trees (found in California)? I am considering using supertree material as a core instead of polyfiber sprinkled with foliage.
Northern Pacific history enthusiast
. When you painted the trunks did you just try not to spray the leaf area to much or did you make a paper mask to block overspray or is it something you don't even need to worry about?
WELL I painted my stems using a brush and I used a couple different colors in the well with some water so tried to get a couple different shades on the bole of the tree. I tried to get the paint on the main stem and some of the branches.
For a couple I am experimenting with using some rubber cement over the bottom paint and paint applied to that then scraping a little off with wire brush to get more texture. Sounds like a lot of work but I think I will try it!
A different video I watched on youtube they painted them with a spray paint can in a paint booth and that may have been quicker but also messier.
Lloyd, Yannis: THANKS for commenting!
Thanks David , mine are supposed to be here next Tuesday . I am looking forward to giving them a try . I was out yesterday picking sage brush also to try Chet's trees .
Northern Pacific history enthusiast
Well I have made some progress on the layout extension, I added about 4" of foam along the back side where the layout transitions to the backdrop. I just glued the foam on to the benchwork and built it up with sheet rock mud to blend it to the layout.
Here is how it looked before:
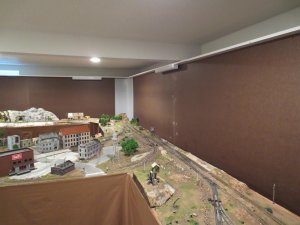
Here I added the 4" of foam by glueing it on to the facia board that runs around the layout. I put a base of brown paint where the road and parking goes and the green will be vegetation that will match the backdrop.
I will tone down the green a little more before adding ground cover material. I was able to find some that matches the backdrop pretty well.
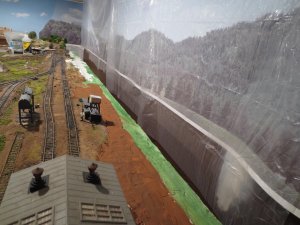
This is how it looks from the other side. I am measuring up from the floor to match the elevation with the back of the foam to the bottom of the backdrop. There is a little stream that lines up with the low spot in the backdrop landscape:
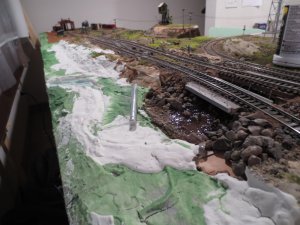
I am roughing it in with carving and the mud and will pour some envirotex in there to match it with the rest of the drainage.
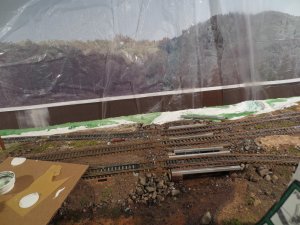
There is some new grass I am experimenting with it is in the center on the right side of the layout. (second picture) They are patches you tear out and glue on, so far I like them.
Some nice progress for sure.
Keep posting photos of the progress. This should be quite interesting getting a transition to the backdrop.
Show me the way.....................
Again, I'll be watching what to do to blend my backdrops to the layout
I want details......lol
Dang that looks awesome
Sent from my SAMSUNG-SM-G920A using Tapatalk
Looking good David . It will be interesting to see how you tie the layout in with the backdrop.
Dave , a question for you about your trees . Do you feel that the matte medium soaked in well on the parts of the trunk that were painted first or would it be better to add an additional step and soak first , then let dry , then paint and then proceed to finish?
David you are a machine and it looks fantastic!
Northern Pacific history enthusiast
THANKS, all for checking out the progress. I added some more mud and did a little scraping last night and really starting to feel that this part of it is moving along. I should be pouring the water Sat. afternoon than can finish off the end.
Looking good David . It will be interesting to see how you tie the layout in with the backdrop.
Some of it will be easier to blend in, in the forested area I will be adding trees to match the backdrop. They will add a layer of scenery in front of the backdrop. At least, that is the plan. I mixed up some water and india ink and sprayed on some of mine to get them more the color of the backdrop.
In the area by the train shed, it will be ground cover that matches the backdrop for that strip between the road and wall. I am experimenting with a paint mixture for the base, and then I have ground cover material (ground foam) that will be sprinkled on, a small clump for the brush and fine ground material for a base under that.
The train table pushes back into the backdrop when it is done. The backdrop is on separate legs as well and can be moved a little to fit against the table.

Affiliate Disclosure: We may receive a commision from some of the links and ads shown on this website
(Learn More Here)




