My First Layout. Questions, Updates, Comments Thread

ModelRailroadForums.com is a free Model Railroad Discussion Forum and photo gallery. We cover all scales and sizes of model railroads. Online since 2002, it's one of the oldest and largest model railroad forums on the web. Whether you're a master model railroader or just getting started, you'll find something of interest here.


Layout1P.jpg

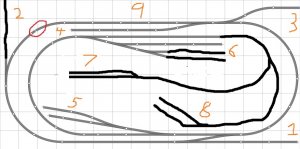
Here's what I've came up with so far. There's a 50 peice limit to the trial version of Anyrail so I loosely drew in what was left ha ha.

1. This is where the mainline starts for bigger Class 1 railroad. The mainline includes the whole outer loop. I could put a staging yard beyond here.
2. Here is where if I expanded in the future I would put a large industry being served by the Class 1 railroad.
3. This is where the Class 1 mainline branches off from the short line. Could put another staging yard beyond here.
4. An interchange siding. I would move the turnout to the other side of the siding, due to directions.
5. Sawmill
6. Small yard
7. Logging camp.
8. Miscellaneous industry. Haven't decided what yet.
9. I could put a passenger station, road, or random scenery here.

If you can see close enough the track in the red circle isn't connected. How would I make sure the lengths and curve degrees are all correct so that the track would connect?

This is a very rough draft so let me know of any mistakes I've made.
 
Well rember the tighter the curve the easyer it is to derail. plus for making sure it all hooks together. depends if. your using sectional track or flex


View attachment 43506

If you can see close enough the track in the red circle isn't connected. How would I make sure the lengths and curve degrees are all correct so that the track would connect?

This is a very rough draft so let me know of any mistakes I've made.


If you play around with small pieces of straight track you can make it connect. You may have to alter both sides to make it work but I am sure you can do it.
 
There is several. differnt size of bachmann track you my need to get a couple of 2 inch sections to fill a cape and the standered curve bachmann sell should be fine for most trains the longer the cars the wider. the curve you need
 
View attachment 43506

If you can see close enough the track in the red circle isn't connected. How would I make sure the lengths and curve degrees are all correct so that the track would connect?

This is a very rough draft so let me know of any mistakes I've made.

It looks like you've just put in that piece of flex track at the bottom and made it too long. The left end of the bottom straight is quite a bit closer to the grid line than the left side of the top straight. If you were to replace that bottom piece with actual EZ track pieces it would shorten up that bottom straightaway and things will line up right.
 
7. Logging camp.
8. Miscellaneous industry. Haven't decided what yet.

This is a very rough draft so let me know of any mistakes I've made.
The curved track from the small yard around to sites 7 and 8 won't work as drawn. That will required a 15" radius curve, and and even tighter radius curve. Also to the best of my knowledge no one makes a 15" to 13" curved turnout so you would have to build that from scratch yourself.

The area through 9, 4, 6 is going to just look like track track track track. Pretty boring.


Are you set on using Bachmann EZ track? It greatly limits what track arrangements you can make.
Are you determine to keep all this on 1 level?
 
View attachment 43506

Here's what I've came up with so far. There's a 50 peice limit to the trial version of Anyrail so I loosely drew in what was left ha ha.

1. This is where the mainline starts for bigger Class 1 railroad. The mainline includes the whole outer loop. I could put a staging yard beyond here.
2. Here is where if I expanded in the future I would put a large industry being served by the Class 1 railroad.
3. This is where the Class 1 mainline branches off from the short line. Could put another staging yard beyond here.
4. An interchange siding. I would move the turnout to the other side of the siding, due to directions.
5. Sawmill
6. Small yard
7. Logging camp.
8. Miscellaneous industry. Haven't decided what yet.
9. I could put a passenger station, road, or random scenery here.

If you can see close enough the track in the red circle isn't connected. How would I make sure the lengths and curve degrees are all correct so that the track would connect?

This is a very rough draft so let me know of any mistakes I've made.

**>

Hi BNSF Nut, I'm Trussrod on here but David is my name and been involved in the hobby for the last 63 years.
Welcome to the forum and glad to see your asking a variety of questions, to not only try and determine what you want to do 'but' also what is possible and will actually fit in the area you have to work with, look realistic and operate as you expect.

1st off, building any layout in a room that takes on moisture to any extent is not a good idea unless you have a dehumidifier and even that may not be enough to prevent problems? Just changes in temperature of a room, if too great can cause problems unless you take steps to prevent the expansion and contraction problem of your track work.

It's been mentioned prior about about track buckling due to expansion expansion and problems with contraction. If you use flex track or even sectional track, such as Atlas or others, a simple solution is just don't solder every other three foot section to the next one and be sure to leave about a 1/16th inch gap between the to adjoining sections so they can slip back and forth to compensate as the changes require. I assume track like Bachmann etc uses something similiar but working with flex track allows for more flexibility but you also need to watch your spacing of tracks being too close to each other even if on cork road bed especially on curves but also in sidings as things can get very tight if your not cautious.

My suggestion for a your layout bench work, is I believe, more what you were thinking of if you have a corner or a room to work with for an 'L' shape or maybe even a 'U' shape with a loop on either end so if you want to watch a train run for a bit you can. That's the way mine is laid out but it a folded, loops over itself at one location, dog bone or basically loop-to-loop. This can still be operated as a Point-to-Point without any continuous run such as a delivery and the empty pick-up possibly being delivered on down the line to another location or even taken back to where the loaded car came from. My suggestion, would be to take two 4x8 sheets of plywood or OSB chipboard and cut one in half so you have two 4x4 end pieces for the two loops on either end and cut the other sheet down the middle so you have two sections of 2' x 8' that can be butt together in a corner with a 45* corner piece to allow for the inner curve. The 8' length of these two sections can of course be adjusted shorter
as needed. This does several things. It makes for a layout that can for the most part easy to reach most things as your depth isn't so great, it's a lot more pleasing to operate on as you can watch your trains making both right hand and left hand curves without seeing it go around the same oval. It like it's going to new territory as it spread thing out more.


Now in looking at your layout plan above several things come to mind from all my past experience. First off, you haven't mentioned what gauge your intending to model, unless I've missed it? Is it HO gauge, and what is your prefference, steam or diesel? If it HO and your going to stick with the plan above you'll need to run the smaller Loco's due to the much tigher radiuses as the larger ones very probably won't even go around them as is the case with even some steam loco's that have three and four flanged drivers as they will bind on the tighter curves!

Keep one thing in mind, even using these cad programs it all too easy to fit things in thinking they will work but when you actually get to laying your track you'll find the spacing is just way too tight. In HO you will need to leave at least


As is your plan has some inner radiuses that only an small to axel diesel or an 0-4-0 steam engine would run around. It's very easy for the mind to preceive something that we think will work and fit till we get to actually laying rail. An NMRA HO clearance gauge is 2" wide and it best to allow at least an extra 3/4" clearance bare bare minimum on straight tracks and probably at least 1.25 to.50" on curves if your going to have any double main line situations. In fact if you use some of the preformed roadbed and track they probably won't allow you to fit in as much as you've got. Again I'm think your working in HO.

As your plan is drawn even the larger outside oval just has barely an 18" radius which is generally considered as a minimum. There is no way your going to run anything but very small loco's and very short cars on it. Again if your in HO. If your in N gauge then it an entirely different story as it should work fine.

I have a number of pictures showing how I built my bench work and the L gurder construction which is very useful if you want any changes in elevation although Woodland Scenics does offer a very complete selection of foam Sub-Terainian risers etc if you would rather just work from a flat surface.

I'm a dealer for Woodland Scenic and have their complete selection available as well as having the complete line of NCE products. I also have Atlas & Peco track and turnouts available as well as Bachmann etc.

Let me know if I can be of help to you? My contact info is at the bottom of my signature below.

 
Iron Horseman, I'm not set on EZ track but I wanted to use something like it for quick installation. Initially I want to keep it on one level but I'm not against multiple. Like I said, it's a very rough draft. Just kind of an idea of what I'm looking for.

Trussrod, thanks for the reply. I did mention before the layout will be HO, but it was briefly and easy to miss. I want to run mostly diesel but I enjoy steam as well. I think the era is decided for me a little, with my Grandpa's inventory being all 40's and 50's stock. But I'm perfectly ok with that!

I have two dehumidifiers in the room and it's usually a pretty constant temperature down there in the spring/summer time. I would need to get heaters down their in winter, however, as it gets chilly. How big of a temperature change would it have to be to damage the track? Is either contraction or expansion more damaging than the other or is it pretty much the same?

I really lucked out and went through some of my literature and magazines and found "101 Track Plans for Model Railroaders", "Track Planning for Realistic Operation", and some other related books/magazines. Don't remember ever getting them, but here they are ha ha. Some of the 4x8 layouts I like are numbers 24-28. I like the amount of sidings they have and the operation potential on them. But, looking at some of the 6x10 plans, I think that's more what I should go after. 39 is the one that catches my eye. It's pretty simple track work with a branch line and small yard. I think I would take out the turntable to expand the yard more. I like 41 and 42 as well.

I would like to be able to run diesels larger than 2 axles, so more reason to go with something more like 6x10.
 
Thank you for the updates and for sharing your enthusiasm for our hobby.

Congratulations on finding those books!


So glad to see you posting again. For a while I thought we had lost you.....

Iron Horseman, I'm not set on EZ track but I wanted to use something like it for quick installation. Initially I want to keep it on one level but I'm not against multiple.
That is good to know. EZ track is so limiting in the track plans it can make.

I think the era is decided for me a little, with my Grandpa's inventory being all 40's and 50's stock.
Thank you for reminding me. I forgot about that from the other thread.

I really lucked out and went through some of my literature and magazines and found "101 Track Plans for Model Railroaders"
That is one I continually refer back to. I keep a copy of it at each of my desks/work spaces.

Some of the 4x8 layouts I like are numbers 24-28. I like the amount of sidings they have and the operation potential on them. But, looking at some of the 6x10 plans, I think that's more what I should go after. 39 is the one that catches my eye. It's pretty simple track work with a branch line and small yard. I think I would take out the turntable to expand the yard more. I like 41 and 42 as well.
I was always a #29 person :-) There is actually a really good version of #28 that was expanded to 6x11 I think. It is in a book that I do not keep at every desk so I can't check. I believe it used 24" radius curves. I've always wanted to build it. Considering your first drawing I thought you would like #25. Ditch the turn table/round house and make Schmidt's switch more useful in that area. Definitely an "urban" industrial layout though.

I've never understood #42. Seems to be way over-yarded with a curved ladder guaranteed to cause problems. All that track but only 4 industrial spurs.

A good thing that can be done is to take one of the 4x8s and relax it into the 6x10 or larger space, or even better into an around the room scenario.
 
Yup I'm still here :) just a busy time of year with the school year ending and final tests to study for..... ugh.

But anyways, how much longer would you say it takes to install flex track vs EZ track. Time is the main reason I would go with it. And it's simplicity is nice.

I like the idea of expanding a 4x8 plan to fit larger area. The main things I'm looking for in my layout are like what I concluded in my experimental design. A larger railroads mainline coming onto the layout from a staging yard for interchange operations, a small to medium sized yard, and a couple or more industries to serve that are related somehow. Like the wood/paper industry.
 
Here is a link to you tube https://www.youtube.com/watch?v=k-LxY-P2n-g it its the Worlds Greatest Hobby video of how to build a model railroad.

If you buy the Bachmann world's greatest hobby EZ track pack http://www.modeltrainstuff.com/Bachmann-HO-World-s-Greatest-Hobby-Track-Pack-p/bac-44596.htm all the track you need is included in the box to build the 4X8 layout and a DVD of the video. This is probably the fastest way to get your railroad up and running.

I am just giving you some options, have fun with what ever you decide to do.
 
Yup I'm still here :) just a busy time of year with the school year ending and final tests to study for..... ugh.
Wait until your "final" is a Master's Thesis or a Doctoral Dissertation.....

But anyways, how much longer would you say it takes to install flex track vs EZ track.
Sorry, I do not know. I have never done a layout with EZ-track where I have actually attached the track to anything. As far as sectional track in general in some ways it it much easier. Just connect the pieces and glue/nail them down. On the other hand if you come up with a situation that requires a piece that doesn't exist it can be very frustrating trying to cut one of the sections into a smaller piece. Flex is easy because one just bends it to where one wants it to go. Place bend, cut, place, bend, cut, etc. It is harder to "connect" because the ties are attached right up to the end and have to be cut to get the joiner in.
 
Last edited by a moderator:
Yup I'm still here :) just a busy time of year with the school year ending and final tests to study for..... ugh.

But anyways, how much longer would you say it takes to install flex track vs EZ track. Time is the main reason I would go with it. And it's simplicity is nice.

I like the idea of expanding a 4x8 plan to fit larger area. The main things I'm looking for in my layout are like what I concluded in my experimental design. A larger railroads mainline coming onto the layout from a staging yard for interchange operations, a small to medium sized yard, and a couple or more industries to serve that are related somehow. Like the wood/paper industry.


Hi BNSF: I've done all my modeling using flex track many years back and now I'm hand laying the rail on either wood ties glued down on a predrawn radius curve center line or by using templates I made of the radius I want and let the tie fall between the two outer edges from the center so my ties are on center or there about, as I like to stagger my ties a bit from side to side. But in the back areas where it's harder to reach I've been using the Central valley Branch line tie strips with their premolded tie plates for my code 70 & 55 which seems to work quite well too as long as the bend I put in the rail falls down in between the tie plates fairly well when I spike it down. I haven't tried it yet but just thought that Woodland Scenics, 'Hobby Tack' might be an easy way to hold my rail in position on the CV Tie Strips to make the drilling and spiking simplier as well as checking gauge once getting it down initially down before spiking to ensure gauge as I just recently found a couple of places in the code 55 rail I just put down that were out of gauge in a hard to reach/see area.
I found this by rolling a car over it to ensure it rolls freely.


**Anyway, using flex track can go very quickly as long as you follow a few simple rules.
Make a large compass using three length of of lite sturdy lumber approximately at least 1/2" x 3x4" and with the two pieces matched up and cut off to the same length drill a screw hole in about an inch from one end and put in a screw in it for the two arms will spread apart on. Use a thinner piece of wood or other material to connect the two arms by screwing to one arm and use a small strong clamp on the other to adjust the width with easily.

If using nails to tack the track down to plywood or other surface, do not tap the nails in too firmly to cause even a shallow 'v' in the ties as it pulls the rails together and forms a tight spots. Also don't leave the nail heads stick up too much.

Be sure that where one section of rail joins another a kink isn't formed. Sometimes I've had to place an extra nail or two along the outside edge of the rail to push a kink in.

Use some type of lite adhesive in just a few spots to hold your track down so you can test run your loco's and cars to ensure they will all run through the areas ok. Watch your outside clearances to ensure Loco over hang or that of cars won't hit walls/cliffs easily. Don't be in too much of a hurry so that you don't test operate over the track you've laid.

Once tested to ensure everything operates as you want then you can go back and secure things more firmly.


Affiliate Disclosure: We may receive a commision from some of the links and ads shown on this website (Learn More Here)

Back
Top