
You are using an out of date browser. It may not display this or other websites correctly.
You should upgrade or use an alternative browser.
You should upgrade or use an alternative browser.
Microscale decal question
- Thread starter Toolbelt
- Start date
-
- Tags
- decals microscale number set
ModelRailroadForums.com is a free Model Railroad Discussion Forum and photo gallery. We cover all scales and sizes of model railroads. Online since 2002, it's one of the oldest and largest model railroad forums on the web. Whether you're a master model railroader or just getting started, you'll find something of interest here.

I'm so far having good results with Guggenhein scissors, and they sell a small pairs of embroidery scissors which might be what you would want.
https://www.guggenhein.com/products/iv-precision
I have the 4.1 inch version. Also useful for...nose hairs.

You can carefully wick up some of the water...and reapply it if needed too...with the corner of a Kleenex or a strip of tissue paper (not the waxed kind). The idea there is to get the water up once you have it placed so it doesn't float into a new location on the water before the water evaporates naturally.
It's tricky at first, but you'll get the hang of it.
One thing about placing individual numbers, or numbers or letters close together is to try to avoid having one clear blob atop another. Which is why you want to trim them as close as you can where they will bump up against another decal. Seems particularly true with your set, as there really is very little space. If you try to put them as close together as the rest but they just won't "go" together, it's likely the clear film blob--one side or the other or both--that's the culprit.
Number boards are usually individually numbers printed/painted on individual glass or (in the more modern era) translucent plastic panes, and they can line up rather raggedly at times. So there is some wiggle room there.


Affiliate Disclosure: We may receive a commision from some of the links and ads shown on this website (Learn More Here)
Snowman
Well-Known Member
Hold the sheet up to a light and look at it sideways (from a shallow angle, almost "across" the sheet, rather than from above. Each decal will have a "clear" coat sheen either underneath or on top or both. OR there may be nothing obvious at all, in which case they might be printed on one solid backing and not be individual bits of art at all.
The bottom side (printed before the actual decal art is printed) also has a soluble glue, which affixes the decal to the sheet (it loosens when you soak the decal paper with water). Each individual bit of art/logo/number will show a slightly larger reflection than just the art--the edges of the clear base layer will extend just a bit beyond the edge of the actual art everywhere. If the individual numbers are each on their own "clear blob," then they will come off separate from the rest. If, say, number 5244 is lined up, and if 5245 follows, there is a good chance each is intended for a specific locomotive/unit and they are probably all printed on the same blob so they stay in alignment--so you don't have to apply each one individually. Many sheets will have sets of numbers and a row or rows of numbers too. If a row runs 1 2 3 4 5...etc...they will probably each be their own number as a stand-alone. Harder to line up three or four numbers that way, but usually the only method for custom/one-of-a-kind numbering.
In this case the last four numbers are NOT in numerical order, so I would bet the whole strip is printed onto one long blob. In which case you cut out the specific set you want. But double check it first by holding it up and looking at the way I described above. It would be a shame to assume 5549 is a set, then soak them and find out they aren't.
The bottom side (printed before the actual decal art is printed) also has a soluble glue, which affixes the decal to the sheet (it loosens when you soak the decal paper with water). Each individual bit of art/logo/number will show a slightly larger reflection than just the art--the edges of the clear base layer will extend just a bit beyond the edge of the actual art everywhere. If the individual numbers are each on their own "clear blob," then they will come off separate from the rest. If, say, number 5244 is lined up, and if 5245 follows, there is a good chance each is intended for a specific locomotive/unit and they are probably all printed on the same blob so they stay in alignment--so you don't have to apply each one individually. Many sheets will have sets of numbers and a row or rows of numbers too. If a row runs 1 2 3 4 5...etc...they will probably each be their own number as a stand-alone. Harder to line up three or four numbers that way, but usually the only method for custom/one-of-a-kind numbering.
In this case the last four numbers are NOT in numerical order, so I would bet the whole strip is printed onto one long blob. In which case you cut out the specific set you want. But double check it first by holding it up and looking at the way I described above. It would be a shame to assume 5549 is a set, then soak them and find out they aren't.
Last edited:
Snowman
Well-Known Member
I would bet it would but...see above. As for the right side (clear blob extension) right of the #9, this is why it's recommended to cut close to the actual art if you can. A razor knife is typically preferred, but you can also use a GOOD set of scissors too.I want to apply #5549 to my steam cab. Are the numbers on this sheet individual or joined continuously? Will there be decal film to the right of the #9 which also needs cutting? If I cut between the #2 and #5, will the 5549 come off as a single number panel?
View attachment 262469
I'm so far having good results with Guggenhein scissors, and they sell a small pairs of embroidery scissors which might be what you would want.
https://www.guggenhein.com/products/iv-precision
I have the 4.1 inch version. Also useful for...nose hairs.
Last edited:
Toolbelt
Well-Known Member
If I cut closely around the edge, won't it make it difficult to hold onto the backing while sliding the decal off?I would bet it would but...see above. As for the right side (clear blob extension) right of the #9, this is why it's recommended to cut close to the actual art if you can. A razor knife is typically preferred, but you can also use a GOOD set of scissors too.
Snowman
Well-Known Member
If I cut closely around the edge, won't it make it difficult to hold onto the backing while sliding the decal off?
That's one tradeoff, yes. If you can live with the edge of the clear blob to the right of the last 9, then you can cut a longer piece of paper to hold onto, true. But not for any sets further left, once you cut between those numbers. You can also cut a bit higher at the top and leave a "holding tab" of paper up there (or down below instead), and you can grip that with tweezers, but at some point the decal will come away from the paper anyway, so you might as well get used to it and practice (practice with other rows or sets first until you get the hang of it). A fine artists brush, like a 0, 00, 000 (sizes) coupled with a (small) bit of water can usually help you push the decal around until you have it where you want it. But do NOT touch it after you get it placed and particularly do not try to pat it dry from above. You'll lift your patting-dry-tool and say "well, where did it just go?" A: It's now stuck, to your patting-dry-tool.If I cut closely around the edge, won't it make it difficult to hold onto the backing while sliding the decal off?
You can carefully wick up some of the water...and reapply it if needed too...with the corner of a Kleenex or a strip of tissue paper (not the waxed kind). The idea there is to get the water up once you have it placed so it doesn't float into a new location on the water before the water evaporates naturally.
It's tricky at first, but you'll get the hang of it.
Last edited:
Toolbelt
Well-Known Member
Yes I know what you're saying. Modern decals are so thin it's hard to to see where the decal ends and the backing begins.. I would assume the groupings of numbers were, while appearing random, actually laid out such that all the prototype matching groupings are covered. In my case, #5549 matches the CN 4-6-2 Pacific I'm modelling. In bright sun, it seems that each row of numbers is connected under one continuous film, which begins just before the first #1 and ends just after the last #9. So I'll just cut close to the first #5 in my number and leave a little to right of the #9 so that I can grab the backing with tweezers. They certainly do pack the digits close together with very little backing exposed to grab.Hold the sheet up to a light and look at it sideways (from a shallow angle, almost "across" the sheet, rather than from above. Each decal will have a "clear" coat sheen either underneath or on top or both. The bottom side (printed before the actual decal art is printed) also has a soluble glue, which affixes the decal to the sheet (it loosens when you soak the decal paper with water). Each individual bit of art/logo/number will show a slightly larger reflection than just the art--the edges of the clear base layer will extend just a bit beyond the edge of the actual art everywhere. If the individual numbers are each on their own "clear blob," then they will come off separate from the rest. If, say, number 5244 is lined up, and if 5245 follows, there is a good chance each is intended for a specific locomotive/unit and they are probably all printed on the same blob so they stay in alignment--so you don't have to apply each one individually. Many sheets will have sets of numbers and a row or rows of numbers too. If a row runs 1 2 3 4 5...etc...they will probably each be their own number as a stand-alone. Harder to line up three or four numbers that way, but usually the only method for custom/one-of-a-kind numbering.
In this case the last four numbers are NOT in numerical order, so I would bet the whole strip is printed onto one long blob. In which case you cut out the specific set you want. But double check it first by holding it up and looking at the way I described above. It would be a shame to assume 5549 is a set, then soak them and find out they aren't.
Toolbelt
Well-Known Member
Oddly enough, my first decaling experience after taking a 40+ year hiatus was doing the number boards on my Athearn RTR GP50 where I had to put individual decal digits on top of number board background decals. I've just never did number groupings before and didn't want to assume the groupings apply in one piece together rather than individual digits.That's one tradeoff, yes. If you can live with the edge of the clear blob to the right of the last 9, then you can cut a longer piece of paper to hold onto, true. But not for any sets further left, once you cut between those numbers. You can also cut a bit higher at the top and leave a "holding tab" of paper up there (or down below instead), and you can grip that with tweezers, but at some point the decal will come away from the paper anyway, so you might as well get used to it and practice (practice with other rows or sets first until you get the hang of it). A fine artists brush, like a 0, 00, 000 (sizes) coupled with a (small) bit of water can usually help you push the decal around until you have it where you want it. But do NOT touch it after you get it placed and particularly to not try to pat it dry from above. You'll lift your pat-tool and say "well, where did it just go?" A: It's now stuck, to your patting tool
You can carefully wick up some of the water...and reapply it if needed with the corner of a Kleenex or a strip of tissue paper (not the waxed kind). The idea there is to get the water up once you have it placed so it doesn't float into a new location on the water before the water evaporates naturally.
It's tricky at first, but you'll get the hang of it.
Attachments

Snowman
Well-Known Member
Much the same for me, although maybe not that long a hiatus. As it happens I recently found a box...a box originally filled with bank checks...from my HO days, and those are all gonna be thinfilm I do think. But I don't know that checking them myself would do you any good anyway. It's YOUR sets that matter.Oddly enough, my first decaling experience after taking a 40+ year hiatus was doing the number boards on my Athearn RTR GP50 where I had to put individual decal digits on top of number board background decals. I've just never did number groupings before and didn't want to assume the groupings apply in one piece together rather than individual digits.
One thing about placing individual numbers, or numbers or letters close together is to try to avoid having one clear blob atop another. Which is why you want to trim them as close as you can where they will bump up against another decal. Seems particularly true with your set, as there really is very little space. If you try to put them as close together as the rest but they just won't "go" together, it's likely the clear film blob--one side or the other or both--that's the culprit.
Number boards are usually individually numbers printed/painted on individual glass or (in the more modern era) translucent plastic panes, and they can line up rather raggedly at times. So there is some wiggle room there.
Toolbelt
Well-Known Member
I'm lucky in that my number just happens to be at the end of the row on the decal sheet, and also, on these cabs, the cab number is the only lettering on a relatively large flat surface. I went through prototype photos and 5549 is the only usable number for the 4-6-2 from this decal sheet.Much the same for me, although maybe not that long a hiatus. As it happens I recently found a box...a box originally filled with bank checks...from my HO days, and those are all gonna be thinfilm I do think. But I don't know that checking them myself would do you any good anyway. It's YOUR sets that matter.
One thing about placing individual numbers, or numbers or letters close together is to try to avoid having one clear blob atop another. Which is why you want to trim them as close as you can where they will bump up against another decal. Seems particularly true with your set, as there really is very little space. If you try to put them as close together as the rest but they just won't "go" together, it's likely the clear film blob--one side or the other or both--that's the culprit.
Number boards are usually individually numbers printed/painted on individual glass or (in the more modern era) translucent plastic panes, and they can line up rather raggedly at times. So there is some wiggle room there.
Toolbelt
Well-Known Member
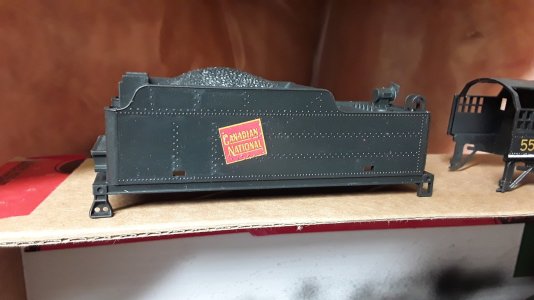
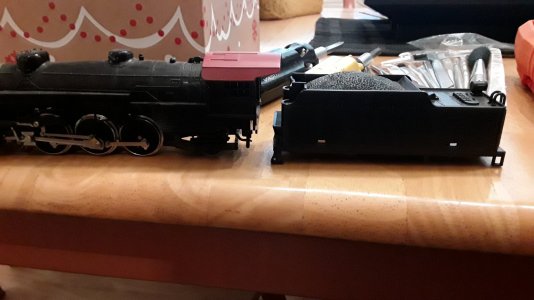
Thanks.Well, like I said, if it's been a long time, or you aren't confident about using the two end number sets in the row, practicing with some of the others first to get the hang of it again will probably be worth your time.
Whether you do or you don't good luck.

Toolbelt
Well-Known Member
Luckily this old girl has no road numbers, however this decal set had all sorts of smaller decals for steam pressure and tender water capacity, etc etc but being they are such small font and gold (like the perimeter of the cab #'s), against the dark loco, they'd be impossible to see from even inches away. I'm not trying to go rivet counter on this one and highly doubt it will even be on my layout (70's-90's era), so it was just a fun side project. And if the fireman needs to know the tender water capacity, he can just keep filling it until it spills over the sides. lolThose cab numbers aren't so bad! It's the little ones under the headlight and on the number boards that are such little stinkers. They will teach you patience!
Toolbelt
Well-Known Member
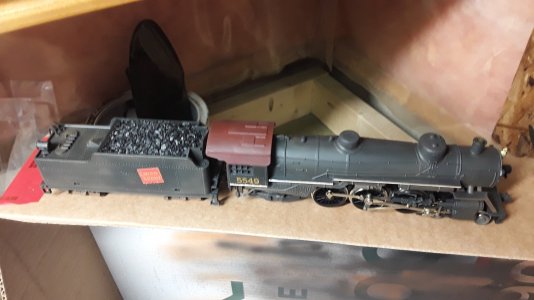
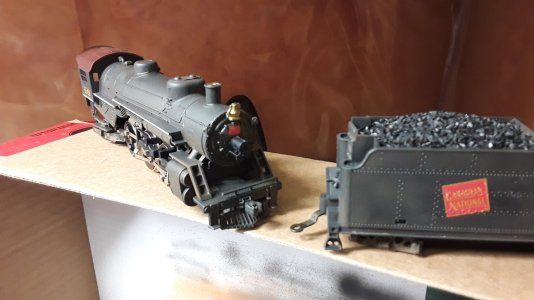
Getting near the end now. Gave me some experience with decals and airbrushing and powders. Added coal ballast over the original plastic coal and added "glass" to the cab windows. Replaced the amber 12v bulb in the tender and replaced the truck mounted coupler with a body mounted Kadee #147. Looking alright for a low mileage 39 yr old. I may end up running this on my layout for a bit now, though I'm not really into steam. 
Attachments

Affiliate Disclosure: We may receive a commision from some of the links and ads shown on this website (Learn More Here)