ModelRailroadForums.com is a free
Model Railroad Discussion Forum and
photo gallery. We cover all scales and sizes of model railroads. Online since 2002, it's one of the oldest and largest model railroad forums on the web. Whether you're a master model railroader or just getting started, you'll find something of interest here.
Hey Jim once off my day shifts I was going to do a little photo tutorial for photobucket picture posting , glad you got it figured out. Your pics show alot of some fine work. Test the track but don't let the track testing stop you from doing scenery. Tony risers and such don't have to look good they just have to do the job.
Jim,
Your canyon/gorge is going to look great and is something I am wanting for my layout as well. Watching your progress is certainly very helpful to me.
Can I ask what you used for the webbing or to form your gorge, it looks like cardboard to me?
I would have to suggest it's cardboard strips . Best way to go at it is a high heat glue gun or heavy duty stapler and just form the terrain with cardboard , lay down some plaster cloth or what ever is available and plaster it up.
Lynn , if you are still in the mood to do a tutorial feel free to do a rock tutorial , as you see in some of those pics I need a lot of tutoring on that

Tony , I used regular old cardboard that I cut into about 3/4 inch wide strips and then stapled them together to form the shape I wanted . You can push and pull on the individual strips before you staple them together to help make humps , bumps and divots . I cut the cardboard at 90 degrees to the inside webbing so the strips are flexible and can be shaped easier .
Jim I was speaking only of photobucket tutorial , rocks are a whole different ball game. I use mostly bragdon molds , ws coloring system because it works and a whole lot of terrain buildup from there.
Jim,
Thank you, might have to "experiment" before I try this technique on the actual layout
Looking fine Jim. Saw he photos on my phone last night and wanted to wait to see tham again on a larger format. Sure looks like you figured out how to post pictures. Looking real fine. Waiting to see the future progress. Well done.

Thanks guys . Can any of you point me to a good rock tutorial , my rockwork desperately needs help . I can not seem to realistically put molded rock together and my carving abilities are non-existant
Rock work can be interesting. I used Woodland Scenics rock molds. I used Hydrocal because that's what I had on hand. Just pieced tham as close together as I could. Any open areas were filled in and scenic cover was put on these areas of some coarse foam for bushes.
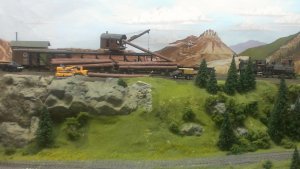
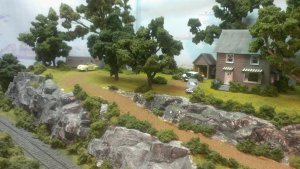
I think a lot of issues with making rockwork look good is in the coloring, I use woodland scenic coloring system exclusively as it is always consistant. I have tried using material other than plaster of paris but found they didn't take the color well and so I stick to plaster of paris. I use bragdon molds for the most part but also have a few larger woodland scenic molds. The other thing I find helps alot is building up the rock surface of the rocks and have found the woodland scenic poly fiber helps a great deal.
This video may help a bit
https://www.youtube.com/watch?v=54momizl0TM
Lynn,
Do you have any recommendations for which Bragdon molds to get? I have looked at their site and they have so many to pick from. They are also a little on the high side (price wise) so would like to not have to do a "trial and error" buy, if you know what I mean.
Jim,
I have a few WS rock molds, and they are pretty good. The problem I have, which I think is what you are having, is how to place those rocks on the layout so they look realistic, especially with rock or cliff faces. Color wise, I too use WS and try to replicate the colors of the rocks around me.
One other option is to create your own rocks (free hand so to speak) using plaster of paris. For cliff faces you can use tin foil crumpled up then laid out in any shape. You can then "pour" thin layers of plaster onto the tin foil. That seems to create interesting "faces".
Tony I can only recommend to buy the larger molds that you like the rockwork in. As you can see with the two rock molds I have ( actually think I have three ) , one I cut in half as it was too large to handle for applying wet molds. I also sometimes just pour in parts of the mold with plaster I may have left over. I often find I get a satisfying outcome if I layer the rock molds when there being applied hard and pushing them and fracturing the rocks to get that cracked rock ready to fall off the cliff look.
That's exactly it Tony , I have several rock molds and can make the rocks , no problem . The problem comes after that when I have to figure out how to attach them in a manner that does not look forced or un natural .
Lynn , could you elaborate a little on what you mean by building up rock faces and how you do that with poly fiber?
Chet , when you " fill in open areas" do you try to carve that filled area also or just smooth it out and figure the entire fill will be covered?
Jim what I mean by building up the rock faces and this is my personal preference of course is to first color the rocks then I'll take some polyfiber and stretch it out as thin as I can get it so it is see through and now lay it on the rock face so it covers quite a bit but still shows lots of the rock. I will then give the area a spritz of the homemade scenic cement , then follow up with a sheet a paper with ws earth on it and gently blow it on the area , rock and polyfiber , now I may take some green foam or burnt grass and sprinkle it on going back and forth in layers then I may take some of the ground up twigs leaves etc that I ran through the wifes blender and sprinkle it on here and there. Of course this all depends on the area I'm modeling. I may lay down some to scale fallen down trees which are basicly twigs. Perhaps blow on some more earth . I also sift my own baseball diamond dirt and put it in a peanut butter container with a panty hose for a lid and shake this over the entire area.
Hope you get the idea Jim , basicly I build up the area in layers.
Lynn , that came from a 4 part series on you-tube. I think Chris Lyon was the artist . He made it look so easy that I thought even I could do it . I really liked his idea that the background needed to give an "impression" and not be the focus as such . After accepting that thought , it became much easier to overlook the mistakes and just continue to paint right on over them , more to create depth than anything . I still have more to do , but am pleased with the results so far .
Thought so Jim. Few years back I asked Chris to do some Videos on his techniques but just wasn't getting it so wife and I made a vacation trip out of it and he gave me a hands in tutorial and another guys RR and caught on right away. Him and his wife also were great hosts for the stay and gave a grand tour of Ottawa.
here is a continuation of the mountain , unless someone points out the flaws I am not seeing I think this shape is done .
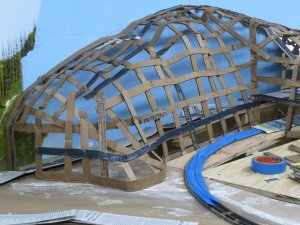
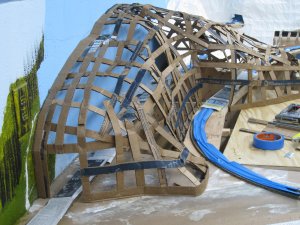
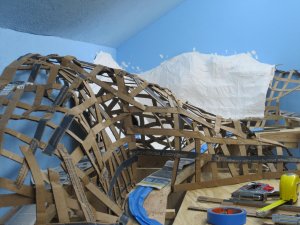
I hate it when work gets in the way of the railroad !!!

Affiliate Disclosure: We may receive a commision from some of the links and ads shown on this website
(Learn More Here)



