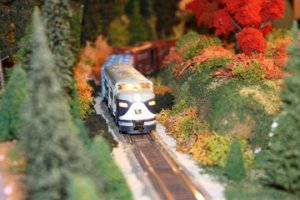
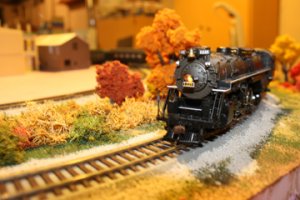
First time here - my layout, in progress

ModelRailroadForums.com is a free Model Railroad Discussion Forum and photo gallery. We cover all scales and sizes of model railroads. Online since 2002, it's one of the oldest and largest model railroad forums on the web. Whether you're a master model railroader or just getting started, you'll find something of interest here.


Attachments

  • IMG_7753-copy.jpg
    IMG_7753-copy.jpg
    93.8 KB · Views: 479
  • IMG_7795-copy.jpg
    IMG_7795-copy.jpg
    94 KB · Views: 480
Looks like a great start. My only suggestion is to get rid of the lichen and replace it with Woodland Scenics ground foam and clump foliage. I know the lichen is cheaper to begin with but it doesn't look like real plants and it will be come brittle and dried out looking pretty quickly.
 
I understand what you're saying

Looks like a great start. My only suggestion is to get rid of the lichen and replace it with Woodland Scenics ground foam and clump foliage. I know the lichen is cheaper to begin with but it doesn't look like real plants and it will be come brittle and dried out looking pretty quickly.

I do have the dark green clump foliage, but could not find the fall clump foliage. I was trying to recreate decidious bushes. I know there are also grasses you can get, which is my next step.


I think weathering your track might help it look better. At least tone down the plastic sheen with an airbrush or spraycan of a weathering color, but if you do, remember to wipe down the railheads afterwards.
 
I don't have an airbrish, but what can I do to achieve the weathering effect? What would I need to deal with the plastic roadbed? I could put ballast on top of the whole thing and in between the rails, but I think that would defeat what I may need to do later on, which is to replace the track without taking out the roadbed. This is Atlas True Track, and I can replace the rails without removing the roadbed.

Again, any advice is appreciated, but remember this is my first full-fledged layout, and I'm still learning some of the skills and don't want to goof up and have to do a lot of wholesale replacements. I just had to send back my Digitrax Zephyr today after it completely blew out. Very little warning, either. It was acting a little goofy when trying to program engines, and then went into d nd, not recognizing one of my decoders when trying to program it, and then finally, the Zephyr completely died, with enough smoke coming out of the Loconet ports to keep Puff The Magic Dragon happy. Remember that song? Mary Travers of Peter, Paul and Mary fame recently died.
 
I don't have an airbrish, but what can I do to achieve the weathering effect? What would I need to deal with the plastic roadbed? I could put ballast on top of the whole thing and in between the rails, but I think that would defeat what I may need to do later on, which is to replace the track without taking out the roadbed. This is Atlas True Track, and I can replace the rails without removing the roadbed.

Again, any advice is appreciated, but remember this is my first full-fledged layout, and I'm still learning some of the skills and don't want to goof up and have to do a lot of wholesale replacements. I just had to send back my Digitrax Zephyr today after it completely blew out. Very little warning, either. It was acting a little goofy when trying to program engines, and then went into d nd, not recognizing one of my decoders when trying to program it, and then finally, the Zephyr completely died, with enough smoke coming out of the Loconet ports to keep Puff The Magic Dragon happy. Remember that song? Mary Travers of Peter, Paul and Mary fame recently died.


Get a spraycan of brown paint. Mask the ballast with masking tape. Spray the track. Wipe the railheads clean with a paper towel.
That's all you need to do to make it not shine like a beacon.
 
I don't have an airbrish, but what can I do to achieve the weathering effect? What would I need to deal with the plastic roadbed? I could put ballast on top of the whole thing and in between the rails, but I think that would defeat what I may need to do later on, which is to replace the track without taking out the roadbed. This is Atlas True Track, and I can replace the rails without removing the roadbed.

Again, any advice is appreciated, but remember this is my first full-fledged layout, and I'm still learning some of the skills and don't want to goof up and have to do a lot of wholesale replacements. I just had to send back my Digitrax Zephyr today after it completely blew out. Very little warning, either. It was acting a little goofy when trying to program engines, and then went into d nd, not recognizing one of my decoders when trying to program it, and then finally, the Zephyr completely died, with enough smoke coming out of the Loconet ports to keep Puff The Magic Dragon happy. Remember that song? Mary Travers of Peter, Paul and Mary fame recently died.
Larry these two gentlemen got's the 411 on how to weather the unitrak!

http://www.powersteamguy1790.com/5.html

http://home.comcast.net/~j.sing/Peavine_Layout_Overview.html

BTW: Larry I love unitrak too, makes life easy!:)
 
Larry, sorry about the Zephyr, but all electronics are subject to failure, especially in the first 10 or 20 hours of use. Digitrax makes a good product and they'll get you out a new one.

In terms of track weathering, are you saying that you are laying down ballast loose and not gluing it down? If so, that's really a mistake, since it will continue to shift around, get in your engines, and just not look good. You can secure ballast with a 50/50 mixture of white glue and water with a little isopropyl alcohol added. Spray down the ballast good with a regular spray bottle with 90% water, 10% alcohol, and few drops of liquid dish washing soap. That will help the glue mixture penetrate evenly. Use an eye dropper to apply the glue mixture once you have the ballast looking the way you want it. You can always remove a track by just doing the reverse, spraying the roadbed down well with the water/alcohol mixture. It will dissolve the glue and allow you to remove track with minimal effort.

Before you start ballasting, I'd spray the tracks with some Floquil Rail Brown from a spray can, since you don't have an airbrush. Don't worry about getting it on the ties since it will all blend together once you've finished ballasting and weathering. Just use a rag to wipe the paint off the tops of the rails before the paint dries and don't spray switches at all. You need to do these by hand so you don't gum up the works.

This is where Floquil paint pens come in handy. You can use Rail Brown and rust to paint the web surfaces of the tracks. You should do switches with just the paint pens but you can go back and touch up the rail webs with the paint pens after doing a general spray job. If you really want the track to look good, use some weathered black and mud pens and color random ties with each color. This will give the illusion of a roadbed with some newer ties (black from the creosote) and older ties, that have taken on a muddy color from being in the weather so long.

Once you have the tracks painted, the ballast glued and dried in place, and have done your touch up work with paint pens, you can weather the center of the roadbed with chalks. You can get inexpensive artist's chalks at craft stores. Just scrape off some black, to represent oil stains, and a light brown, to represent mud, as you go around the tracks. Use your fingers to spread out the chalk and work it into the ballast. The chalk will stay put once its worked in.

None of this is difficult, just tedious. However, if you do all this to your tracks before you go any further, you'll have a much more realistic layout when you're done. This is an example I did using Bachmann E-Z track and I think you'll agree it looks a lot better than it did when it came out of the box. :)
 
What I had planned on doing

I like the suggestion about weathering the rails. What I was planning on doing is leaving the top part (the ties) bare with the plastic, and just having the ballast either along the edge (Something I picked up in Model Railroader Magazine), or cover the entire bank of the plastic roadbed up to the top. I wasn't planning to put ballast between the rails and ties.


You can salvage that lichen Larry. Get a little liquid glycerin solution and spritz it on the lichen. That will make it pliable. Then sprinkle it with some WS coarse turf. No one will know it's lichen but you.

I think drug stores still have glycerin liquid.
 
I found some of that liquid glycerin solution, now what do I do?

West Virginia Midland Man:

I found some of the liquid glycerin solution, and want to apply it to my lichens. Do I have to mix it with water, as the directions for the glycerin says? How do I put it on my lichens?

My goal was to have the fall colors on the lichens, because in Michigan in the fall, we get colors for grass in the undergrowth between and underneath trees, as well as any weeded areas. That was the reason behind the lichens. I like the idea of sprinkling a little corse turf on it, but I don't want to lose the fall color feel that I'm trying to produce.
 
I'd follow the instructions and use a spray bottle to mist it on. This is an old school solution, few modelers use lichen anymore, but this is what the old modelers did to keep their lichen moist.
 
You'll have to repray the lichen ab out one a year, since the glycerin will evaporate. If you have used enough glycerin, the lichen should feel soft and pliable. As soon as it starts feeling stiff, spray it down again. I fyou use any more lichen, it's much more effective to soak it in a glycerin-water mixture and let it dry first. The lichen will stay in good shape longer with this method.
 
The reason for the lichens was because I was trying to model northern Michigan undergrowth. I have since put some coarse grass in red and yellow to highlight the color a bit more. I will have some pictures ASAP.
 
I have new photos of my layout, in progress.

Visit my Facebook photo album at:
Larry's model railroad, in progress

The changes are on the second page. And I apologize for the darkness, because the lighting in the basement is not the greatest.

I do have some questions concerning my buildings, though. I have had a lot of trouble with excess glue, and want to find a way to get some of it off so I can have the buildings look better. And on my Merchants Row building, I have issues with the places where the plastic was joined with the sprues. I tried using a file to remove it, but they still show.

Would something like nail polish remover work for removing excess glue? If not, what would?

You can see them on my Facebook photo album.

I have shown some of the places under construction still, as well as the lakebed I'm creating. The photos don't do it justice right now, because it is still white. When I put some gray and black effects on it, it will look much better on the rocks, and when I put the tan and black on the lake itself, and cover over it (this lake will have some ripples on it), it will look much better overall.

I still have yet to lay my city street.


What type of glue are you using Larry? The experienced modeler almost always uses liquid glue (Testors, Plastruct, etc; the kind with the little brush in it.) The model airplane type glue which comes in a tube is OK, but the glue's thicker and if it runs, you get blobs. They can be removed like so:

1. Let it dry. Don't mess with it until it's dry. The more you mess with it before it dries, the more damage you will do to the surface of whatever it's stuck on.

2. Get an X-Acto chisel blade. Once the glue is 100% dry, carefully and slowly chisel away the excess glue a little at a time until it's all gone.

3. Paint the building with acrylic paints, then weather over the error. Chances are, you will be the only one who even knows it's there.

Option: Cover up a mistake with a sign if it makes sense.


Affiliate Disclosure: We may receive a commision from some of the links and ads shown on this website (Learn More Here)

Back
Top