Diesel ditch lights

ModelRailroadForums.com is a free Model Railroad Discussion Forum and photo gallery. We cover all scales and sizes of model railroads. Online since 2002, it's one of the oldest and largest model railroad forums on the web. Whether you're a master model railroader or just getting started, you'll find something of interest here.


Peter MacCauley

New Member
Hi, everyone. I'm new to the forum, so this will be my first post.

I'm interested to see if anyone has installed ditch lights on modern HO scale diesel locomotives. I know there was an article about this in the newest MR, but i want to see if anyone has done this on non-Athearn locomotives, or widecab ones as well. Does anyone know how long it would take for one locomotive? If possible, i wouldn't mind seeing photos (either of the finished product or in-progress). Many thanks, Peter.
 
First off welcome to the forum.

I have added ditch lights to a Athearn R-T-R C44-9W. I don't have any pictures of it, but all I did was drill out the ditch light housings and added light bulbs.

-Smoke
 
http://www.modelrailroadphotos.com/photos/showphoto.php?photo=2504&ppuser=1356

is one of my photos in the gallery here on this site. Mine is not focused on the lights but I am sure there are others in the gallery. Installing ditchlites is deciding what kind of bulbs, grain of wheat or LED, finding or making a housing and just doing it. This one used grain of wheat (GOW) bulbs and a Details West casting with the back removed to make room for the wires. The wires go down behind the pilot and up into the shell and to the decoder. Which reminds me, don't forget resistors! What value resistor? [V(source)-V(bulb)]/current of bulb [13V-1.5V]/.02A =600 Ohm


Here's one I've been checking out.
http://www.accuratelighting.com/

Adding them is not so hard. DC or DCC you can wire it to the same lead as the headlights, so they only work in on direction. In DCC you can also use a function lead, so you can turn them on or off, or make them flash, ect.

Few options for installing:
Large anti-climber, deck mounted: Drill through the pilot, and through the anti-climber, and then install the casting, and the bulb, running the wires through.

Small anti-climber, drill diagonally away from the pilot, then drill just a tad more of the walkway straight down, for wire clearance. Insert wires, place casting over bulb and secure.

Pilot mounted, drill through the pilot, and casting, insert bulb, with wires going through pilot.
 
Drilling and soldering, that's the easy part. What's been holding me back is figuring out how to get the shell back on without pinching or otherwise damaging the wires.
 
I've done two so far and I'm working on my 3rd one now. My first was this Athearn BB SD40-2. I used Details West DL-228 ditchlights in which I drilled out the insides enough to place a 1.5v 15mA 1.2mm Miniatronic incandescent lamps.
IMG_2953.png

(BN unit are not working ditchlights for the unit is a dummy)
Next I used the same stuff for my Athearn Genesis MRL SD45-2 #310 that I custom painted. This time I took a file and rounded the corners to match the prototype #310's ditchlights.
IMG_2950.png


Now unlike the article in MR I do NOT like to have any wires exposed so I drill from the top of the walkway at the location of the lights trying not to go all the way through. Then drill from underneath the walkway through the anticlimber directly to my downward hole. Run the wires in the holes and place my ditchlight housing right over the bulb and glue it down.
IMG_2955.png

(Note: you can NOT see any wires)
 
Last edited by a moderator:
Now here is the one that I am working on next. You ask about wide cabs. Kato puts ditch lights on their Dash 9's but they are under the anticlimber and area where I haven't seen to many of the prototype have them. (Not true but for this model of BNSF H1 I mean). So with this Athearn Blue Box that I am superdetailing, I chose to place them on top of the Anticlimber. This one is a little difficult due to the additive flange that is used for the GE engines. I use Details West DL 243 w/platforms to do the job. I use the exact same bulbs as before, and do the exact same thing when it comes to drilling out for the wires.
IMG_2962.png

IMG_2961.png

IMG_2963.png
 
Last edited by a moderator:
One big secret of the trade is, If you want flashing ditchlights, use Incandecants, just bright ones Golden White LED's, dont go with pure white as they will look blue.
 
zgardner18, Those ditch lites look great, You said you custom painted that MRL #310 right. I am wondering what brand and and color you sed to paint the blue, have a SD45 I wanna do as a MRL myself. Thanks for your help
 
The NCE decoders do some cool things with ditch lights as well. Alternating, delay-on, etc.

Has anyone simply used a surface mount LED as the light (casing and all), modding the shape of it a bit to suit?

Mark


i need to add ditch lights to every single engine I have. Well not the kato but they light up with the led thats for the heads too.

When using the DW ditch light kit, do you drill out the front for a hole and the bottom where it would mount?
 
Here is one I used 2x3mm SMLEDs for the ditchlites. They are from n-gineering. The headlite is a 3mm LED. There are no wires between the shell and chassis. I used spring contacts to take electricity from the decoder to the lights.
http://members.trainorders.com/pmack/gp39e/bn_gp39e.htm

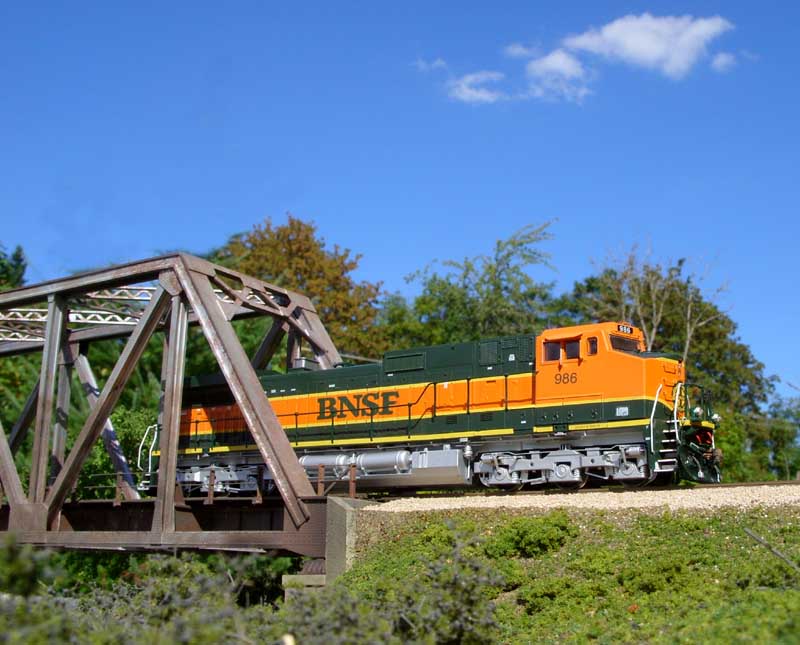
my BNSF 986:
bnsf986.jpg


Sorry I don't have ditchlite closeups.
 
Last edited by a moderator:
zgardner18, Those ditch lites look great, You said you custom painted that MRL #310 right. I am wondering what brand and and color you sed to paint the blue, have a SD45 I wanna do as a MRL myself. Thanks for your help

I painted the SD45-2 #310 and I also painted the SD45 #369 next to it. I use FLoquil Dark Blue for my blue and Floquil engine black for the black. Now I have a friend that has painted over 50 MRL engines and he loves to use Poly Scale CSX Blue and his look very nice. Great thing about MRL is that they have had different companies paint their engines and they all differ in blues. Now if you are looking for a SD45 in MRL and you don't really want to paint it, you could do what I am doing and just wait for Athearn to come out with a MRL in their new RTR SD45. Athearn has been really good about coming out with a lot of MRL units lately. I'm guessing/hoping that they also produce a MRL unit in their new F45.
 
Last edited by a moderator:
i need to add ditch lights to every single engine I have. Well not the kato but they light up with the led thats for the heads too.

When using the DW ditch light kit, do you drill out the front for a hole and the bottom where it would mount?

When drilling I come from the bottom up. You have to be real careful when drilling them out. I've done a few now and still I blow out the backs. Don't worry if you do just pick up some MMD fast drying White Putty at your LHS and just putty the backs or where ever you blew through, paint it and its a good as new. Then just use super glue to glue the light housing to the deck, hook up your wires and presto you got real looking/working ditchlights. Now the wiring is a different story that might be better explained by someone else.
 
Here is one I used 2x3mm SMLEDs for the ditchlites. They are from n-gineering. The headlite is a 3mm LED. There are no wires between the shell and chassis. I used spring contacts to take electricity from the decoder to the lights.
http://members.trainorders.com/pmack/gp39e/bn_gp39e.htm

my BNSF 986:
[ IMG]http://members.trainorders.com/pmack/temp/bnsf986.jpg[ /IMG]

Sorry I don't have ditchlite closeups.

Hey Paul, good to hear from you. I like your version of the BNSF #986. I hope that mine comes out just as good as yours. Is your a Blue Box too? You need to send me some more photos of it so I can check it out.
 
Here is my Athearn Blue Box BNSF Dash-9 that I have mostly finished. You can see my new ditchlights that will work once I convert it over to DCC.
IMG_3256.png


Here is also another picture of my Athearn Genesis SD45-2 with ditchlights.
IMG_3205.png
 
That Dash-9 looks really good Zak, nice work. I just bought one myself in CN colors and your detail work is definitely giving me some ideas. :cool:


Affiliate Disclosure: We may receive a commision from some of the links and ads shown on this website (Learn More Here)

Back
Top