Decals......the basics

ModelRailroadForums.com is a free Model Railroad Discussion Forum and photo gallery. We cover all scales and sizes of model railroads. Online since 2002, it's one of the oldest and largest model railroad forums on the web. Whether you're a master model railroader or just getting started, you'll find something of interest here.


Toolbelt

Well-Known Member
I will be putting some decals on a steam loco which I'm in the process of painting(flat paint). After placing the decals, my plan was to apply a flat clear. It's always recommended to apply decals to a glossy surface, so my initial thought was to apply a gloss coat to just the areas the decals would be placed, which I recently read was a no no. Others have said to at least gloss coat the entire panel/surface area for the decals while others have said to gloss coat the entire loco, apply the decals, and then apply a clear coat finish of choice to finish it off. Some have even suggested simply applying the decals directly to the flat paint. I'm looking for acceptable, not necessarily museum quality results here. This steam loco only needs a cab number if that plays any role. The cab sides are isolated from the rest of the loco. In my earlier modelling days 40+ years ago, I applied decals directly without even using Microset or Microsol, or top coating, with acceptable results. I guess I'm asking what can I get away with here.
 
My 2cents here, yes on the gloss coat first. But, if you are applying the gloss coat with an airbrush I would go just the area where the decal would go with a feathered edge, if with a brush I would go further to a panel edge. This will prevent a hard edge at the area around the decal.
 
My 2cents here, yes on the gloss coat first. But, if you are applying the gloss coat with an airbrush I would go just the area where the decal would go with a feathered edge, if with a brush I would go further to a panel edge. This will prevent a hard edge at the area around the decal.
So is the recommendation about avoiding spot-glossing mainly to prevent a raised physical outline, or does spot glossing (even if later applying a flat gloss) affect how the final paint colour appears (blotchy)?


It can be easy with crappy results, or it can be hard with excellent results.

It's not usually a matter of difficulty though, but how much effort do you want to expend to get excellent results?

You can half-ass it, or you can do it correctly. Your hobby, your railroad, and your choice. And your results.
 
I guess I'm asking what can I get away with here.
Decaling is one of the last steps, and not one I would be looking to "get away with" doing less than what's required for an acceptable job. I make sure I have a glossy surface. That can be a paint that dries glossy, or a gloss clear coat. After using setting solution of choice and letting it dry, and making sure no silvering has occurred, I apply a cleat flat or a 50-50 mix of clear and flat. This doesn't take a great deal of time. The urge to race to the finish line has caused mistakes that have required do-overs more than once in my experience. Do it right or do it over. ;)
 
Decaling is one of the last steps, and not one I would be looking to "get away with" doing less than what's required for an acceptable job. I make sure I have a glossy surface. That can be a paint that dries glossy, or a gloss clear coat. After using setting solution of choice and letting it dry, and making sure no silvering has occurred, I apply a cleat flat or a 50-50 mix of clear and flat. This doesn't take a great deal of time. The urge to race to the finish line has caused mistakes that have required do-overs more than once in my experience. Do it right or do it over. ;)
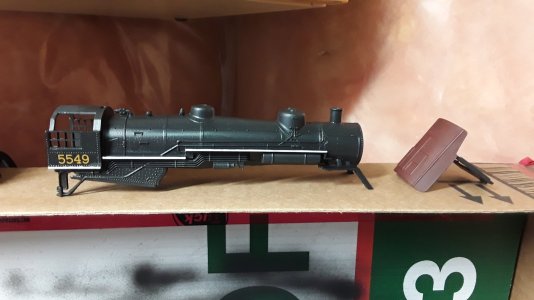
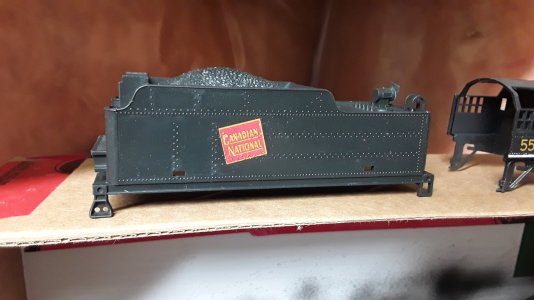
Normally I'm unhealthily picky about doing things 100% right, however this project is for a loco I don't intend to run or even display. I simply want to put a cab # and CN patch on the tender on a 40+ year old Mehano just for kicks. I don't need museum quality, but I also don't want to make a mess of it. Middle of the road would suffice in this case.
 
It can be easy with crappy results, or it can be hard with excellent results.

It's not usually a matter of difficulty though, but how much effort do you want to expend to get excellent results?

You can half-ass it, or you can do it correctly. Your hobby, your railroad, and your choice. And your results.
I'm looking for something between crappy and excellent on this particular project. A good result will suffice.
 
If you are just looking to do cab numbers another thought would be dry transfer numbers/letters. No gloss coat needed before, just a clear flat after to seal them in. I've used them for bumper numbers on military models with great success.


If you are just looking to do cab numbers another thought would be dry transfer numbers/letters. No gloss coat needed before, just a clear flat after to seal them in. I've used them for bumper numbers on military models with great success.
I just happened to be rummaging through a box of assorted decal sets at an old local hobby shop a couple of weeks ago and came across a Microscale CN steam loco set which started this whole project. lol
 
Ok fine, you all win. I'm going to pick up some gloss clearcoat (Alclad II ALC 600 Aqua Gloss Clear)
for my airbrush. My basement workshop is starting to look like a mad scientist's laboratory. 🥸
 
You'll be glad you did. Alclad is great stuff.
Im about 3 days in to the airbrush world and I think it takes longer to learn all the products than to actually spray. Thinners, reducers, flow controllers, acrylics, poly's, flat this/gloss that, lacquers blah blah blah. It's a sick world. haha I stumbled onto the Alcad as my hobby shop was out of the other gloss acrylics, but it reads like a good product so I'll pick some up tomorrow. My desire is to use water based, or at least water cleanable products, preferably of the stir/shake it and shoot variety. Seems even dedicated airbrush paints need the addition of thinners and flow controllers. I question why they don't just sell all-in-one type products.
 
When I was building 1/48 scale aircraft, Testors sold air brush ready paint. I used that and Poly-S back in the 80s. You had to thin the Poly-S, but it was no big deal to get it to spraying consistency.
 
When I was building 1/48 scale aircraft, Testors sold air brush ready paint. I used that and Poly-S back in the 80s. You had to thin the Poly-S, but it was no big deal to get it to spraying consistency.
It also seems like the various brands are not always compatible as far as thinners go, even if they're all acrylic type paints. Tamiya thinner is different than Vallejo thinner, etc etc.
 
I use Mr. Hobby - Mr. Leveling Thinner to thin everything except Vallejo which just gets water. I thin Model Master, Tamiya, Humbrol, Testors little bottles, Tru-Color and Gunze Sangyo to a 50-50 ratio using pipettes and a disposable medicine cups. SMS paints are close to airbrush ready and I usually only add a couple drops of MLT to break the surface tension a bit.

Practice on scrap and you should get the hang of it fairly quick. Once you start using it you will be amazed at what it can do. I'm to the point that I would rather spend 10 minutes masking than brush paint something due to the finesse you can get out of one.

In this photo look at the subtle difference between the orange where it goes over the green vs the yellow. Note that the orange is thin enough to be translucent. All the markings were masked and sprayed. The only brush work was the wash and drybrush for weathering.

IMG_0011.JPG
 
My desire is to use water based, or at least water cleanable products, preferably of the stir/shake it and shoot variety. Seems even dedicated airbrush paints need the addition of thinners and flow controllers. I question why they don't just sell all-in-one type products.
Gaahleri (https://www.gaahleri.com/) has introduced a line of water based acrylics designed to be applied un-thinned. I haven't used them myself, but I follow several scale modeler's on YouTube, and they seem quite impressed with them.
They have also come out with a color matching program to match colors for a specific project you may have going.
 
Well, almost done. Still need to weather and matt coat it. Full paint job and tune up as well.
 

Attachments

  • 20260419_183900.jpg
    20260419_183900.jpg
    238.1 KB · Views: 37
  • 20260419_183939.jpg
    20260419_183939.jpg
    244.8 KB · Views: 30


Affiliate Disclosure: We may receive a commision from some of the links and ads shown on this website (Learn More Here)

Back
Top