
You are using an out of date browser. It may not display this or other websites correctly.
You should upgrade or use an alternative browser.
You should upgrade or use an alternative browser.
Building the Pinnacle Creek Mining & Timber Co. RR
- Thread starter HOexplorer
- Start date
ModelRailroadForums.com is a free Model Railroad Discussion Forum and photo gallery. We cover all scales and sizes of model railroads. Online since 2002, it's one of the oldest and largest model railroad forums on the web. Whether you're a master model railroader or just getting started, you'll find something of interest here.


Mike
Sure about that? I see them in many 'Westerns' ... LOL
Sorry, I'll shut up now.
Some 'how to' pictures would be great! I sort of get what you're saying, but I'm not entirely sure...
Thanks , Mike
LOL
Mike
Well Erik , You Asked and here you go.
[video=youtube_share;VmsjvMA-EoE]http://youtu.be/VmsjvMA-EoE[/video]
Mike
Thumb is OK but up and down the ladder I have gotten something in my left knee and that is what is doing me in along with a cracked rib and I don't even want to tell you how I did that.
I hope it helped.
Thanks , Mike


Mike


Affiliate Disclosure: We may receive a commision from some of the links and ads shown on this website (Learn More Here)
DairyStateDad
Mumbling in the corner
Those are amazing! How did you do that?!
I like the way the edges are feathered, like the real thing, and the darker undersides, which add to the realism.
I like the way the edges are feathered, like the real thing, and the darker undersides, which add to the realism.
Sirfoldalot
Days Gone Bye!
Those look good from my "no artistic ability" eyes.
If I remember correctly .. Your layout will be desert one side and forest the other?
Very few, almost non existence, clouds over the desert .. Slightly more heavy as sky nears the mountains .. And heavy oner the forested area?
If I remember correctly .. Your layout will be desert one side and forest the other?
Very few, almost non existence, clouds over the desert .. Slightly more heavy as sky nears the mountains .. And heavy oner the forested area?
Look excellent to me, maybe not so close together for that wispy type.
HOexplorer
Well-Known Member
Thanks for the great comments. Much appreciated. First off as most of you know my back is not good. On my previous backdrops I simply painted the clouds with a brush and was quite happy with the results. I remember I do all my painting left handed because my right shoulder hurts after a short time. Anyway, I thought about something that would not hurt my back or shoulder and came up with spray cans just like the 'taggers' use. If you remember way back I mentioned that I do this modeling with a couple of things in mind. Do it cheap and do it with relatively easy to procure supplies. An airbrush, for example, does not fit my personal idea of cheap. So I don't use one.
Back to spray cans:
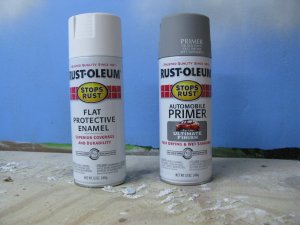
These come from Lowes since it is closer than HDepot. No difference in brands between any of the stores. I just get the color I want and don't worry about qualities.
Erik, I will do a tutorial on these clouds this week.
As for the comments: Sherrel we live in the few clouds zone I know. Even farther East the clouds are fewer, but I will have to have some clouds on the backdrop. I haven't seen a cloud here in San Diego County for 10 days, but I've seen plain blue backdrops and the words, dull, boring, unimaginative, and chicken s**t, because folks are scared to try clouds, come to mind. I won't have many but I have to have some.
Mike, Good point about the tops. I will try that. I know you sell cloud stencils and I'm not sure how they work?
Stoker, No trails. The year will be 1941 and they weren't as common as they are now. Jim
Back to spray cans:
These come from Lowes since it is closer than HDepot. No difference in brands between any of the stores. I just get the color I want and don't worry about qualities.
Erik, I will do a tutorial on these clouds this week.
As for the comments: Sherrel we live in the few clouds zone I know. Even farther East the clouds are fewer, but I will have to have some clouds on the backdrop. I haven't seen a cloud here in San Diego County for 10 days, but I've seen plain blue backdrops and the words, dull, boring, unimaginative, and chicken s**t, because folks are scared to try clouds, come to mind. I won't have many but I have to have some.
Mike, Good point about the tops. I will try that. I know you sell cloud stencils and I'm not sure how they work?
Stoker, No trails. The year will be 1941 and they weren't as common as they are now. Jim
Last edited by a moderator:
Fifer
Member
Jim , you do not need the stencils. Just rip up the edge of a couple pieces of cardboard (randomly) , hold it about a half inch of the surface and spray down at the ripped edge. Then use the other and even flip them over and use different angle to get other sizes and shapes.Mike, Good point about the tops. I will try that. I know you sell cloud stencils and I'm not sure how they work?
Jim
Mike
Sirfoldalot
Days Gone Bye!
Stoker, No trails. The year will be 1941 and they weren't as common as they are now. Jim
Sure about that? I see them in many 'Westerns' ... LOL
Sorry, I'll shut up now.
HOexplorer
Well-Known Member
Thanks Mike! I tried your method out and it works better. I've repainted my efforts sky blue a couple of minutes ago. I'm out of paint so these 'new' clouds better work.
Sherrel, That was back in the days when a movie was shot for $20,000 and finished in less than twenty days. The couldn't edit those trails out so they left them in. No money or time for a reshoot of many scenes in those days. Jim CM&T
Sherrel, That was back in the days when a movie was shot for $20,000 and finished in less than twenty days. The couldn't edit those trails out so they left them in. No money or time for a reshoot of many scenes in those days. Jim CM&T
DairyStateDad
Mumbling in the corner
Just rip up the edge of a couple pieces of cardboard (randomly) , hold it about a half inch of the surface and spray down at the ripped edge. Then use the other and even flip them over and use different angle to get other sizes and shapes.
Mike
Some 'how to' pictures would be great! I sort of get what you're saying, but I'm not entirely sure...
Fifer
Member
Well I will put that on my long To Do list.Some 'how to' pictures would be great! I sort of get what you're saying, but I'm not entirely sure...
Thanks , Mike
HOexplorer
Well-Known Member
Erik, I know what to do and I will show you how all this works about clouds this Tuesday. Mike has other things to do, like running Fifer Hobby Supply, running an N gauge layout, and operating a train club. Jim 
Fifer
Member
Thanks Jim , Today is NASCAR day and worked on the new shed this AM. Today in the AM I was a contractor and This afternoon a lazy bum.Erik, I know what to do and I will show you how all this works about clouds this Tuesday. Mike has other things to do, like running Fifer Hobby Supply, running an N gauge layout, and operating a train club. Jim
LOL
Mike
Fifer
Member
Some 'how to' pictures would be great! I sort of get what you're saying, but I'm not entirely sure...
Well Erik , You Asked and here you go.
[video=youtube_share;VmsjvMA-EoE]http://youtu.be/VmsjvMA-EoE[/video]
Mike
DairyStateDad
Mumbling in the corner
Wow, talk about personal service! That was very helpful -- thank you for taking the time to do it. And your layout looks great -- I'll have to check out more of your videos. Have a great day -- and hope your thumb gets well soon.
Fifer
Member
Thanks Erik and in reality I tend to not think of things people may want to know and thanks for the suggestion on the video.Wow, talk about personal service! That was very helpful -- thank you for taking the time to do it. And your layout looks great -- I'll have to check out more of your videos. Have a great day -- and hope your thumb gets well soon.
Thumb is OK but up and down the ladder I have gotten something in my left knee and that is what is doing me in along with a cracked rib and I don't even want to tell you how I did that.
I hope it helped.
Thanks , Mike
HOexplorer
Well-Known Member
Thanks Mike, that was great! Now I'm off the hook! Jim
Fifer
Member
No , the pressure is on you to see if it worked !!!!!Thanks Mike, that was great! Now I'm off the hook! Jim
Mike
Silverton
Member
Mike, It's amazing how realistic the clouds look with the cardboard pieces used as patterns. And your video was very informative and kind of tied the whole explanation together. A quick question, if using the outside torn pieces works on the larger clouds, couldn't the inverse of that work also. What I mean is, in making smaller clouds, could you use a larger square or rectangle piece of cardboard and ruff cut or ruff tare a "hole" or cloud pattern on the inside of the cardboard. Another words, a whole small cloud inside the piece of larger cardboard. Still using your same techniques of holding the cardboard away from the wall and so forth. - Chris
HOexplorer
Well-Known Member
Chris, Don't know when Mike will be back so let me answer. You can make smaller clouds using a 'hole' in the cardboard so yes, the inverse is correct.
Mike is a video guy and I'm a photo guy. Let's look and my slightly different technique.
First, I add a line of gray under my white to add a dark underbelly.
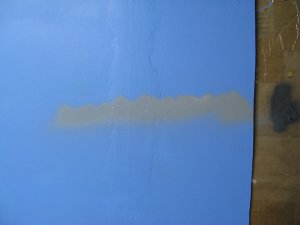
Next I will add my white in a circular motion holding the torn cardboard close to the back drop. I may add more gray and then add another layer of white. Notice the cardboard to protect the wall.
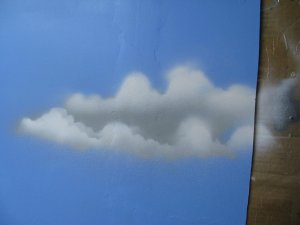
Ultimately you may have a cloud that looks like this one:
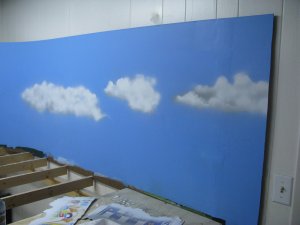
I recommend practicing with a large piece of cardboard. It may take only a couple of 'clouds' to get this right. Then head for the backdrop. I like adding white and gray and white while everything is wet. Better blending I think. My clouds are fairly large and may be easier than making Z scale clouds. For that I would probably use 'Holes' or an airbrush. Notice the changes to the cloud next to the end of the backdrop. You can see how the addition of extra white and gray fill it in. Notice the cardboard templates at the bottom of this last picture. See if you can match them to the clouds. Jim
Mike is a video guy and I'm a photo guy. Let's look and my slightly different technique.
First, I add a line of gray under my white to add a dark underbelly.
Next I will add my white in a circular motion holding the torn cardboard close to the back drop. I may add more gray and then add another layer of white. Notice the cardboard to protect the wall.
Ultimately you may have a cloud that looks like this one:
I recommend practicing with a large piece of cardboard. It may take only a couple of 'clouds' to get this right. Then head for the backdrop. I like adding white and gray and white while everything is wet. Better blending I think. My clouds are fairly large and may be easier than making Z scale clouds. For that I would probably use 'Holes' or an airbrush. Notice the changes to the cloud next to the end of the backdrop. You can see how the addition of extra white and gray fill it in. Notice the cardboard templates at the bottom of this last picture. See if you can match them to the clouds. Jim
Last edited by a moderator:
Affiliate Disclosure: We may receive a commision from some of the links and ads shown on this website (Learn More Here)