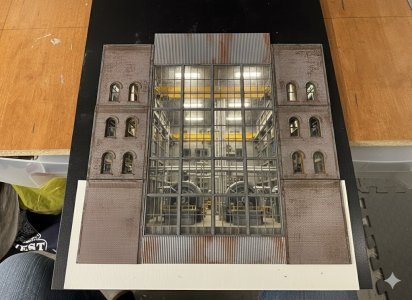
Build a HO scale power plant to hide a concrete pillar

ModelRailroadForums.com is a free Model Railroad Discussion Forum and photo gallery. We cover all scales and sizes of model railroads. Online since 2002, it's one of the oldest and largest model railroad forums on the web. Whether you're a master model railroader or just getting started, you'll find something of interest here.


Curious as to how he uses it.

Jerome

I use Sintra mainly for backer board as I laminate styrene cladding to it. Saves me from having to add much bracing. Roofs I use it by just painting it if I am modeling a flat roof with gravel or tar paper. I use it for the base the structure will sit on.

For years I have been building detailed false front facades. Instead of wood or styrene pieces to support the finished styrene I laminate it to the Sintra and a 3 walled false front 1-2 or 3” deep are much less expensive and just as strong as using plywood and definitely stronger than Evergreen Scale Models styrene structural pieces

Sintra is defined as:

Sintra board, also known as Sintra PVC, is a lightweight yet durable material made from expanded polyvinyl chloride (PVC). This versatile material is widely used for indoor and outdoor applications, offering a perfect balance between rigidity and flexibility


When I’m home later I will get some pictures
 
Last edited:
Here is the Harborside power plant wall being dry fitted today into the scene
IMG_5510.png

He now is thinking of going back to the original design of the harbor. A concrete or metal seawall wall under the power plant not land forms. He changed his mind after I had the wall built but not painted. If he does go back there will be 6 discharge pipes added

He also has the paper mill side wall for the power plant to install. When he does that the final dimensions of the front aisle facing wall can be measured. Both side walls are held in place by 3 magnets in a V formation.
 
Here is the Harborside power plant wall being dry fitted today into the sceneView attachment 259537
He now is thinking of going back to the original design of the harbor. A concrete or metal seawall wall under the power plant not land forms. He changed his mind after I had the wall built but not painted. If he does go back there will be 6 discharge pipes added

He also has the paper mill side wall for the power plant to install. When he does that the final dimensions of the front aisle facing wall can be measured. Both side walls are held in place by 3 magnets in a V formation.
Looking good! That power plant will make excellent camouflage to hide the pillar.


Looking good! That power plant will make excellent camouflage to hide the pillar.
Looks incredible so far looking forward to see it finished

Thank you, I really appreciate the kind words. It’s great you are following along

It really is different doing work for a friend versus a commission job. Basically this has turned into a let’s wing it job and that’s not me. Normally this should not have taken more than 6 weeks from design to build. But helping a friend (unpaid) is a different animal and this build and the paper mill thread build have opened my eyes to that. But the power plant is slowly starting to inch forward again. The #3 wall or the one facing the paper mill will be back on my bench for detailing on Wednesday. Then that will get installed and I will start (again) the front wall. He’s in no hurry and once the front dimensions are locked in I can create window wall.
 

Attachments

  • IMG_3208.jpeg
    IMG_3208.jpeg
    321.9 KB · Views: 38
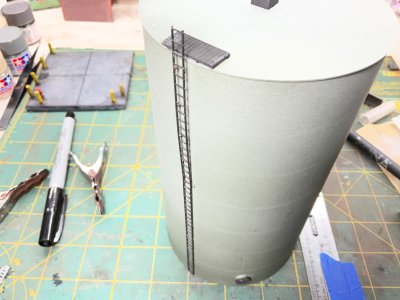
No it’s not the #3 power plant wall nor is this the front curtain wall! It’s a Bunker C oil tank. I’m told when power plants in the olden days (1965 here at the power plants) restarted the boilers they used oil and particularly very dirty Bunker C. So my friend found a tank kit to use.

Tichy #7013 water or oil tank kit. A kit someone started and gave up on! He purchased for cheap like $5.00 cheap and figured someday he’d use it! Well whoever started the tank cylinder had no clue, the directions while minimal give enough info to assemble it. The person must not have been able to read! Tichy offers the kit with 2 roofs a flat and a conical, only the flat roof was in this box! There are 2 options to get to the roof. A very delicate ladder with safety cages up the side or a spiral stair case which is what I chose. Then found out a main support sprue was not in the box. So a flat roofed oil tank was my choice! With a straight up ladder. I didn’t use the very sweet looking safety cages as this was 1965 and OSHA was signed into law by President Nixon in 12/1970. So it’s doubtful there’d have a safety cage on this ladder. Besides looking at the safety cage pieces, many pieces of rod were broken

Disassembly of the tank cylinder was a must. Thankfully it was assembled with some sort of white glue. A little water, a hair dryer, more water and lots of patience I had all sorts of side wall parts to clean up.

While not perfect I put the tank back together.

We needed a base to start. 5” square
IMG_5535.jpeg


Test fit
IMG_5451.jpeg


Paint
IMG_5565.jpeg
turns out its way to green, toned it down with a earthen color mix to lighten it up

Add the ladder and a landing spot
IMG_5575.jpeg


Change the center vent
IMG_5576.jpeg


Add a fill overflow pipe
IMG_5584.jpeg


Remove the overflow vent pipe and add 3 Inspection hatches
IMG_5606.jpeg
IMG_5605.jpeg


Lock it all in with a matte clear finish and let it dry

Next up is heavy duty weathering

 

Attachments

  • IMG_5579.jpeg
    IMG_5579.jpeg
    862.3 KB · Views: 30
Last edited:
Thank you, I really appreciate the kind words. It’s great you are following along

It really is different doing work for a friend versus a commission job. Basically this has turned into a let’s wing it job and that’s not me. Normally this should not have taken more than 6 weeks from design to build. But helping a friend (unpaid) is a different animal and this build and the paper mill thread build have opened my eyes to that. But the power plant is slowly starting to inch forward again. The #3 wall or the one facing the paper mill will be back on my bench for detailing on Wednesday. Then that will get installed and I will start (again) the front wall. He’s in no hurry and once the front dimensions are locked in I can create window wall.
I can hear the generators operating just looking at the photo.
 
I can hear the generators operating just looking at the photo.

I know my response the other day to the guy at the OPS session was no sound! At the work session yesterday the owner of the layout where the power plant is located asked if it was feasible for adding sound. My 1st reply was “really” and then “I guess so”. I thought about and we talked about it over lunch. I have space for a couple sugar cube speakers in the bumped out portion of the curtain wall. I’ll report in if this comes to be but it will not be me doing it. It’s beyond my comfort level
 
I’ve been cleaning and organizing since Friday morning in the train room. I have been playing with the gravel on the berm containment basin.

I have maybe 90 minutes of clean up left in the room and bench. But that can wait until tomorrow. I finished the 1st layer of gravel and after 48+ hours it finally is dry enough. Tonight I will paint a few roof details, the walkway over the berm and the piping to the power plant from the tanks
IMG_6316.jpeg
IMG_6366.jpeg
IMG_6367.jpeg
IMG_6368.jpeg
pictures from around the berm
 
Been gone and missed my work bench. Finally sat down yesterday to paint and add some details to the Bunk C oil storage tank
IMG_6754.jpeg

Dry fitted a roof hatch. Added the ladder and glued the vent pipes, needed to decide which center vent was more appropriate
IMG_6730.jpeg
IMG_6731.jpeg
IMG_6732.jpeg
IMG_6733.jpeg

IMG_6752.jpeg
Added an access hatch to the bottom ring of the tank. Glued up an access ladder/platform to cross the berm. The ladder/platform needs trimming now that glue dried. Need to Create a wire hand rail and paint
IMG_6750.jpeg
IMG_6737.jpeg
IMG_6738.jpeg
IMG_6736.jpeg

Some pictures showing progression.

This morning is touch up and finishing the berm access ladder. Then maybe this evening weathering
 
The tank is done but not delivered to its home layout, maybe Monday.

I showed the tank and berm on my Facebook page, Wisconsin Interstate. 2 offers to buy it as is. The 2 offers were within a couple $$$ of each other and over $150. So I asked my friend John if he wanted to sell it, I mean maybe he did. But nope he wants it.

Texted the 2 guys back and told them no the owner wanted to keep it. $20.00 for the Tichy kit at the LHS and guys offering 7x that for someone to build for them.

Pictures later today as checking the ones I took to post here are not very good.

The east power plant wall has been given a surface primer. I’ll get back to it in a few days. It’s gone from a simple flat wall with Styrene corrugated siding to a concrete wall, to a multi dimensional wall back to a flat wall. Back to the original keep it simple. The front though will still be a view into the turbine hall.

Again sorry for the delay in posting here but the Power Plant is not a priority and is maybe #4 in order on the list. But it will be shown as I move along between projects
 
The tank is done but not delivered to its home layout, maybe Monday.

I showed the tank and berm on my Facebook page, Wisconsin Interstate. 2 offers to buy it as is. The 2 offers were within a couple $$$ of each other and over $150. So I asked my friend John if he wanted to sell it, I mean maybe he did. But nope he wants it.

Texted the 2 guys back and told them no the owner wanted to keep it. $20.00 for the Tichy kit at the LHS and guys offering 7x that for someone to build for them.

Pictures later today as checking the ones I took to post here are not very good.

The east power plant wall has been given a surface primer. I’ll get back to it in a few days. It’s gone from a simple flat wall with Styrene corrugated siding to a concrete wall, to a multi dimensional wall back to a flat wall. Back to the original keep it simple. The front though will still be a view into the turbine hall.

Again sorry for the delay in posting here but the Power Plant is not a priority and is maybe #4 in order on the list. But it will be shown as I move along between projects
Wow! That really speaks for the quality of your workmanship that you got two offers to buy it for over $150, I look forward to seeing the pictures of the finished tank and berm. Keep up the good work!:D


Wow! That really speaks for the quality of your workmanship that you got two offers to buy it for over $150, I look forward to seeing the pictures of the finished tank and berm. Keep up the good work!:D
Actually it’s probably a case of guys with more money available than time, but thank you.

I had a weathering client that I couldn’t believe he was sending me commission work until he passed last Summer. His custom weathering on FB was unreal but he said he didn’t have time to weather his own stuff so sent it to me. 2 of my best regulars have little time. 1 is a LA Firefire fighter and the other is a bank president. I don’t care, money is money but there is not much left out there for hobby funds this year


Affiliate Disclosure: We may receive a commision from some of the links and ads shown on this website (Learn More Here)

Back
Top