Appalachian Mountain Coal Mining 4x8 Build

ModelRailroadForums.com is a free Model Railroad Discussion Forum and photo gallery. We cover all scales and sizes of model railroads. Online since 2002, it's one of the oldest and largest model railroad forums on the web. Whether you're a master model railroader or just getting started, you'll find something of interest here.


Thanks. Yours is really nice too, plus getting your GF to help you out. Nicely done.

I finally finished up painting the main line, and have begun the process of ballasting (just a few sections of track). My weekend's just about over, so I'll probably take a bit of a slowdown for a few days. I'll still work on it a bit at a time throughout the week, time permitting.

Thanks again,
Shannon
 
Here's my progress update for this week. As expected, I didn't get much time during the week to work on it. However, I had plenty of time this weekend.

I started off my work by ballasting as much as I could on the main line. I managed to get the center of the track on the mainline from the rerailer on the front to the last turnout on the front (first if you go from left to right). I got the center and inside done from the turnout to just into the downgrade, both sides and the center from there to near the bridge on the back.

While the glue was drying on the ballast, I went ahead and added the mining line's roadbed (only temporarily where it crosses the main line, due to still needing to plaster under the roadbed in those spots), and to the yard/staging area. I also painted the track (except for the turnouts) on both the mining line and yard/staging area.

The next couple of weeks may be slow going due to running trains with my club on a modular layout that we're setting up at the local fair. Our club is fairly small, and consists largely of retirees. Since I work during the day, I'll likely be spending my evenings and the next couple of weekends there.

My appologies in advance, but my update pictures will take 2 posts to upload.

Shannon


Do you use the same nickname on youtube - if yes, i saw your comment on ''i think'' what was a call of duty video or airplane video, not sure
 
Hello all,
Sorry it's been so long since I've posted an update on the layout. I've been busy running trains at the county fair with my train club.

I haven't done anything on the visual aspect of the layout since my last update. I'm kind of at a halt on that for the time being, as I've run into some issues with the track after running it quite a bit more. There are a couple of spots where the track has some whoop-dee-doos causing the rolling stock to uncouple. I'm going to have to continue running to pinpoint those spots and put some scrap foam underneath the track to level it out.

The big news is on the locomotive and power side of my layout. First off, the power. My layout is no longer straight DC, I now have it running DCC through a Digitrax Zephyr. I did, however, find a new spot to plug up the standard DC control box so it can still be incorporated into the layout's power system. Before ya'll start scratching your heads and such, I have an explanation. Through a recent locomotive purchase, I found that some locomotives will not run DC (00) on a DCC system without shorting out the DCC system. The standard DC controller is incorporated to allow control of those locomotives, albeit with the Zephyr's track power turned off. I was also able to incorporate the program track into the yard using the first yard track for it. It is insulated from the main power so not to cause any shorts or other issues. I chose that track because it's 1) within easy reach to set the locos on, 2) it's my longest track in the yard (to allow room for locos such as the UP turbine mentioned later in this post), and 3) running locomotives "should" never have to go all the way into this track (I left 1 9" straight powered for locos to enter and couple to the rolling stock parked there).

On to the locomotives. While at the fair, I met a VERY talented airbrush artist who is into model railroading. Since his business at the fair was airbrushing T-Shirts, I got him to do an awesome SD70 in NS trim for me with an embossed horsehead on the back. It turned out awesome. Come to find out, his painting talent doesn't stop with airbrushing (he airbrushes cars, bikes, ATVs and such for his day job), he's also good with weathering locomotives. Since my painting skills are lacking, he weathered my SD38 and made it look amazing. He's also working on my GP38-2.

In addition to the painting, I picked up a couple of new locomotives mostly for club use (a bit large for my layout). The first of which is a Kato SD70 in CSX garb with road number 713. I know, CSX and NS are rival RRs. However, they do work together on occasion. I mostly picked up the CSX trim to look a bit more prototypical hauling the "Juice Train" (my club has 23 Tropicana orange juice box cars to model the train hauled by CSX that supposedly comes through here every morning at about 2am). Awesome running locomotive that actually works well on my layout (better than my SD38, go figure on that one).

Next up was an MTH SD70 in UP #4141 (George Bush) trim. I purchased this train so I could have something with DCC and sound to run on my layout. It ran my layout OK, and the sounds did work. However, I couldn't get it to hold any address other than 03 (default). Every time I would remove power from the track or pull the locomotive from the track, it would drop the address. I read somewhere that someone had the same issue with one and had to RMA it through MTH. I took it back to my LHS and was able to do an exchange on it for a different locomotive.

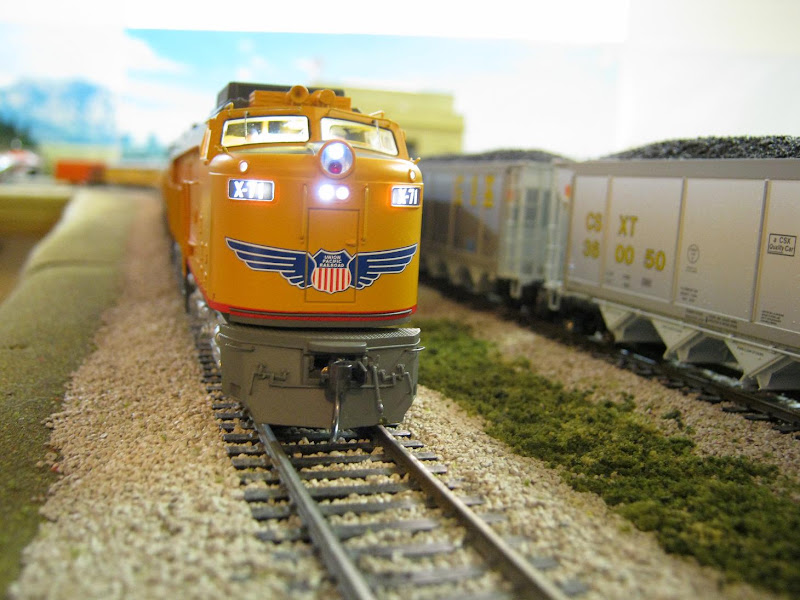
The replacement? An Athearn Union Pacific Varanda Turbine with tender, road number X-65. After reading the manual at the shop, I found it was merely DCC ready, so I asked the gentleman behind the counter for either a Soundtrax or Tsunami decoder to put in it. He gave me a Soundbug, ensuring me that it was not just a sound decoder, but also a mobile decoder. I had my doubts because the Soundbug was under $50 w/ speaker. Guess what, I was right. I get it all home and proceed to remove the body from the locomotive to install the decoder. After a few minutes of hunting for a DCC connector (this loco is DCC ready), I went to plug it in. It wouldn't fit. After reading the manual again and going to Digitrax's website, it was confirmed that the Soundbug is a sound only addition for the DH165 decoders. Oh well, I'll go back Monday and pick up a DH165 decoder for it and get it going. In the meantime, I can run it back and forth on the front straight on my mainline using my DC controller (this is the locomotive that shorts out the Zephyr while running in DC).

Have a good weekend,
Shannon
 
Last edited by a moderator:
Just figured I'd share a few pictures. The first 2 were taken on the club's modular layout @ the fair.

The first is CSX #713 hauling the Juice Train.

The second is weathered NS #3819 hauling the Juice Train.

The third is my new UP Turbine #X-65.

The fourth is UP #X-65 and CSX #713 as a size comparison (UP #X-65 is HUGE).

2 more pics to follow.


My layout's largest radius is 18". Despite the turbine's enormous size, it will take down to that. It runs on my layout, but it does have issues in the tunnel portions due to the crazy amount of overhang at the front, center, and rear of the locomotive.

If you don't have any obstructions (or other trains on another line) in the curves, you should be just fine on 22" radius.

It has 2 sets of 2 pairs of 2 axle trucks, if that makes any sense. Described a bit more in detail, there are 2 main pivot points on the chassis. One at the front and one at the rear. Each of those contains it's own sub-chassis that holds the couplers. On those sub-chassis rides 1 swiveling truck with free rolling axles, and 1 fixed truck (swivels with the sub-chassis) with driven axles. Each truck is 2 axles. At the back of the locomotive is a 6 axle tender. Each truck on the tender holds 3 axles. The tender's trucks are only about the size of the 2-axle trucks on the locomotive despite having 3 axles.

Speaking of the turbine, I just checked out a sound sample of Tsunami's turbine sound. OMG!!! I think I'll stick the SoundBug with a DH165 into my SD38 and get me a Tsunami for the turbine.

It's the last one under Diesel Prime Movers:
http://www.soundtraxx.com/dsd/tsunami/tsunamisound.php
 
Last edited by a moderator:
Ya the Veranda is pretty sweet. I have one, and got the QSI sound decoder and 2 speakers. It's sounds great. I also upgraded all the lights to LEDs. They are so much better than the Athearn lights. Mark G. on this forum did the installation for me.

IMG_0529.JPG
 
Very nice Veranda, Motley. I can't wait to get mine converted to DCC and sound.

As for the layout, I just wrapped up laying the ballast in the other tunnel. It should be dry by the time I come home from work tomorrow evening. Then it'll be time to clean the rails and do some test runs to ensure that the ballast didn't cause any issues that'll need to get fixed before closing in the tunnels. I did, however, go back over with an X-Acto knife to clear whatever ballast I could from the path of the wheel flanges to minimize the issues during the test runs.

Once I'm satisfied with the test runs, I'll start closing up the tunnels by creating the portals using wire frame and plaster cloth. Then more test runs to check for portal clearance, then time to secure the track going over the tunnels, then paint on the tunnel walls. Once that's complete, it'll be time to create the mountains to finish up the base terrain.

Hopefully I'll be able to start work on the tunnel portals by this weekend.

Shannon
 
I've been pretty busy this week. I managed to finish ballasting inside the tunnels, as well as most of the main line. This morning, I started on the tunnel portals. I took some wire hangars, cut them, bent them to shape and size, and then pushed them through the ballast and foam to create the frames for the portals for all 4 portals. The last thing I did (I just did it not 10 minutes ago), was lay some plaster cloth over the frames of the entrance and exit portals of the first mountain tunnels. Before moving on to the putting the cloth over the other portals, I'm going to let the first ones dry so I can trim the cloth and do some test runs to make sure that it's gonna work the way I planned it. If all goes well, I should be starting on the other portals this evening. I'll try to get some pics up then as well.

In addition to working on the layout itself, I traded in my CSX SD70 (the layout is, after all, an NS based layout), on an NS Dash 9. I also got the SD38 and the new Dash 9 converted over to DCC, as well as installed the Soundbug into the Dash 9 (definitely need to do some programming work on the Soundbug, as it's a bit quiet on the engine to the point where I can't hear it over the wheels running over the track, as well as get a PR2 or PR3 to load up a better sound file to it since it's currently set for the default generic diesel sound file). On top of that, I got the SD38 and Dash 9 set up to where they can be MU'd and run well together.

I'll be sure to get ya'll an update on how well the tunnel portals work out, as well as get some pics up of the updates.

Later,
Shannon
 
Got both sets of tunnel portals created. Once the mountains are in place, however, I may go back and add some shape to them to they don't look like covered wagons. They do work well as a basis for the tunnels to be build from.

As promised, here's some pics of the layout as it sits tonight.
 
I managed to get a few more things done on the layout.

First and most importantly, I was having more issues with the trackwork. That was my biggest priority before moving on. Upon close inspection, I noticed that the rails were leaning to the outside of the curves in some spots, causing unneeded derailments. Unfortunately, one of those spots was where I had already laid down ballast. To attempt to circumvent removing the track from the ballast to raise the low side, I made an attempt at adding solder to the low rail and filing it until it was right. After about a week or so of doing it to the same spot 2-3 times a night, I gave up on that idea and just pulled the 2 pieces of track from the layout, installed new track pieces, leveled them, and sprinkled some ballast in the spots where the old ballast came up (after doing several test runs to insure that the problem there was fixed before moving on). I also found a couple of spots on the mining line where I had to level the track, as well as filling down some of the plaster cloth over the tunnels that were making the track wavy. After fixing those issues, the track is running well with the exception of my Bowser 100-ton hoppers (3 of which are kits, one is an RTR). My Bachmann Platinum RTR hoppers have no issues (1 did, but it was easily fixed by adding a little more clearance for the wheels). I added metal wheels to the 3 kits that had plastic wheels (the Bowser RTR already had metal wheels), and began experimenting with adding weight to them (I also swapped them over to Kadee couplers). None of those fixes worked. Even with weight added, the kits seem to be too light (on the trucks, the overall weight is actually a bit on the heavy side). The trucks on the kits don't seem to want to follow the track all the time unless it's the wrong way through a turnout (turnout set to straight, firmly pressed against the rail, but the trucks still like to try to make the turn). Maybe I need to brush up on my kit building skills before using kit rolling stock on my layout.

In addition to the revised trackwork, I managed to create the base structure for one of the mountains, giving the train a place to "disappear" for a brief time. I do plan on going back once the other mountain's base structure is complete to perform the final shaping of the mountains, thus allowing me to finish shaping the rest of the terrain. I want to finish the shape of the mountains first to allow me to make the rest of the terrain flow a little better (making it make a bit more sense in how it looks).

I also finished ballasting the main line. I'll wait on the rest of the ballast until I can get the landscaping finished (including grass).

I did do some fine tuning on the Soundbug in the Dash 9, but to no avail. It's still nearly inaudible. It's not a big issue at the moment, so I'll wait until the layout is closer to completion before purchasing a PR2/PR3 and load the sounds into it.

I don't have any updated pictures yet. However, I did take a quick video of it last night to display it's progress.

Here's the link:

http://www.youtube.com/watch?v=XOYOdtrvfdI

Shannon

 
Nice layout!
This is what I would have done, but space became a problem. I actually started scratch building a mine loadout and set it up on the small shelf diorama. Never did get around to finishing it up.

Here are a couple of pics of it. One is of it set up and the other is it's current state.

I'll be watching this thread, for sure. :D
love you coal loader how did you make it?

pm me if you want


Sorry it's been so long since an update. I've been kinda busy with work, plus taking a bit of time off to go see my parents and sister.

While home, I was able to find the train set that got me into trains when I was in the 1st grade, and my dad's train set. A OO scale Hornby High Speed Train set (part number R.693, containing a British Rail Class 43 Intercity HST 125 powered and dummy with 2 coaches), as well as a OO scale Hornby Depot Diesel set (part # R.700 containing a Barclay Class 06 "Shunter" [switch engine], flatbed w/car, wagon, and Shell tanker). Both of these sets were a little worse for wear, but are now operating again (I haven't run either of them in about 18 years, they haven't been lubricated since the factory, played with by me when I was a kid, and were stored in a box with other trains, track, transformers, and accessories). I also found my dad's old train set. My dad's train set was an old Tyco Shifter set with a Santa Fe 0-4-0 loco. I was also able to get it running on a DC transformer on my layout. This set has now been passed on to me.

Also while home, I made a found a local model railroad shop and made a bit of a trip to go check it out. While in the shop, I ran across a Lionel HO GS-4 Daylight. I didn't know that Lionel made HO trains until I found that engine. I had to have it. She still runs pretty decent on a standard DC power pack.

Speaking of old engines and DC, since I've been getting more of the older engines, I got a switch from Radio Shack and managed (with a little help from this forum) to get my layout set to run from a standard DC transformer or DCC at the flip of a switch to allow me to run those older engines without worry of damage or degraded performance due to the DCC system.

As for further progress on the layout, I have added a plateau and begun shaping the mountain. I've also added a semaphore to the yard entrance. In addition to the above, I also repaired NS GP38 #5287 and converted her over to DCC.

Attached are a couple of quick pics.

The first is of the HST 125 with the powered loco to the left and the dummy to the right. Very interesting engines. The Class 43 HST 125 is the official record holder for the fastest diesel engine, having reached a top speed of 148mph, and running at 125mph in regular service. These were first built in 1976 and continue to run the mainline in the United Kingdom. The Intercity liver seen on this train is no longer an active livery, as British Rail has been privatized and broken down into several railroads (railways in the UK) including Virgin. Just in case anyone reading this has never heard of OO scale, it is 1/76 (3.5mm to 1 foot) scale as opposed to HO's 1/87 scale (4mm to 1 foot), but still runs on HO size track (both are 16.5mm rail). OO scale is popular in Europe. OO was selected for use on European prototypes at the onset of HO scale due to the large motors of the time not being able to fit in the European prototype's body. Though technology has improved, it would be too painstaking to convert every European model railway builder to HO.

The second picture is an overall view of the layout. On the right, you can see where I opted to use a plateau in lieu of a mountain. I felt this would work out better so I can add additional scenery (buildings and such) instead of taking up that whole area for a mountain on which little scenery would be able to be placed. The vehicles on the layout were given to me by a member of my local train club. The buildings sitting on the plateau were part of my dad's train collection. I placed them on the layout to add additional interest while the rest of the layout is being built. These buildings will most likely come off once the scenery is in place. On the left, you can see where I've begun shaping the mountain at it's base. At bottom center, you can see where I have hooked up both the DC transformer and the DCC controller. To the right of the Zephyr, you can see the wires going to the toggle switch that allows me to switch from DC to DCC. To the left of the DC transformer is the power switch for the semaphore. I'm considering removing the switch and just connecting the semaphore directly to the rails. On the plateau, you can also see my dad's Tyco 0-4-0 and my Lionel GS-4 sitting on a couple of random sections of track.

Sorry for such a long post, I guess I had a few more updates than I thought.

Shannon


Affiliate Disclosure: We may receive a commision from some of the links and ads shown on this website (Learn More Here)

Back
Top