
I few months ago I built a Labelle tank car kit and thought to myself "I can probably scratch build that a lot cheaper". If you factor in time spent, I was of course completely wrong, but if you factor in just materials, I MIGHT have been right?  Anyway, pics below on my brazen knock off build of a late 1800s wooden frame tank car. First stop, the frame. The outsides are 1/8 x 3/8 basswood, call it 12" x 36" HO scale.

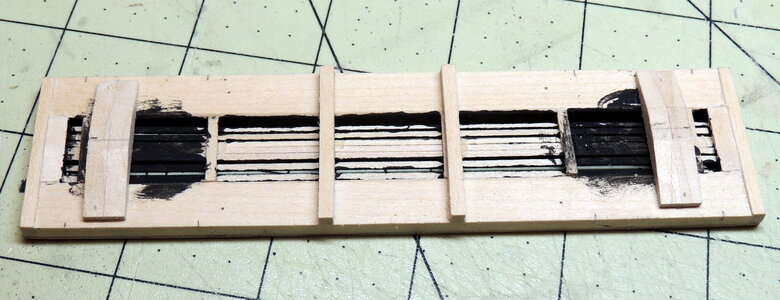
I actually ended up rebuilding the frame since the dimensions were off on the first attempt and I wanted to sink the tank deeper into it. The rebuilt version uses scale 6x6s to hold the scale 2x4s that make the "cradle" for the tank. I ended up sanding the curve in these before cutting them, they were just too fragile and annoying to do after cutting.

I really wanted to use scribed sheets for the decking here but didn't have enough 1/32" thick scraps and the 1/16" thick stuff I do have on hand seemed way to thick for the scale I wanted. So, used old reliable scale 2x6s cut individually and glued in place. Also notice 4 holes on each side drilled into the decking and through the frame, these will be used later to secure the tank.

Next up, the tank. This is a 7/8" dowel puchased for about $2 at Walmart. Cut to length, then sanded the ends down to get a decent looking curve.

Before wrapping, I drilled 5 holes in the dowel and filled with lead sinkers. Note to anyone trying this at home, do not attempt to drill too close to the ends of the dowel, the whole thing will split and explode (ask me how I know...). I filled the holes with wood putty and sanded the whole thing smooth.
The tank wrap is made from 0.005" thick styrene from Evergreen. The rivets were made with a nifty little rolling tool - https://www.hobbylinc.com/htm/tsm/tsm09910.htm

Each layer gets progressively smaller and approximates a tank welded/riveted together from multiple pieces. The seams are all at the bottom of the tank, hidden by the cradle. If I had it to do over again I would have drilled the holes for the weights from the top instead. The wood putty filler for those holes made it annoying to get the tank wrapper glue to stick well. I tried CA at first but eventually used Aileen's Tacky Glue here to join the wood/putty and first layer of wrap, with a very little bit of Faller Expert plastic cement to glue the layers to each other.

These are the supports for the railing. Scale 6x6s, with one end beveled a bit so they angle outward from the frame. At first I tried to sand them each individually before settling on the painter's tape to keep them together and bevel them all at one go, the results were much more consistent this way.

I used a cast metal tank dome from Labelle. The "steel cables" to anchor the tank to the frame are 0.015" brass wire. I really need to get new black paint, this is a ~12 year old jar of Polly Scale Steam Power Black that has clearly seen better days. Still, I kind of like the rustic look it gives the tank compared to a perfectly smooth surface.

Railing and U brackets are also made from 0.015" brass wire.

Anyway, pics below on my brazen knock off build of a late 1800s wooden frame tank car. First stop, the frame. The outsides are 1/8 x 3/8 basswood, call it 12" x 36" HO scale.I actually ended up rebuilding the frame since the dimensions were off on the first attempt and I wanted to sink the tank deeper into it. The rebuilt version uses scale 6x6s to hold the scale 2x4s that make the "cradle" for the tank. I ended up sanding the curve in these before cutting them, they were just too fragile and annoying to do after cutting.
I really wanted to use scribed sheets for the decking here but didn't have enough 1/32" thick scraps and the 1/16" thick stuff I do have on hand seemed way to thick for the scale I wanted. So, used old reliable scale 2x6s cut individually and glued in place. Also notice 4 holes on each side drilled into the decking and through the frame, these will be used later to secure the tank.
Next up, the tank. This is a 7/8" dowel puchased for about $2 at Walmart. Cut to length, then sanded the ends down to get a decent looking curve.
Before wrapping, I drilled 5 holes in the dowel and filled with lead sinkers. Note to anyone trying this at home, do not attempt to drill too close to the ends of the dowel, the whole thing will split and explode (ask me how I know...). I filled the holes with wood putty and sanded the whole thing smooth.
The tank wrap is made from 0.005" thick styrene from Evergreen. The rivets were made with a nifty little rolling tool - https://www.hobbylinc.com/htm/tsm/tsm09910.htm
Each layer gets progressively smaller and approximates a tank welded/riveted together from multiple pieces. The seams are all at the bottom of the tank, hidden by the cradle. If I had it to do over again I would have drilled the holes for the weights from the top instead. The wood putty filler for those holes made it annoying to get the tank wrapper glue to stick well. I tried CA at first but eventually used Aileen's Tacky Glue here to join the wood/putty and first layer of wrap, with a very little bit of Faller Expert plastic cement to glue the layers to each other.
These are the supports for the railing. Scale 6x6s, with one end beveled a bit so they angle outward from the frame. At first I tried to sand them each individually before settling on the painter's tape to keep them together and bevel them all at one go, the results were much more consistent this way.
I used a cast metal tank dome from Labelle. The "steel cables" to anchor the tank to the frame are 0.015" brass wire. I really need to get new black paint, this is a ~12 year old jar of Polly Scale Steam Power Black that has clearly seen better days. Still, I kind of like the rustic look it gives the tank compared to a perfectly smooth surface.
Railing and U brackets are also made from 0.015" brass wire.


 Once I get more I can finish the tank retaining straps and the railings.