Smudge617
Well-Known Member
No, Abteilung paint is made by AK Interactive, a Spanish company.but is Abteilung 502 from germany? Or somewhere else? Could not find out.

No, Abteilung paint is made by AK Interactive, a Spanish company.but is Abteilung 502 from germany? Or somewhere else? Could not find out.
ah also from AK okay. still wondering why they choose that name..No, Abteilung paint is made by AK Interactive, a Spanish company.

Probably because it's main purpose is for military models.ah also from AK okay. still wondering why they choose that name..
DaveHi Tom, Here is that group of cars I will be "fading down". As you can see, these are all old timers. All I have is rattle cans and paint, NO airbrush so this is what I am trying:
1. Remove and paint trucks (done)
2. give cars a coat of dull coat
3. Use a white wash to fade the cars. Maybe a little dust around the bottom/front/back
4. A little soot at the top, from the coal steam
I dull coated one side, will be doing the other side tonight then maybe wait till the weekend to experiment with the white wash.
You can see some of the cars have been tinkered with a little. This is my first experience at "batch weathering".
View attachment 186766
Most of these are Roundhouse, but I kept the trucks separate anyway. May be a week or so before I post the progress...
Dave LASM
Thanks, Tom. I was going to do what you said, exactly what I was thinking, but wife persuaded me to wait. I guess it didn't hurt but next time I will move forward without asking the wife -- kind of a bad habit I got in, trying to include her in my model tasks. Honestly, she is not that interested but does sometimes does feign interest .Dave
Have fun and follow your plan
You should be able to do the other side of the car roughly 1/2 hour after you spray it. Depends a lot on atmospheric conditions in the space you are working on. If you are uncomfortable about the 1/2 hour for sure 1 hour and at worst in 2 hours everything should be thoroughly dry. But your plan is fine and as long as your comfortable that’s what counts
Enjoy the process
Terry is my most ardent supporter and my worst critic. I will occasionally ask her to look at something for an opinion. But, sometimes she will pop into the studio and tell me something about what I am weathering. Usually that she’s not feeling it, her words for it’s not looking good!Thanks, Tom. I was going to do what you said, exactly what I was thinking, but wife persuaded me to wait. I guess it didn't hurt but next time I will move forward without asking the wife -- kind of a bad habit I got in, trying to include her in my model tasks. Honestly, she is not that interested but does sometimes does feign interest .
Worst part is when she wants to touch stuff on the layout. She is like an 8 year old with some super clumsy fingers. I cringe everytime she reaches in there.
Dave LASM
It’s May and I can ship again. These have been done for awhile. Heading to Chicago
View attachment 186900
View attachment 186901View attachment 186902View attachment 186903View attachment 186904
ThanksWho ever gets those will be very happy with them!
They look great!
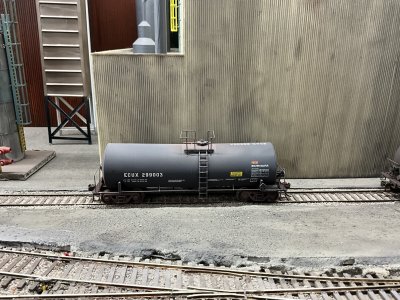
Sorry folks for posting later than I wanted, …
Z, we keep no timetables here. Post along your weathering process anytime you want, or later! While the 2 CN covered hoppers have never been seen in this thread before they were weathered a few years ago. The modeler that commissioned them lost interest in model railroading before they were done told me to keep them. I was doing publicity shots and a modeler in Montreal saw them in the background on my FB page. Similar to the inquiries I’ve had on the 2 graffitied reefers in the background of the pictures I posted hereView attachment 186909
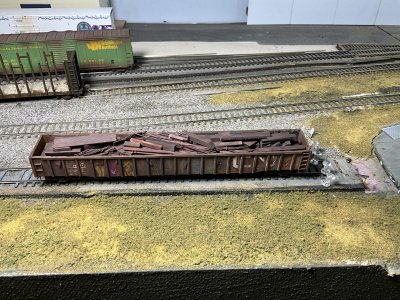
Sorry folks for posting later than I wanted, but I've been busy with work and getting ready around the house for summer!
I just finished up on side 2 of this car, I might have pushed it a little harder on this side!
All in all, I'm happy with it. Trying to get into the knack of hand painting graffiti, man is it tuff. But starting small and getting larger as I progress might be the way to go!
Cheers!
Z
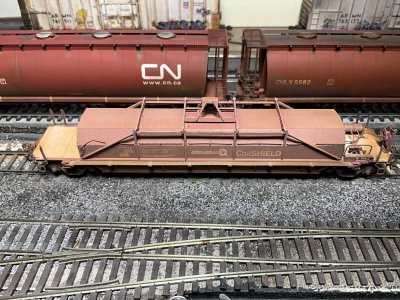
Ok, I’m kind of bored and have mentioned it few times. A client sent me a project that I decided to tackle today. A KIT, yep a KIT.
View attachment 186991
I do follow instructions (usually) for kits and have on this.
View attachment 186992
Previously cut off the sprue parts (someone else) were repaired. The balance of the parts were cut off the sprue. Gluing has begun and I should pictures tonight

It wasn’t bad at all. I’m letting the glue dry and will put the body on the frame tonight. Trying to decide if I weather this (as a surprise gift) one or not. Maybe a nice light gray dust. Private road name that the friend purchased. Midland Roads is from Tony Koester’s (former editor of RMC and a contributor still at MRR magazine) layout!Ahhh yes.... the kit, kind of brings a tear to my eye. Not really! Been there, I've assembled 3 Intermountain hopper kits years back and a 4th is still waiting in the que for it's turn.... which will probably never happen. They almost put me in the nut house!
Have fun Tom!
View attachment 186993
View attachment 186994