Water Modeling: Help Wanted


catnippertom

That Oregon Guy
I have been documenting my adventures in building my layout(Here) and I have gotten to a point where I want to start attempting to model some water on my small layout.


20231107_130300.jpg
Screenshot 2023-09-15 131242.png


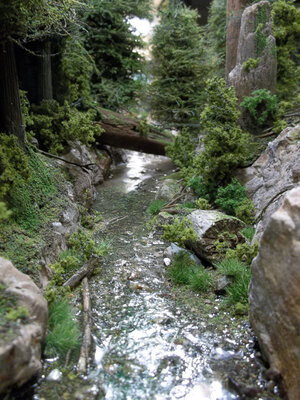
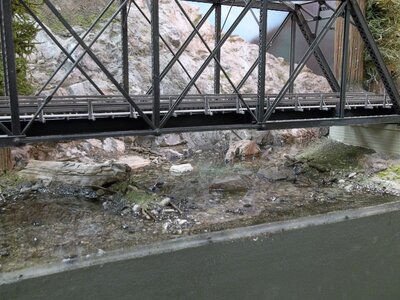
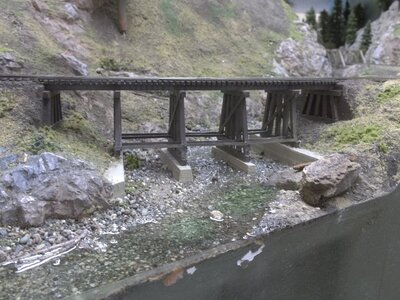
Here you can see the section that I want to model and the inspiration for the section.

1699567620124.png

I have about 7 or so bottles of the blue color glue that I aquired at Dollar Tree a while back and I wanted to consult the forum on what I should do. This glue is not very viscous and nor does it dry quickly. I want to be able to fill the sections that I dug out with the glue. Does anyone have any thoughts on this?

1699567842361.png

I had created this swatch that is about 1mm thick but it took so many small layers and quite a bit of time in order to get this very minute swatch. I don't know if I can do that as many times over as it would take in order to get it done. Should I just decided to chuck it and go to resin or something else? Can I add something to the glue in order to make it dry faster or thicker? Please give me some help so I can get this started. Thanks!
 
On my last layout I used envirotex lite. It's a 2-part epoxy. It's not overly expensive. I got it at Walmart. I just added a few drops of my color choice when mixing. Very simple process. It had incredible looking reflection, and depth. I had good results with Modpodge, and Liquitex painting layers, but found it took too long to dry, and multiple coats eventually gave me bubbles that were hard to remove. After extensive reading on modeling water I gave this a try.

1699569388321.png
 
I also use Envirotex Lite. I use a small blow torch quickly over each thin pour to make the Envirotex a thinner consistency which lets any bubbles to rise, otherwise the Envirotex is too thick for the bubbles to come to the surface. Hit it a few more times with the torch to "pop" the surface bubbles. I rarely have bubble issues. In areas where it may creep up on a rock, log or bank just use a paint brush with a flat clear coat or glue a bit of dust, dirt or ground foam on the area. There is also a dye that can be added the the mix. The key is to pour thin layers, get the bubbles out and let it dry before pouring the next layer. I did a few mockups before I poured on the layout. These are some water scenes on the Sonoma Mountain Railroad.
 

Attachments

  • 000 web page 100_0442.jpg
    000 web page 100_0442.jpg
    754 KB · Views: 34
  • 100_0598.JPG
    100_0598.JPG
    664.2 KB · Views: 30
  • 100_0998.JPG
    100_0998.JPG
    517.9 KB · Views: 34
I also use Envirotex Lite. I use a small blow torch quickly over each thin pour to make the Envirotex a thinner consistency which lets any bubbles to rise, otherwise the Envirotex is too thick for the bubbles to come to the surface. Hit it a few more times with the torch to "pop" the surface bubbles. I rarely have bubble issues. In areas where it may creep up on a rock, log or bank just use a paint brush with a flat clear coat or glue a bit of dust, dirt or ground foam on the area. There is also a dye that can be added the the mix. The key is to pour thin layers, get the bubbles out and let it dry before pouring the next layer. I did a few mockups before I poured on the layout. These are some water scenes on the Sonoma Mountain Railroad.
Instead of using a flame, just use a drinking straw and blow across it several times. The carbon dioxide in your breath clears them up just as well.

This way you don't accidently burn the house down,:D
 
I also use Envirotex Lite. I use a small blow torch quickly over each thin pour to make the Envirotex a thinner consistency which lets any bubbles to rise, otherwise the Envirotex is too thick for the bubbles to come to the surface. Hit it a few more times with the torch to "pop" the surface bubbles. I rarely have bubble issues. In areas where it may creep up on a rock, log or bank just use a paint brush with a flat clear coat or glue a bit of dust, dirt or ground foam on the area. There is also a dye that can be added the the mix. The key is to pour thin layers, get the bubbles out and let it dry before pouring the next layer. I did a few mockups before I poured on the layout. These are some water scenes on the Sonoma Mountain Railroad.
Okay crazy idea but do you think that maybe if I torched the glue it would dry faster??
 
Properly measured...AND...properly mixed (takes almost five minutes of mixing) of both the hardener and the resin would have the pour cured within 24 hours, but hard to the touch inside of four hours...typically. This bears repeating...it has to be properly measured, and then really well mixed, including scraping the bottom of the vessel and the sides of the vessel, for more than two minutes, even more than three minutes.

You will only destroy the mix with heat. It gets warm enough on its own because the reaction is exothermic.

After you have poured the mix into the area, let it spread. You can help it a bit with a stir stick to get closer to the edges, but if you have calculated the volume (area X depth) correctly, and the surface is both SEALED and LEVEL, the volume should spread out over five minutes or so. You do not want the quick set epoxy, the five minute stuff used for knife handles and such. Envirotex and Swing Paints' Nu Lustre 55 are examples of fine 'finish quality' epoxies for large slab wooden table tops, for example.

You'll have hundreds of tiny bubbles near the surface of the pour. If you mixed it all well, there'll be bubbles....period. Let the pour spread out for 8 minutes or so. You have tons of time. Tons. After ten minutes, you'll find that most of the bubbles have popped on their own. Where they have not, insert a clean and dry soda straw into your mouth and gently blow across the surface. The bubbles will pop magically. Trust me, they just do.

Not only paint the bottom of the vessel, but you can tint epoxies using small amounts of the cheapo craft paints available at WalMart, for example. In one full cup of the mix, you can add a single drop of two or three colours if you know what they'll look like when mixed. Even more, if you want to have the water appear a bit turbid, semi-opaque, add a pinch of Plaster of Paris powder. It works like a hot damn, as my own results show. Two images, the Thompson River is southern British Columbia east of Ashcroft, where the CN crosses the river. Not the colour and turbidity:

index.php


A lot of the sky's blue shows up in that image, but the water is quite green and only semi-translucent.

Next, on one of my early layouts:

index.php


Back
Top