ModelRailroadForums.com is a free
Model Railroad Discussion Forum and
photo gallery. We cover all scales and sizes of model railroads. Online since 2002, it's one of the oldest and largest model railroad forums on the web. Whether you're a master model railroader or just getting started, you'll find something of interest here.
I decided to build a shelf layout and have a couple of questions regarding track. I looked at Atlas and Peco as well as Kato Uni-track. Has anyone used the Uni track? It looks pretty solid and is already ballasted. Will I have to solder the joints together or is it ok just as it comes out of the box? I know I'll have to solder with Peco and Atlas.
Any suggestions for the ballast under the track? Woodlands makes some not bad looking stuff and there is always cork.
I'm going to be making the layout in sections so I can work on each one and then if I decide, I can move them around as well.
Suggestions?
Thanks.
Hi D.E. -
You do not have to solder Kato Unitrack.
You do not have to solder other brands of track, either, if you are referring to soldering one track section to another. It's not necessary. You will, however, have to solder feeder wires to the track to provide power for running trains.
The material you place under the track is called
roadbed. Cork and Woodland Scenics Track-Bed are two types of roadbed.
Ballast is the stone-like material you lay around the ties and on the sloping sides of the roadbed. Ballast is then secured with some sort of glue.
Unitrack combines roadbed and ballast into a single molded plastic product. This makes Unitrack quick and easy to use, but it is generally considered to be less realistic in appearance than track with separately-applied ballast.
With that said, there are some very nice looking layouts made with Unitrack. Here is the blog for the N-scale JJJ&E railroad, which uses Unitrack.
http://powersteamguy1790snewjjje.blogspot.com/
- Jeff
What scale are you in? I've used HO Unitrack-not a bad product. Also used Atlas track, switches, and electrical components extensively. Peco makes decent switches.
I swear by Uni-track and I would use it for anything comparable in size to a 4x8 or smaller. Though, for a large basement spanning empire where I'd want the design flexibility of using flextrack I might try another manufactures. Otherwise I've found Kato track impossible to beat.
I guess it depends what your goals are and your budget. I'm not a fan of the all-in-one tracks, primarily because they are very restrictive in terms of how you can arrange your track. They are also quite expensive.
I recently started my 'last' layout in HO. In the past, I've tried Atlas, Peco, Micro Engineering, Shinohara, 'Walthers' (also Shinohara) and handlaid track. For this layout, I went with Peco code 83 for everything - turnouts and flextrack - except one crossing that is Atlas.
My reasons for preferring Peco:
Both rails move on their flextrack
Love their turnouts, electrically and mechanically. The built-in over-centre spring alone puts them at the top of my list.
As with almost everything in this wonderful hobby, there is no right answer, just one that's right for you.
I'm not a fan of the all-in-one tracks, primarily because they are very restrictive in terms of how you can arrange your track.
That is my thought. There are just not as many different "pieces" of track with the all-in-one type and no flex track.
The Kato track locks together very securely, I would avoid solder.
As far as soldering rail joints goes, I haven't done it since I started using DCC. In the 'old days' of DC cabs and block wiring, an electrical block could extend over several rail joints, which are poor conductors. Nowadays with DCC, if you follow the recommendations of the manufacturers, you'll have feeder wires on about every other piece of track on average, and multiple feeders to your rails, so it's much less an issue.
Depending where you live, it can be an advantage if the rails can move a little in the rail joiners due to expansion and contraction caused by fluctuating temperature.
Although I've used them, with no problem, and like the latching feature, someone told me, or I heard somewhere a while back that Peco switches do not meet the NMRA standard trackwork. Something to do with the wing or guard rail, or curvature thru the frog.
ok, so I cut 3 pieces of 3/8" 18"x4' for my layout. What is the proper way to glue the pink foam insulation to it securely?
Silicone? Liquid nails? hot glue? The plywood is fairly dry so it will absorb quite alot of glue.
What does everyone use? And to secure the track to the foam? I was going to use cork painted grey or black to simulate ballast.
Thanks.
ok, so I cut 3 pieces of 3/8" 18"x4' for my layout. What is the proper way to glue the pink foam insulation to it securely?
I've used both Loctite PL 300 Foamboard Adhesive and Liquid Nails for Projects (Interior). These are much stronger than latex caulk and are a good choice for foam-to-plywood. Use plenty of weights to hold down the foam while the adhesive cures. These types of adhesives will
not be absorbed by dry plywood like water-based glue would be.
Whatever you use, I recommend testing it on your foam because some adhesives will attack the foam and dissolve it.
And to secure the track to the foam? I was going to use cork painted grey or black to simulate ballast.
This is where I recommend latex caulk. I use the least expensive store brand caulk available -- don't spend extra for the "brand name" caulk. Latex caulk is strong enough to hold cork to foam and track to cork, but you can remove the track later if absolutely necessary without completely destroying the track.
When using caulk to attach track to cork, squeeze a bead of caulk down the centerline and then use a putty knife to spread the caulk thinly. If a lot of caulk oozes up between the ties, you are using too much caulk.
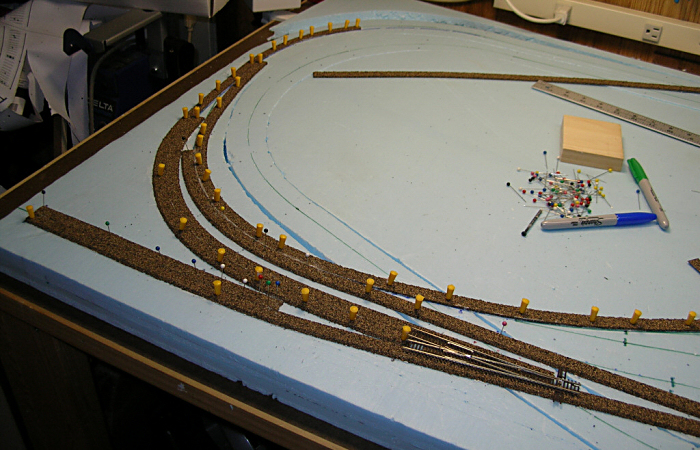
I generally lay cork for an area of track, let the caulk cure for a day (or at least overnight), they lay the track. I use pins to hold the cork while the caulk cures. I also use pins to hold down the track while its caulk cures.
- Jeff
great. Thanks for the tips.

Affiliate Disclosure: We may receive a commision from some of the links and ads shown on this website
(Learn More Here)