ModelRailroadForums.com is a free Model Railroad Discussion Forum and photo gallery. We cover all scales and sizes of model railroads. Online since 2002, it's one of the oldest and largest model railroad forums on the web. Whether you're a master model railroader or just getting started, you'll find something of interest here.
I have had this DPM modular kit for a really long time. I finally figured out what to do with it. It has enough parts to use for the brewery at Aaronsburg.
So tonight I got started on coloring the mortar, thanks to learning about doing that with sheetrock compound thinned with water. At first I had too much water, so then I had to thicken it up. But I think it's going to be OK now...
Before...
And after...
One thing though... This isn't really easy to do in the recliner chair....
Hmmmm.... There's a bit of a learning curve here. The ratio of mortar to brick was looking a little high, so I tried to dial it back by wiping it with a slightly damp Q-tip, but now I seem to have gone too far in the other direction. Packing up for the night. I will work on this more over the weekend...
I recall suggesting using the sheetrock mud. I did the same thing trying to get the right amount on. But figured it out and turned out looking real good on my rail shop.
Years ago when I was working one of my many part time jobs doing punch out work for painters working in apartments we had some problems with joint compound shrinking and cracking after it dried.
Is that an issue to consider for these kinds of projects?
We solved the problem by using Red Devil's one time spackling. Could that be used to color the mortar in the same way?
Thank you for sharing your experience with me gentlemen.
practice makes perfect, i have not done this yet, but plan to. I always thought you just mix up the mud somewhat thin and spread it out on the brick, then as it dries or before it dries just wipe off?? Again i havent done this yet so im probably wrong
practice makes perfect, i have not done this yet, but plan to. I always thought you just mix up the mud somewhat thin and spread it out on the brick, then as it dries or before it dries just wipe off?? Again i havent done this yet so im probably wrong
No, that's the basic idea. The result looks pretty good, but I found myself thinking it was a little too much. But looking at it this morning, maybe it just needs some weathering on top to dial it back. I will post another picture later.
I recall suggesting using the sheetrock mud. I did the same thing trying to get the right amount on. But figured it out and turned out looking real good on my rail shop.
Indeed, you did. I really like the general look, too. I just need to figure out how to get the right balance... I'm sure that will come with more practice.
Years ago when I was working one of my many part time jobs doing punch out work for painters working in apartments we had some problems with joint compound shrinking and cracking after it dried.
Is that an issue to consider for these kinds of projects?
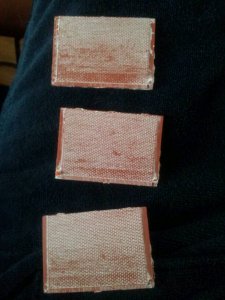
OK, so here's where I am now. On the bottom is a section that I treated, then gave an initial wipe - off. The mortar is nicely filled in, but it is so bright white I think it overpowers the brick.
The two upper pieces are ones I tried to make a little less heavy on the mortar, but wiped off too much.
So, with the bottom one as a starting point of reference...
1) Would just weathering it... Maybe with an India ink wash?... Something else?... Probably solve the problem?
or...
2) Do I need to color the sheetrock compound somewhat to more of a gray (or get a gray sheetrock compound) before applying it?
or...
3) Is it simply a matter of learning how to not over apply it to start with? (And if so, what is the secret to that?)
I see what you mean. The bottom one is too much. Go with the two top ones. And get some weathering powders, use rusty brown and black. But do this very sparingly, you don't want to over do the powders.
Try thinning the mortor down with more water also. When you do this, its easier to rub off when its dry. Use a damp cloth to clean the top.
Thats what I did with mine. I didn't color the mortar or anything.
Thanks for the tip on more water. Ironically, when I was first doing this Friday night, I thought I'd added too much water -- it was almost soupy -- and so I thickened it back up with more compound So I'll keep experimenting. And I'm about due for another visit to the LHS, so I'll put some weathering powers on my shopping list...
Get the Bradgon powders if they have them. Also get a make up brush (yes the girly stuff), big fat one thats stiff. When you use the powders, dip the brush in the container, only get a little bit on the brush, then make stabbing motions on the building or what ever your weathering. A tiny bit goes a long way. They are messy so wear some latex gloves. And put lots of newspaper down. Don't get any on your cloths it will never come out. Ask me how I know this.
If you put too much on, just wipe it off with a damp paper towel and start over.
Once you are happy with the way it looks, spray it with some dull coat to seal it.
Well, I took those three pieces, used warm tap water to wash out all the mortar I put in last week, dried them off and started over. More water to start with was absolutely the ticket Michael -- I dipped my rag in water and then applied the sheetrock compound, and it was a lot thinner. After rubbing it in, I wiped off excess. As it dries, the mortar brightens up some, and I might need to go over the wall sections again to cut it back a bit more, but it's already looking a lot better.
The other thing I like about this method is that I can completely start over if I don't like the results. The stuff I washed off tonight had been on there a week.
Once I'm satisfied with these I'll post more pix. Then get to work on the rest of the parts.
I haven't started on weathering yet. These are dry and have been wiped off once. I might try another wipe - off with an only slightly damp cloth or paper towel. I think the white looks brighter in the picture than in person.
Picked up some weathering powders this afternoon and a rattle-can of Dullcote. Store didn't have Bragdon, so I got the Bar Mills ones -- we'll see how those do. I hope I can get to this some this week, but I'm not sure -- I have night shifts every day thru Wednesday as well as my usual day time work.
The mortar is nicely filled in, but it is so bright white I think it overpowers the brick.
The two upper pieces are ones I tried to make a little less heavy on the mortar, but wiped off too much.
So, with the bottom one as a starting point of reference...
I used something called antique white (craft) paint from Walmart for my mortar, as seen in the buiding on the left. I used the same brand of paint on the bricks, as well. This building is like plaster cast and came white. Some individual bricks are painted other colors for interest.
After the base paint bricks were well dry, at least 24 hours, I added the top coat (antique white), and wiped that off in a couple minutes, letting the "mortar" stay settled in the cracks.
I used testors gray paint on the rocks on the bottom, by the pop machine.
The building on the right, I just painted the field stone and mortar one color, like someone would do like 30 years after construction to brighten something up.


 So I'll keep experimenting. And I'm about due for another visit to the LHS, so I'll put some weathering powers on my shopping list...