Replacing missing ties via 3d printing


Frank

Active Member
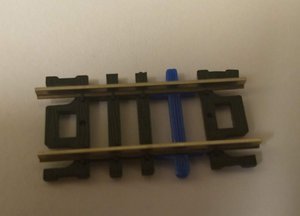
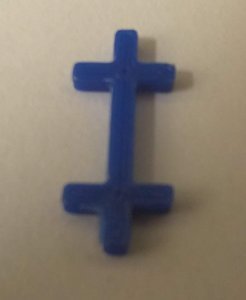
Hi, I think this has happened to most of us. Especially if we are soldering track directly. I took some quick measurements with a vernier caliper and drew the tie in FreeCAD. And this is the result.

This isn't perfect, the track doesn't actually slide into the tie at all, but it's the right height and the right width. I can probably just glue the tie to the neighboring ones with acetone. And if I print it with wood impregnated filament, I could even finish it off as if it's wood. But, I think the effect here is actually pretty good, and certainly a lot less of a pain than trying to solder wires to the track without melting any ties.

I'll probably post the design to thingiverse when I've got the track attachment figured out. That's just rather challenging to measure and draw.
Bluetie2.jpgbluetie.jpg
 
Why would you need to 3D print replacement ties? When I was laying track with Atlas Flex track, I constantly had to cut-off sections of ties because the inner sliding rail needed to be shortened and therefore the ties needed to be removed. I kept the cut-off ties knowing I would need them later. I file down the spike heads on the loose ties and slide the tie(s) into position, after soldering the rails together. I have a pile of ties still for times when I need them. In other places I have used wood ties, when I needed a bunch of ties for whatever reason.

Your blue 3D printed tie looks to be .010 to .020 per end, to long. I also cut off the non-scale end ties that are attached to the next tie in, where I used sectional track to complete my yards; or, what have you and replaced with my cut free ties.

If you just like making the 3D ties, have at'r! It's your prerogative.
That's a fair question, I find it extremely difficult to solder my wiring to n scale track without melting ties on both sides. With flex track that would probably be easier in some ways, but for the time being I'm using sectional track and don't really want to be restricted to using sectional track just because I want to directly power something.

As far as making my own, this is something that I do once and then don't have to do again. It's far easier to just remove the adjacent ties completely where I want to solder and then just replace them with my own.

As for the length, you're absolutely correct, they are slightly longer than they should be, I did some rounding because I was more focused on height and width than length. But, shortening them up a bit isn't particularly hard.
 
I think the effect here is actually pretty good, and certainly a lot less of a pain than trying to solder wires to the track without melting any ties.
Interesting. So the plan is to remove a tie, solder the wires there and then position this piece under that location?

when I've got the track attachment figured out.
I guess you could put some bumps to represent spikes, but if there is a wire soldered over the top anyway, no one is going to see it.
 
Last edited:
Interesting. So the plan is to remove a tie, solder the wires there and then position this piece under that location?

when I've got the track attachment figured out.
I guess you could put some bumps to represent spikes, but if there is a wire soldered over the top anyway, no one is going to see it.
That's essentially the plan. I haven't decided how many ties to remove, probably more than one just to reduce the risk of melting adjacent ties. I think if I were working with flex track, it would probably be easier to just cut the ties and move them down the line.

Ideally, I'm looking to place the wire completely under the track so that it's nearly impossible to see without knowing where to look. In practice, I'm sure there'll be a bit of solder, but after I weather the track, that'll probably be pretty subtle.

This wasn't that much work and once I've got a working design, then I'll have a constant source of replacement ties. Part of the point of this is to learn how to use my CAD software. I've got some ideas for later on that are going to be much more complicated. For example, I'd like to create a weird old timey mountain stairway.

The main limitation on attachment at this time, is my lakc of skill at CAD, so it'll probably take a bit. Eventually, I'll be ballasting over the ties, so just a simple groove might be sufficient. Actually holding the track in place via a replacement tie is probably not necessary if it's one or two in the middle of an otherwise attached stretch.
 
Hi Frank -

I appreciate the capability to 3D print all sorts of small and large model railroad items, and I'm kind of envious that you have jumped into 3D printing. But surely it's easier, cheaper, and faster to use the ties left over from track laying to fill in your missing ties. After all, even a few inches of flex track will provide plenty of ties for this purpose, and they are guaranteed to be exactly the right dimension and appearance.

On the other hand, if the main purpose of the exercise is to learn how to use your 3D printer, cool!

Below are a few of my lonely surplus ties, eagerly waiting for their chance to be used as replacement ties to fill in gaps during future track laying.

- Jeff

ties_leftover.png
 
Hi Frank -

I appreciate the capability to 3D print all sorts of small and large model railroad items, and I'm kind of envious that you have jumped into 3D printing. But surely it's easier, cheaper, and faster to use the ties left over from track laying to fill in your missing ties. After all, even a few inches of flex track will provide plenty of ties for this purpose, and they are guaranteed to be exactly the right dimension and appearance.

On the other hand, if the main purpose of the exercise is to learn how to use your 3D printer, cool!

Below are a few of my lonely surplus ties, eagerly waiting for their chance to be used as replacement ties to fill in gaps during future track laying.

- Jeff
If you've got spares, then it's definitely cheaper, but in my case, I really haven't got any to begin with, so they're not less expensive when you realize that I would have to disassemble a section of track to get them. Each tie uses so little plastic that the software estimate for amount is 0 grams, which means that I could potentially get more than 2,000 ties made for $20 worth of material. That's probably overstating the cost somewhat, but that comes out to about a cent a tie at that weight. And, it's probably significantly less. So, if I want a lot of them, I'd be better of buying or having them produced in a different way, but not that expensive otherwise.

Yes, part of the point of this is to learn how to do the process. Part of it is the flexibility. If I need a different radius curve, I can just create my own ties with custom spacing. Or, I can build ones that accommodate becoming a part of a road crossing or other similarity.

3d printing is definitely not the answer to everything and I probably wouldn't be as gung ho about it if I already had invested my time and energy into learning how to do things in different ways. Plus, for some things, it's just not the answer. For much of the model building construction, laser cutting is often times a better solution or some other technology.

It's also definitely not a good solution in general if you need a ton of something. If you need a ton of something, then you're probably looking for injection molding or something else.

I definitely don't blame anybody here for not having jumped in yet. I think the uses for 3d printing in this hobby are not as clear cut as they might be in some other hobbies. Ties, are probably not the best thing to use it on, but other things like printing turntables or potentially locomotive detailing parts may be.
 
Hi Frank -

Believe me, I am on the lookout for a good reason to get into 3D printing. I'm involved in three hobbies where it could become useful -- model railroading, amateur astronomy, and (less likely) ham radio.

- Jeff
 
Hi Frank -

Believe me, I am on the lookout for a good reason to get into 3D printing. I'm involved in three hobbies where it could become useful -- model railroading, amateur astronomy, and (less likely) ham radio.

- Jeff
I'd personally wait a bit. The equipment has gotten a lot better, but it's improving at a massive rate. I think the application for model railroading is still very much to be seen.

At this point, I'd say that getting a laser cutter is probably more helpful for the hobby than a 3d printer is. But, I think that as those of us that have an interest in trains and have the printers experiment, that the full scope of what is and isn't helpful will become apparent.

I got the 3d printer for other uses, the model railroading aspect is just a bit of a bonus on top of that. I think the big advantage is being able to create your own tools and jigs for doing things like laying track. I'm not there yet, but I'll probably eventually redo all the tracks I've got by hand, using 3d printed patterns to make sure everything gets laid properly.

I don't know where you live, but in many areas, there's makerspaces that have 3d printers that can be rented. Renting is probably better for beginners as somebody else is responsible for maintenance and ensuring that it's tuned to spec.
 
Frank -

You mention using FreeCAD to design your parts. Can someone like me -- without much CAD experience -- expect to use the program successfully? Or is there another program that might be better for me?

- Jeff
 
Frank -

You mention using FreeCAD to design your parts. Can someone like me -- without much CAD experience -- expect to use the program successfully? Or is there another program that might be better for me?

- Jeff
The main problem I have with FreeCAD is that it's a relatively immature release and still has bugs. A few days ago I couldn't get it to create a new file, but then inexplicably later that day it worked.

That being said, if you can describe something in 2d with straight lines and arcs, it's not that hard to do. Adding a third dimension is a bit tricky, but so far I've been able to manage.

For some things though, you'd really want a 3d modeler program instead. For example, I'll eventually be making an n-scale stone staircase and doing that in FreeCAD would be incredibly hard, or impossible.


Back
Top