Redo on my Chinese railroad layout


You are confused on the terms. When the power flows through both routes of the turnout all the time is it NOT power routing. Power routing is when the power only goes down the path the turnout is switched to. The other track would be electrically dead because both rails would be the same polarity.
This is why my original recommendation was simply two wires to the track.
Thanks, I had the feeling I didn't have that quite right. I was thinking about it sending power to where the train would go, but in retrospect that wouldn't make much sense for a definition. It's going both ways as the train does have the potential to travel the wrong way into a turnout on my layout.

As you can see from the picture, I opted to take your advice and it seems to be working as expected.

Can your printer make up 5 ties on a curve to fill that gap?
Definitely, it's somewhat more complicated than doing a single tie, but once I've got a decent tie that can slot into the track, making several that cover a curve is mostly a matter of giving the appropriate arcs to the inner and outer spacers.

I wound up removing 5 ties because of the way that I did it previously, I screwed up a couple of the ones on either side and they weren't at the same location to begin with. It was either take the 5 or risk ruining a new section of track. I think I made the right call, but in general, it would have been better to remove fewer ties.

The main limitation once you've got a design that can do the spacers and a tie is the build volume. Mine has a volume of 230mm by 230mm by 250mm, so, 5 ties is mostly a matter of getting the correct arc difference between the inner and outer spacers. Theoretically, I could do probably 45 degrees at a time. I think that's right, I'm too tired and lazy to do the math right now.

Designwise, This is still in development, right now I've got a tie that can slot into the top of a track, which may eventually be useful for maintaining appropriate track separation for laying flexible track. I'll likely keep a copy of that design and widen the slot in order to accommodate the bottom of the track.
 
Frank....So now you have used your printer some. Is it what you thought it would be as far as model railroad usefulness?
 
Frank....So now you have used your printer some. Is it what you thought it would be as far as model railroad usefulness?
The short answer is that it's quite useful.

The longer answer is that it depends a bit on how much time you want to spend learning how to optimize the print quality and do your own design work. If you're not willing to do the fiddling to get things just right or are just going to print other people's designs, then current printers are probably not good enough.

The main thing holding me back at the moment is that I'm just not very good creating the drawings. But, I just started recently, so that will probably improve with time.

That being said, these things are quite helpful for printing your own tools, jigs, patterns, building components for models and just generally filling in gaps where there aren't already suitable mass-produced kits that can be modified for your appropriate needs.

Mine was roughly $210 including shipping. I had to do some assembly on it and it's got a bit of a learning curve, but we're rapidly approaching the point where it'll be practical for most people.

It can print N-scale things, but I think that it's probably a bit better for larger scales.

I have a community college that is about 15 minutes from me, and was thinking of taking an intro CAD course, and if it works out than take another. The eventual hope is to have a 3-D printer, and laser cutter in my shop. It would probably be closer to retirement that I would have the time to pursue this fully, but in 5-7 years these items will come along way in quality, and the price will come down. Many more of us will have these things at our disposal.
 
I've been rather busy with school, but now that I've graduated, I'm working on this again. I've found what appears to be a great method of controlling the turnouts from below here, https://1fatgmc.com/RailRoad/Servo Control/Servo Control-Index.html . It looks rather cool and like something that's doable without many issues. I may not have the bits here before January, but that's OK.

I've decided to make extensive use of Blender and my 3d printer for the landscaping and general modelling. Most likely, I'm going to be using color prints inside of the buildings. This should be more than enough detail as N-Scale is rather small and except for larger things like counters and people, it likely won't be noticeable anyways..

I'm planning to eventually include at least one giant statue carved out of a model and trying to do that any way other than 3d printing is likely to be a massive headache. Similarly, I'm likely to do the same with the tunnel sections and try to design something which can be easily removed in case of derailment with minimal visibility on the layout. I've been wanting to have a section where the train goes behind a waterfall and a 3d printed waterfall over which water is modeled should be the most reliable way of doing it.
 
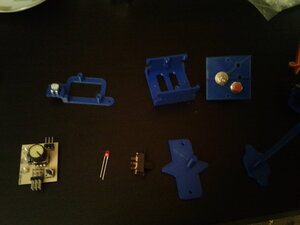
I'm still waiting on a couple parts, but I've got nearly everything I need. The top left to right are the mount for the servo tester and toggle box for the actual switch. It's probably hard to see, but the toggle controls the direction and the DPDT switch controls the actual powering of the servo. The bottom row are the servo tester, LED, switch for polarity and the tools for getting the servo bracket oriented correct.

Thanks to black friday, I've got a laser engraver/cutter attachment for my Ender 3 3d printer coming and I'm probably going to be using it to create a proper control panel for the setup. Most likely laser etching the path of the tracks with circles for where I need to install my switches and LEDs. Or cutting a stencil that I can use for spray painting the routes in different colors. If I can figure out how to do it, I may line the active tracks with a few LEDs to help follow the path of the train through the layout and possibly light the ends of any of my spurs.
20201128_185404.jpg
 
I have a community college that is about 15 minutes from me, and was thinking of taking an intro CAD course, and if it works out than take another. The eventual hope is to have a 3-D printer, and laser cutter in my shop. It would probably be closer to retirement that I would have the time to pursue this fully, but in 5-7 years these items will come along way in quality, and the price will come down. Many more of us will have these things at our disposal.
A bit of a late reply here as I hadn't had anything to say. But, right now, you can get a laser engraver/cutter to attach to several of Creality's 3d printers with minimal need to modify anything. The main physical mods that I've seen involved either installing a switch or disconnecting the laser when not in use. It remains to be seen how useful it's going to be, but at bare minimum it looks like it could be good for creating custom control panels and laser cutting paper for other bits.

Sub $300 for a 3d printer and laser engraver/cutter is a pretty big game changer. Even the non-sale price of closer to $350 is pretty ridiculous.


Back
Top