ModelRailroadForums.com is a free
Model Railroad Discussion Forum and
photo gallery. We cover all scales and sizes of model railroads. Online since 2002, it's one of the oldest and largest model railroad forums on the web. Whether you're a master model railroader or just getting started, you'll find something of interest here.
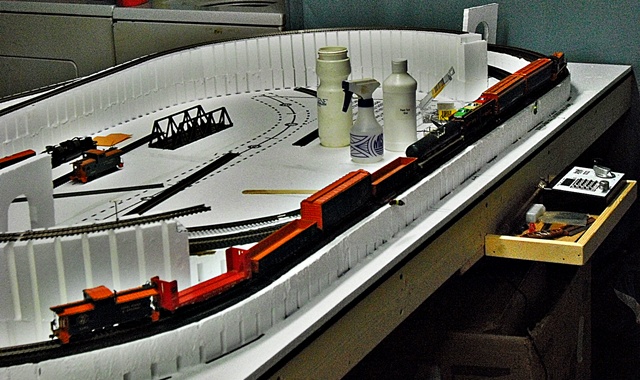
By now, in several posts you have seen some of my construction photo work. When I was building the present layout, every time I got to some major point I shot a few photos. Pixels cost nothing and provide you with a record of what, how, and where stuff is hidden under the final hard shell scenery.
Okay, here is where the outside loop is finally completed. A lot of work is still to follow, but it is time to run a train and see how this thing is going to work. At this time the track is anchored by foam nails as an anchor, and the "hot section" where the DCC is connected is in place. IN the end this is where there are two switches deep underground, so the work has to be absolutely perfect if you do not want to be constantly pulling the access doors out and clearing a derailment in a tight space.
You will note the tunnel "frames" have been set - and other work is getting ready to place, check, measure for correct clearances and so on.
IF you log everything you are building, then when it is time to pull something apart and make changes you know what is under there, and how it was built.
The Aerojet
Excellent idea....! I took construction photos of my layout as I completed the track work, scenery and wiring.
Recently I had some questions of what color I used for some accessory wiring and I should be able to check the photographs and determine the correct color coding of the wire that I used.
Learned a lesson that the next time around I'll...
!. Color code all wiring and keep to the plan.
2. Label all terminals and buss lines.
3. Keep all wiring access from below...avoid wiring from above before scenery is in place, it maybe easier now, but work later can be difficult. Later the scenery may make accessibility hard to impossible to access the wiring.
Again, good suggestions Aerojet.
Thanks.
Greg
While I don't photograph as I go, but I have no tunnels either. I have always color-coded wiring and labeled terminals; something I learned from the pros who installed equipment at our factory over the years. Additionally, when I build a structure, I write down the paint colors that I use for different things on the first page of the instructions; then I file those instructions in a small file cabinet in the train shed. Never know if you are going to have to touch things up. It's come in handy when I started a structure and put it aside for a few years...which I have done several times.
Willie
For me, wiring has always been a hot topic. I run everything down to barrier strips and label those. The wiring looms which go up, say to the city center are splayed as needed above the layout board, but beneath the scenery. Speaking of wiring fun -- a couple of years ago I had a real problem. Switching on the layout smoke was pouring out of tunnel # 3, which is close to the city wiring. The smell of burning Styrofoam soon followed. Grabbed a 20# CO2 and shot into tunnel 3 until the stuff was coming out of all four tunnels.
Fire out. Now what was burning? OLD street lights from the 70's had dried out and the insulation had flaked off, causing a short, and therefore a fire started. Replaced all street lights with current Walther's units, and cleaned up the mess. Never know it happened ... JUST be careful! Since the wiring was all run to barrier strips it was not hard to rewire the section. just pull out all the feed lines, and the burnt wires, replace with new fixtures, connected to the same feed lines, and connect to the barrier strip. YES it did blow a fuse as well on my 12 volt power source ....
The Aerojet
I think that photographing the progress of a model railroad is quite interesting. It is really easy today with digital photography. I have posted some before and after photos of the latest improvement and progress on my layout, but when I started my layout over 30 years ago, there was no digital photography and developing photos could get expensive so I took very few construction photos.
I really like to post before and after photos.
Digital photos cost virtually nothing, once you have the phone/camera. Not like the old days, when you had to wait to get the photos developed. As long as my phone has power, I'm taking photos.
As for wiring, my background is ME, not EE. As such, my wiring practices could be better, but I only do what I can build/maintain myself. Tracing wires is never fun, particularly, when people are coming over in 30 minutes. I am getting better at wiring and soldering, however.
Aerojet:
Please check your inbox for an email.
Thanks.
Greg
This is good advice for real life construction too. When my brother-in-law was having a house built, we would go over and photograph every wall and floor every few days, keeping careful notes about which photos were which. Now, he has a visual record of every electric line, cable run, duct work, plumbing, etc. throughout the house. Makes it easier down the road when repairs or modifications are needed.

Affiliate Disclosure: We may receive a commision from some of the links and ads shown on this website
(Learn More Here)