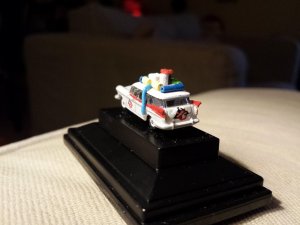
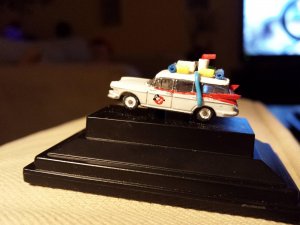
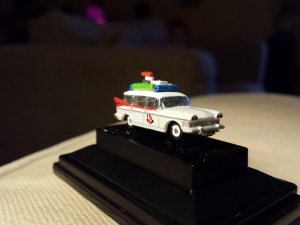
Need help with tiny details.


Skipjacks

Member
The scope of this project is that I'm trying to turn this car...
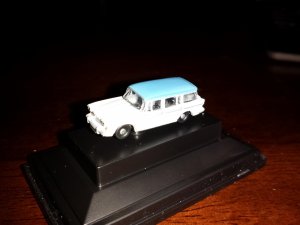
IMG_20151128_195413.jpg
Into this car. (I saw the car at Klein's and immediately thought of Ecto 1 and couldn't pass up the project)
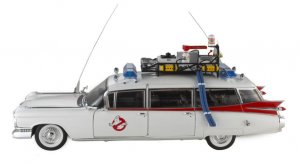
W1176_03_w900.jpg

It's going well so far as you can see here. This is after about 2 hours of working on it. (Adding the tail fins was the tough part as they aren't part of the car I used)
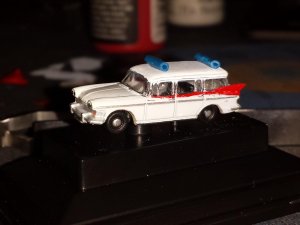
IMG_20151128_220450(1).jpg

Where I'm stuck is how to do the Ghostbusters logo on the doors. It will be about 2mm across.

I tried downloading the logo, shrinking it, and printing it, but it's just too pixelated at that size and looks horrible. Even my industrial printer at work can't do the logo that small with any kind of decent resolution.

My hand simply isn't steady enough to draw it, even under magnification.

This is n scale. The car is a whopping 1 inch long.

Any of you super detailers have any suggestions on how to do this? I thought about stenciling it. That would let me apply the paint easily. But then I couldn't figure out how to make a stencil that small.
 
I've gotten fine enough detail to read the little "SD40-2" placards that NS puts on the cab of their locomotives by the road numbers, though they are a little less than crisp and perfect. That's using a good photo printer and Photoshop. The problem is that there is a limitation to the print heads and ink bleed on any printer. You can only get so fine a detail before the combination of those two begins obscuring the finer points of the details. With good printer and software, along with choosing the right print settings, you should be able to get a decal that looks more or less like it's supposed to when viewing it from a couple feet away, but I can't imagine being able to get a "magnifying glass ready" decal done. That would take commercial equipment and something like pad printing to accomplish. You're just not going to get it with readily available equipment.
 
I think you offered me important advice about shrinking the logo using better software. That might have been where I'm failing. I'll try it in photoshop as opposed to more generic photo software.
 
I think you offered me important advice about shrinking the logo using better software. That might have been where I'm failing. I'll try it in photoshop as opposed to more generic photo software.

Something else, also. When using Photoshop, make sure you set your Pixels/inch at a good high level like at least 600 if not 1200. Basically the best resolution your printer will support. That will also help. If you're printing something small at 72ppi (which a lot of programs default to) it's going to pixelate a LOT more than it will at 600ppi. You may even have to enlarge it and then use your Photoshop tools to refine the edges at that large a resolution, but doing that extra work will help your print quality. I never could get very small lettering to come out at all readable until I upped my image resolution to 1200 ppi.
 
Last edited by a moderator:
I appreciate the printer advice. I would never have thought about increasing the DPI of the tiny image. I'll keep that in mind the next time I try something like this. For this one, it's Friday night and I don't have access to my industrial printer until Monday and I'm impatient. So I decided to take a stab at freehanding it with a paintbrush cut down to 4 hairs.

I'm happy with the result.

Ultimately it's not perfect, but it's a lot better than most 1 inch n scale Ecto 1's in the world.

IMG_20151204_224902.jpgIMG_20151204_224916.jpgIMG_20151204_224930.jpg
 
For printing photo quality, I like dyesub (dye sublimination). It yields nearly continuous tone for EVERY pixel. I say nearly because typical color resolution is 16 shades per color (primary color, Yellow, magenta & cyan) without dithering. I have canon units that print 313dpi & a sony that does 400+ dpi. I can not get as good a fine detail & quality from my 2400dpi color laser. I figure a dyesub dot/pixel is equal to roughly 12 to 16 dithered inkjet/laser dot/pixel.

BTW you ghost busters wagon looks good.
 
Last edited by a moderator:
For printing photo quality, I like dyesub (dye sublimination). It yields nearly continuous tone for EVERY pixel. I say nearly because typical color resolution is 16 shades per color (primary color, Yellow, magenta & cyan) without dithering. I have canon units that print 313dpi & a sony that does 400+ dpi. I can not get as good a fine detail & quality from my 2400dpi color laser. I figure a dyesub dot/pixel is equal to roughly 12 to 16 dithered inkjet/laser dot/pixel.

BTW you ghost busters wagon looks good.

I've definitely not been impressed with laser printers for really fine detail. My inkjet prints 6000dpi, so it's definitely better than the 2400dpi on my color laser and there's much less flaking around the edges when you cut the decals. I was hoping the laser might have less bleed, so I did try it, but in the end went back to the hi-res inkjet. The only times I've ever heard people recommending dye-sub has been for photo printing, and I honestly didn't ever even think about them being able to print decals, but what you're saying makes sense. I'd love to see a comparison between the hi-res inkjet and the dye-sub, but considering the limited ways I'd be using it could probably never justify the cost anyway.
 
I have not YET tried printing any decals with dyesub. I am tempted to try and see if I can find a suitable receiver material. Too many other projects..............

Postcard size dyesub printers are CHEAP, I have several. I do have a primera pro but they are expensive to operate. A couple decades ago I wrote printing programs for dyesub as well as ink jet, laser & even dot matrix (oops, there I go dating myself)
 
Programming for a dyesub is far more complicated than any of the other printer types. Non-disclosure agreements etc, and lots more data per pixel etc. Fargo sent me the programming material, but left out the drivers that needed to be down-loaded to the printer. They were shocked that I was actually going to work on a driver after seeing the complexity involved. I took a driver I wrote for a IBM printer and modified it for thermal wax printing ( yes the Fargo dyesubs also printed thermal was) and had it fully working in a couple hours or less (been a few moons back).

What makes dyesub costly for larger printers is they are PAGE printers. Printing just one letter or even a single dot on a page uses/costs a full page of consumables. Postcard size is still a page printer, but far, far cheaper.


Back
Top