Nate’s O-Scale Wall Shelf Layout


GazooRC

Active Member
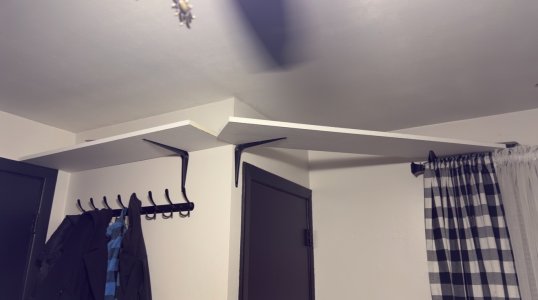
Well I started tinkering with how this layout is going to look going around a small room. I started with the hardest part. Being that I have to use o72 curves this layout was going to be mostly curves. There’s a closet bump out that really made things interesting. Before you judge me this is just mocked up and will be re designed later. I just needed to get something up so I had something to hold the track. Hardest part is done I just need to get a bigger piece to marry the 2 boards and cut off the excess. This is what I have so far.
 

Attachments

  • IMG_0047.jpeg
    IMG_0047.jpeg
    722.5 KB · Views: 49
You are off to a good start!

Smart idea taking on the hardest part first. Now you will be working "downhill", hopefully.
Yea that’s what I was thinking. I should have bought more of the bigger planks but I was winging it when I went to HD. I’m going to try and get a little more done today. After everything is up and track is down I’m going to cut off all the access wood so you can see the train better.
 
Several years ago i did something similar in my apartment. Difference was that i wanted to be able to watch the trains at eye level. Since there was also a station incorporated, i've had to be able to reach over the layout. This turned out to be tricky and i ended up installing two swing bridges because of two entrances to the living room where the layout was.
20130603_154107.jpg

This is one of the bridges in the open position. Much of the railorad shelves was on these "L" shaped brackets just like yours. You can also see i did quite a bit of benchwork to support some scenery. This is the other open bridge, oh yes the two lines went on different levels when leaving the station, with one of them making a full loop over itself...never again on a shelf layout:
20130603_153956.jpg
. Next is where two levels are converging into same altitude and here the shelf was partly screwed into the wall and partly on legs specifically to make wide curves (i don't like sharp curves on layouts):
20130603_154124.jpg
Last is the station area. Here there was a couch underneath and i have chosen a specific height not to wack my head on the layout while sitting down and getting up off the couch:
20130603_154152.jpg

You can see the living room still useable. Lessons learned: don't bother with the loop as this was a constant source of derailments (the upper line worked fine-no loop). And 2: do not build swing bridges on the curves, with temperature changes the allingement was very tricky.
20130605_170129.jpg

Overall plan. And some of my first scenery was tried on this layout:
20130623_214021.jpg

I built two lines for the purpose of being able to watch two trains going at the same time, that's always fun to watch.
 
Last edited:
Well I started tinkering with how this layout is going to look going around a small room. I started with the hardest part. Being that I have to use o72 curves this layout was going to be mostly curves. There’s a closet bump out that really made things interesting. Before you judge me this is just mocked up and will be re designed later. I just needed to get something up so I had something to hold the track. Hardest part is done I just need to get a bigger piece to marry the 2 boards and cut off the excess. This is what I have so far.
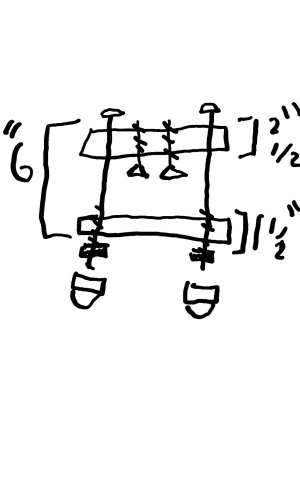
I helped a friend put a loop around his son's bedroom using these.

https://i.etsystatic.com/18979696/r/il/084147/5717023836/il_1588xN.5717023836_d1nj.jpg
 
Last edited:
Maybe get a sheet of plywood and custom cut shelves to match the needed size and umm umm zig-zags.
Yea that’s what I’m thinking for that closet area.
Several years ago i did something similar in my apartment. Difference was that i wanted to be able to watch the trains at eye level. Since there was also a station incorporated, i've had to be able to reach over the layout. This turned out to be tricky and i ended up installing two swing bridges because of two entrances to the living room where the layout was.
This is one of the bridges in the open position. Much of the railorad shelves was on these "L" shaped brackets just like yours. You can also see i did quite a bit of benchwork to support some scenery. This is the other open bridge, oh yes the two lines went on different levels when leaving the station, with one of them making a full loop over itself...never again on a shelf layout:. Next is where two levels are converging into same altitude and here the shelf was partly screwed into the wall and partly on legs specifically to make wide curves (i don't like sharp curves on layouts):Last is the station area. Here there was a couch underneath and i have chosen a specific height not to wack my head on the layout while sitting down and getting up off the couch:
You can see the living room still useable. Lessons learned: don't bother with the loop as this was a constant source of derailments (the upper line worked fine-no loop). And 2: do not build swing bridges on the curves, with temperature changes the allingement was very tricky.
Overall plan. And some of my first scenery was tried on this layout:
I built two lines for the purpose of being able to watch two trains going at the same time, that's always fun to watch.
That’s actually a really good idea. I don’t have the space down low though that’s why I had to go up high. I have my ground RC’s and 3D printers in the same room.
I seen those but I don’t trust them to hold my heavy big boy.
 
IMG_0163.jpeg
Guys I’m so pissed! I spent all day finishing this layout. Up and down a ladder and all to find out my Big Boy hits the wall on turns. 🤬🤬🤬
the way I see it I have 2 options. Get a shorter locomotive that doesn’t need a football field to turn or redo the track with o82 curves maybe so I don’t get so much swing. Then I’m going to have overhang everywhere.
How to I post a video on here?
 
View attachment 201057Guys I’m so pissed! I spent all day finishing this layout. Up and down a ladder and all to find out my Big Boy hits the wall on turns. 🤬🤬🤬
the way I see it I have 2 options. Get a shorter locomotive that doesn’t need a football field to turn or redo the track with o82 curves maybe so I don’t get so much swing. Then I’m going to have overhang everywhere.
How to I post a video on here?
Sorry to hear that...but poor planning. Before you start to hang stuff around the corners, you might want to put the Big Boy on a table top on a curve. Take note what kind of curve you wish to use and measure the amount of overhang for the particular curve. Then before hanging the individual shelves draw the center line of your track and outer line of the overhang on each board before you cut it into shape. Don't worry though, real railroads had to do the same things, either reallign some curves, and even carve brand new tunnels for the larger power...and lastly on my own railroad i've had to do the same clearance modifications...and damn the gymnastics involved after the road bed was already screwed in🤣, i could have auditioned for a ballerina 😆. But i always tested my equipment by hand on each track section before trying to run it. It's all part of the hobby, as well as reality in 1:1 scale.
 
Guys I’m so pissed! I spent all day finishing this layout. Up and down a ladder and all to find out my Big Boy hits the wall on turns. 🤬🤬🤬
the way I see it I have 2 options. Get a shorter locomotive that doesn’t need a football field to turn or redo the track with o82 curves maybe so I don’t get so much swing. Then I’m going to have overhang everywhere.
How to I post a video on here?
If you're too close to the wall with the track, chances are good that O82 curves ain't going to be hardly any better than the O72 curves. Menard's offers tubular track with up to O96 curves, but I imagine the Big Boy's front end will still swing out a fair amount even on these big curves.

All in all, your best bet may be simply get a shorter, non-articulated locomotive as you have surmised.

As far as posting a video, as long as you have a video hosting site such as YouTube or similar, you can simply link to it. As I've never done it, hopefully someone that has can fill you in with more explicit instructions on how to do it.
 
I'm sorry to hear about your troubles, but your work looks good! 👍

In my mind you have two choices:
1. Modify your shelves so you can move the track further away from the walls. Then your Big Boy can navigate the turns without hitting the walls.
2. Get a smaller locomotive that fits your layout.

If it were me, I would modify the shelves. Be sure to measure the overhang before making changes so you only do it once.

If you do decide on a smaller locomotive your Big Boy should be easy to sell.

It's all part of the hobby, as well as reality in 1:1 scale.
Mac is correct, you aren't the first and you won't be the last.

How to I post a video on here?
As far as I know you can't post videos directly onto the forum. But you can post a link to the video. One Drive (that's how I did it) and YouTube are two options.
 
Yes I know this was on me. I thought with such a wide curve it would be fine. That’s what you get for assuming right. Trust me I kicked myself enough after I went to go use it. I’m still fuming I can’t believe I made such a rookie mistake. Love the way it came out too.
I just ordered some o82 and o96 curves. I’m going to figure something out. If i can’t get it to work then I also ordered big boys helper, 6-28330 and matching tender. Big boy can go in a glass case as it’s my favorite steam engine.
Rico that thought did cross my mind lol it’s only a little bit and it’s coming out of the turn so 4 spots in the room.

Here’s the layout


Back
Top