
BunkerTheHusky
Well-Known Member
While I mentioned it in a post on the introductions portion of the forum, I wanted to go a bit more in depth on this project, why I did what I did, etc.
Back in 2019, I was at a hobby shop, and discovered a very sad little model, literally tossed in a plastic bin, labeled "Broken-Parts Only. No return". This poor thing had its original paint stripped, but done in a way that damaged the plastic and made the details on it look muddy. I don't necessarily know why I am the way I am, but seeing any sort of toy or model in such sorry shape makes my heart break and immediately want to rescue it. It was being sold for $5, so it wasn't much of a loss if it turned out un-rescuable.
(Edit: The model originally came with Rapido couplers. For some reason I upgraded the couplers way early on in the project, even before replacing the motor or taking "before" shots. I'm not sure why)


Now, upon bringing it home and taking its shell off, I could immediately tell that the motor was burnt out. I don't know how or why, but it was thoroughly toasted. A little discouraged, but still determined, I did a web search to see if I could find a replacement motor that I could either retrofit, or directly place into it. Ebay came to my rescue and I found a new old stock motor from Mini-Trix for $15. I ordered it, and while I waited for it to come, I took apart both trucks and thoroughly cleaned and relubricated the mechanism. The headlamp wire was a bit crusty, so I replaced that as well. The new motor came, and I popped it in. At the suggestion from a friend, I also added a small ceramic capacitor to help smooth the supply voltage to the motor. After a few encouraging nudges, the locomotive started running smoothly, and quietly!
With a now working engine, I started thinking of what to do with the body. I recalled seeing a similar locomotive at the Illinois Railway museum, and after a little research, I found the locomotive I was thinking about.

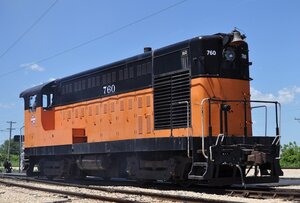
(photo courtesy of thedieselshop.us)
Indeed, as far as I'm aware, both locomotives are Fairbanks Morse H-10-44s. The main difference is that #760 is an earlier model that has the swooping walkway, and the extended porch roof, as well as a headlamp that is located further up on the nose. It was an ambitious series of modifications to make, but I was determined. I had good prior experience working with polystyrene, and plenty of time at my disposal.


I was incredibly pleased at the results, despite the long hours it took. The model was really beginning to take shape. Last thing was to paint it. The only really tricky part was getting the orange to match Milwaukee Road's colors, but after a few attempts, I got close enough to be content. Decals were designed in Photoshop, and printed at home.


In total, this project took me around 80 hours to complete. I thoroughly enjoyed every minute of it. Taking a junker that is not worth most peoples time of day, and giving it the TLC it deserves is such an incredible feeling.
What does everyone think? What should I improve on for next time? And most importantly, would you like to see similar projects like this from me in the future? Thank you for your interest!
Back in 2019, I was at a hobby shop, and discovered a very sad little model, literally tossed in a plastic bin, labeled "Broken-Parts Only. No return". This poor thing had its original paint stripped, but done in a way that damaged the plastic and made the details on it look muddy. I don't necessarily know why I am the way I am, but seeing any sort of toy or model in such sorry shape makes my heart break and immediately want to rescue it. It was being sold for $5, so it wasn't much of a loss if it turned out un-rescuable.
(Edit: The model originally came with Rapido couplers. For some reason I upgraded the couplers way early on in the project, even before replacing the motor or taking "before" shots. I'm not sure why)
Now, upon bringing it home and taking its shell off, I could immediately tell that the motor was burnt out. I don't know how or why, but it was thoroughly toasted. A little discouraged, but still determined, I did a web search to see if I could find a replacement motor that I could either retrofit, or directly place into it. Ebay came to my rescue and I found a new old stock motor from Mini-Trix for $15. I ordered it, and while I waited for it to come, I took apart both trucks and thoroughly cleaned and relubricated the mechanism. The headlamp wire was a bit crusty, so I replaced that as well. The new motor came, and I popped it in. At the suggestion from a friend, I also added a small ceramic capacitor to help smooth the supply voltage to the motor. After a few encouraging nudges, the locomotive started running smoothly, and quietly!
With a now working engine, I started thinking of what to do with the body. I recalled seeing a similar locomotive at the Illinois Railway museum, and after a little research, I found the locomotive I was thinking about.
(photo courtesy of thedieselshop.us)
Indeed, as far as I'm aware, both locomotives are Fairbanks Morse H-10-44s. The main difference is that #760 is an earlier model that has the swooping walkway, and the extended porch roof, as well as a headlamp that is located further up on the nose. It was an ambitious series of modifications to make, but I was determined. I had good prior experience working with polystyrene, and plenty of time at my disposal.
I was incredibly pleased at the results, despite the long hours it took. The model was really beginning to take shape. Last thing was to paint it. The only really tricky part was getting the orange to match Milwaukee Road's colors, but after a few attempts, I got close enough to be content. Decals were designed in Photoshop, and printed at home.
In total, this project took me around 80 hours to complete. I thoroughly enjoyed every minute of it. Taking a junker that is not worth most peoples time of day, and giving it the TLC it deserves is such an incredible feeling.
What does everyone think? What should I improve on for next time? And most importantly, would you like to see similar projects like this from me in the future? Thank you for your interest!
Attachments
Last edited:

