Grades?


conrailocs

New Member
As I continue to plan my railroad I have another question. With the current plan, there will be a 5% grade on my layout spaning 100 inches. This will be a hidden section so I don't care if it looks realistic. All I want to know is whether it will operate ok. I won't be running long trains (1 loco and <10 cars). This is my first layout so I have no prior experience. I'd appreciate any help.
Thanks,
conrailocs
 
From what I've read, and tips on the forums, a 4% grade is the prototypical MAXIMUM. However, if this section will be hidden, and there is no concern for what it looks like, then there should be problem. You may want to be sure to not plan any turnouts, or crossovers in this area. The engine may already be working hard, so a derailment could be real bad in a hidden area like this.

Or, just design the track operation so that you're always going downhill!;)
 
Some locos will handle your 10 car train, some won't..........a few locos will have trouble dragging themselves up a 5% grade. If there are any curves in the grade, the actual grade will increase depending on the curve......a 90 degree bend could make your loco think it's pulling up a 10% grade. So if you base "operate OK" on whether you can just drop ANY loco on the layout and expect it to work, I would say no. What scale is this?
 
Don't go over a 2% grade. That is the maximum you want on a model railroad. Trust me on this, you'll be posting questions like "why does my locomotives stall out on my grades?".
 
Don't go over a 2% grade. That is the maximum you want on a model railroad. Trust me on this, you'll be posting questions like "why does my locomotives stall out on my grades?".

I Agree.............you are restricting what engines you can run if you go much steeper than this. You will end up having to buy engines that can get round your track rather than buying what appeals to you. Very few if any model steam engines would pull 10 cars up a 5% grade even most diesels would struggle.
 
If the 100" is the maximum distance you have to work with in between levels and you haven't factored in the transitions, i.e. the distance required to curve the trackwork upwards from level at the bottom and to return to level at the top. Your actual grade's % is going to increase impossibly if those transitions are included into the 100". How much hieght difference between levels are you planning on.
 
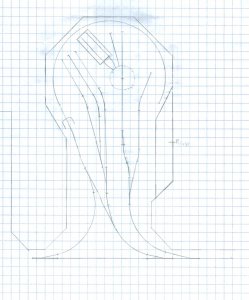
Thanks for the help. To answer the questions, my layout is HO and the total rise is 5 inches. Layout Plan 2.0.jpg
 
The curved track at the top is the grade down to staging. The staging yard isn't shown but connects to the curved track at the top right and extends to the bottom of the plan. I would love to just build a helix but I don't have room for a radius any larger then 20". With this small of a radius the height gained in one level (the circumference) at a 2, 3, or 4% grade isn't enough to allow clearance for a train to fit on the first level. Any help would be very much appreciated.
 
Is that your entire space available you have drawn? Where does the mainline go with the wye tracks?

Instead of having an island layout, with access around the edges. Why not do an around the room walls, with the operating pit in the center. You can get much larger radius, and longer runs going into staging. The staging tracks can be visible, as they wrap around and climb up and down to and from staging. Its called a Nolex. Not a helix, but a visible around the room helix.
 
I have to be brutally honest...and it's just my nature to be helpful and try to get people to avoid disappointment IF they can learn vicariously and don't have to learn everything 'the hard way'. Don't go over about 2.5%. Big period after that. But, if you won't listen to me, think logically. What train that you get down a 5% grade to nether staging will make it up again if it won't make it up the very same grade, curves and all, up on the top level? I mean, without using your hands to help it, or breaking it up under the layout to let the locomotive get part of it up to the top deck again. If you won't mind breaking it up, how will you actually do that? Will you leave enough room between the decks for you to see well enough, and to reach in well enough, to separate cars in a given consist? If you leave enough room to do that, what will that facility mean in terms of the grade you'll need to get your trains down that low? Maybe you'll need more like 8%...!!!!

We all get stuck on fantasies. We want this, and gotta have that...and we won't let them go. We soon learn that we made a mistake, and all our hours and materials become disappointments and wastes. For the sake of your enjoyment in a few months, don't impose silly requirements, unrealistic physical demands, on your tiny work-horses. Don't set yourself up for failure. Keep working on the thinking process for a while until you get inspiration that still excites you and that you KNOW will work because of all the information-gathering you have done.
 
Last edited by a moderator:
Let me suggest something, IF you haven't started construction: Instead of trying to gain all the elevation from the zero elevation, have you thought about depressing the main level by an inch or so under the upper section. True, you'll have some grade on the main level, but that might be the answer.
 
Thanks for all the replies. I'm quickly learning that there is virtually no easy way to fit a grade in from staging to the upper level. What if I did some sort of removeable thing. I think they are called cassets in England. I'll put up an illistration soon.
 
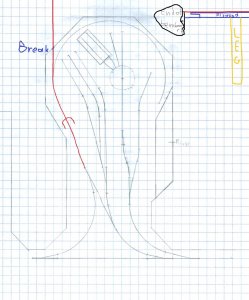
I was having issues with paint so I'll just try to explain it. After the track to "staging" goes through the tunnel it will stay level and go off the end of the benchwork. The piece of plywood would only be about 5 inches wide. The plywood connected to the benchwork and another piece would be notched to fit together with some method of attaching them. The second piece of plyood would be detachable and I'd have multiple versions of it (the tracks of staging). Then I'd have one leg to use on the end of the plywood storage tracks. If this makes any sense feedback would be appreciate
 

Attachments

  • Layout Plan 2.2.jpg
    Layout Plan 2.2.jpg
    207.2 KB · Views: 183
I would square that corner of the peninsular as joining tracks (especially removable ones) on an angle is difficult to achieve accurately, not impossible but why make it hard. The top of your staging extension I would make plain (no tracks) and hinge it to the layout and hinge the leg under the end of that, so it could all be folded up and allowed to hang vertically when not in use.

Your staging tracks would then sit on top as required and then stored on shelf brackets on a wall or under another part of the layout.

As you would then have more room on that side of the layout I would suggest rerouting the three sidings to follow the shape of the staging lead track to give more capacity for on-layout car storage. (passenger coaches?)
 
ok that makes sense. And I could just put attach the folding "plain" extension to the benchwork however far down from the top as the removeable plywood is thick. Thanks for the idea. How would you suggest connecting the two tracks electrically and physically connecting the rails? For the rails I was thinking I could make the two layers of plywood in a way that the top one could slide into the benchwork and the rail joiners would line up automatically.
 
Yes that's right, just set it to allow for your staging shelves thickness. I would just use the track connectors as a physical way of aligning the tracks, solder them to either the staging or the layout tracks so the other ends can be slipped in and out. Solder some wires to the staging tracks, pass them out the side between the rail ties and use a plug on the end with a socket on the side of the layout fascia to make a good electrical connection. If you can make your shelves with sides that reach both below and above the raildeck (like an I beam lying on it's side) so that it's a slightly loose fit on your extension, you'll have easy lining up of the track and security for your rolling stock if you intend to load them off layout. Close the end in permanently to prevent roll offs and on the open layout end use a removable "wall" that is dowelled into the track base (2 screws in the bottom of the wall with their heads cut off and 2 corresponding holes drilled into the track base).

You should then be able to, with reasonable care, carry loaded shelves of cars back and forth to the layout.
 
Thanks so much for all the help! I'll try doing just what you said. I just recently joined this website and it has been great so far. It's like having tons of friends who are willing to help out with anything you need. Just one more question. If I ran the trains into the removable track, locomotive first, then flipped the track around when that train was heading back onto the layout, would that mess up the electricity? There really isn't a difference between the red and black wires other then the insulation color is there? I'd also need some sort of a removable bumper on the end so it could be switched.
Thanks,
conrailocs
 
Ok .. My 2 cents... If these "racks" are for cars -- why do you need electrical power to them?
Just stop the locomotive short of the break and use the five finger claw to shift the cars enough to couple.


Back
Top