Grade transitions


DairyStateDad

Mumbling in the corner
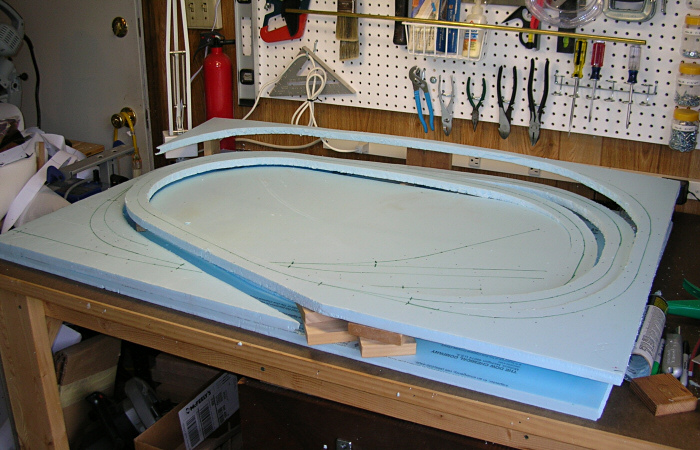
As I fine-tune my plan, I'm working now on making sure the grades are going to work.

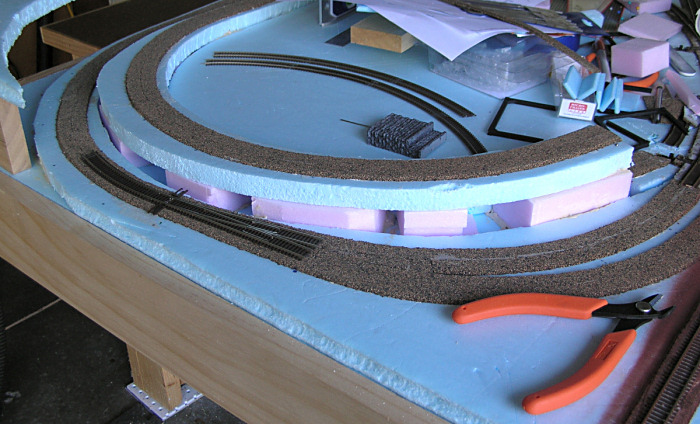
Generally I'm trying to keep all grades below 3%, and even shallower as much as possible. It's a matter of optimizing grade vs. clearance at the one portion of the design where there is track over other track.

I plan to run mostly short trains anyway, and I wouldn't rule out a "helper district" on one stretch if it seems necessary (in fact, that could be kinda fun).

One factor I'm concerned about is transitions, especially from flat to grade.

I've seen a couple of different approaches on the forums...

One is fairly basic: make the first foot rise 1/8 inch, then go into the actual grade.

Another is much more complicated, involving 1) calculating your maximum rolling stock or loco length and then 2) raising your grade in 1/2% increments for a series of car lengths. Eg, 1/2% for first car length is at 1/2% grade, second car length is at 1% grade, third car length is at 1.5% grade, and so on, until you're at the desired grade.

However, that requires either extending the entire grade run or else making the final grade higher than the total average grade for the ascent.:confused:

(I made a very complicated spreadsheet trying to work this out, but it's pretty much a mess now... :))

So any suggestions on how to make this simple without overthinking it (which is my specialty :)) ?

Erik
 
Usually just using the mild bend of 1/2" plywood satisfies the transition into and out of a grade. Try this and lay track over the transition then run some of your longest cars over it and watch the couplers.
 
Too much math for me. I made my own grade stick years ago when my track was put down, and my Homasote roadbed was in 5/8 " plywood. I just let the plywood bend on its own until I had it at the grade I wanted (2 percent) and used it's natural bend to bring it back to level. The grade starts between the first and second covered hoppers. The only other thing I had to account for was the superelevation on a curve. Worked out just fine without any confusing math.

IMAG0326.jpg IMAG0176.jpg The second picture is transition back to level.
 
Last edited by a moderator:
Oh, and don't forget the reverse transition at the top (thought I'd throw that in before you got too comfortable with the answers)
 
I just put mine in but have not put roadbed or track down yet. What I did, not knowing anything at all, is that my supports are 16" apart the first and last sections have a rise of 1/2" over 16" going up to 2 1/2" at the top. The max rise lasts for about 20".

DSCF8232_zps9abcd967.jpg


DSCF8233_zps6eb8b20a.jpg


Did I do it right? I have no idea as I've never done this before but it looks right and will test it allot before it get scenery added to it.
 
Since my ruling grade, which about a 4 percent, is between two 90 degree curves, I just let the natural stiffness of the 1/2-in. plywood sub-roadbed (created by "cookie-cutter" starting with the flat surface coming out of a yard), take care of the transition. Same at the upper end. I also get a little superelevation that way. Unless you have problems with longer locomotives and rolling stock uncoupling or derailing, don't worry about it.
 
The sub-roadbed on my N-scale layout is 3/4-inch foam. I used the cookie-cutter method and allowed the natural bending of the foam to produce grade transitions.

cookie_cutter2.jpg


The grades are supported by foam blocks.

grades700.jpg


Although my layout is N-scale, I got the idea from an HO layout I saw online.

- Jeff
 
Those pictures are all really helpful. The bottom line lesson I'm hearing is that these probably don't have to be as complicated as I'm making them.

My plan is to put a layer of 3/4 or 1-inch foam subroadbed on top of the 2-inch foam base, and where the track rises, just use the 1-inch (or 3/4-inch) foam in a similar cookie cutter fashion, with lots of support. So it sounds like that will work, and that I can simplify that spreadsheet! :)... Thanks for the input, everyone!
 
However, that requires either extending the entire grade run or else making the final grade higher than the total average grade for the ascent.

You may use a simpler method of building the transition (e.g., just allowing the bending of the plywood to create it), but that doesn't remove the requirement of planning for the extra length at the top and bottom of each grade. The transitions will still be there. If you don't allow enough length for them, it will just make the nominal grade steeper than you expect.

vert_transition.gif
 
As is always the case, Byron makes a telling point. This is where planning is so critical, but also flexibility...and I mean in you, the builder, not in the cookie cutter elements that fashion your vertical transitions on grades...both into and out of the grade. If you had planned on achieving a certain minimal height for the sake of clearance over a railroad passing under a bridge, but forgotten the necessary vertical curves on either end of the height change, you now have a serious problem. You won't achieve your clearance between those two important transitions, or at the top of the highest one.

The low rails will be on roadbed, meaning height up off the layout surface. Above those low rails will be a girder or Howe Truss, or something that supports both the roadbed, decking if there is to be any, and the ties and rails atop all those. All this structure adds up to several inches in height that your trains on the higher rails must attain. Your expected 3% grade, already a gulper, has now increased to about 3.6 on a typically smallish layout space. That can make or break your plan entirely.

Trouble is, it's a gift that keeps on giving. As you steepen the grade between the transitions out of necessity, you must also lengthen the transitions!!!! !!!! Thinking about it for a few seconds, the purpose of the transitions is to allow the locomotive to keep its tractive effort firmly applied to the rails. Too abrupt a transition will have anything from the front of the pilot digging into the rails to wheel sleeping, even uncoupling behind the locomotive. So, the transitions must be gradual enough to be effective. If what you have between them is steep in order to stick to your planned overpass or working level at the top, you now must lengthen and make even more gradual the transitions to acccount for the steeper angle of rise at the high end of the lower transition.

Sounds horrible, and hardly worth all the hassle. Well, maybe so, but it need not be that way. Any combination of more run or space, compromise on the plan or outright modification, or even adding more towing power by double-heading can help. But the point to remember is that at the end of the day, your locomotive(s) must be able to do what you want them to do on the rails you provide for it. You must plan, and even do trials to see if your motive power can work effectively on the grades and curves you feel you must have on your layout. If those trials are a bust, best take a longer look at your plan.
 
I did my grades the way Byron states in his post. A couple of them are no more than the track bending from flat to gradual slope to the desired climb/grade. Some of the longer and/or steeper grades use the track bed to do this easement or transition bend. I also, ever so slightly built in a balloon, if you will, in the actual grade itself on longer runs. I have a couple of 3% grades that are 8' that do this and I have found that the cars tend to stay coupled very well doing this. I am talking about a very small amount of upward bend that is virtually unseen unless you pay attention while viewing it.
 
Crandell and Byron -- I appreciate those cautions... and that brings me back to why I originally started this thread...

Maybe a simpler way to ask my question is, what rules of thumb do people suggest for making the transitions adequate?

I mentioned two -- one a fairly elaborate mathematical formula (make the transition segment grade increase in 0.5% increments for each car length), the other a much more seat of the pants one (raise the first foot 1/8 inch, then go into the grade).

(And while I didn't explicitly ask about transitions back to flat, of course it stands to reason that those need to be accounted for, too, and I am keeping them in mind.)

Then there seems to be a prevailing notion that for the most part the subroadbed -- whether plywood or other material -- will more or less default to appropriate transitions, especially if using the cookie-cutter method.

Do you have any alternative specific rules of thumb for working out the transitions?

Edited to add: By the way, in my first post, I said I was holding grades to under 3%, and used that number mostly as a ballpark figure. I'm really working to try to keep most of them to 2.5% or less.

Erik

PS - Byron, just want to say that I have admired your work in MRP and at your website.
 
Last edited by a moderator:
I also, ever so slightly built in a balloon, if you will, in the actual grade itself on longer runs.

Can you explain? I get what the result is, but I'm curious how you actually "got there" in the building of it...
 
what rules of thumb do people suggest for making the transitions adequate?

I'm typically designing for others to build, so I am fairly conservative. I try to allow one car length for each percent of grade for the transition. Especially if you are planning for 3% grade, which some have found to be on the edge of reliability, you want to be conservative to allow for any minor errors in planning or construction which could unexpectedly shift the grade higher.

Many published plans assume a hockey stick-like abrupt angle, even for fairly steep grades, which makes them misleading -- and layouts built from them disappointing. This also misleads newcomers as to what is possible or "best practice".

When it comes to grades, "less is more" for a first layout, in my humble opinion.

Then there seems to be a prevailing notion that for the most part the subroadbed -- whether plywood or other material -- will more or less default to appropriate transitions, especially if using the cookie-cutter method.

I've personally had good luck with 1/2" or thicker good quality plywood to make transitions. I'm not as personally confident of foam, as I have found it to sometimes "bend" at an angle (deforming internally) rather than curve, but others seem to have had success. But if you are talking about 3% or higher grades and short transitions, you may find that you need extra risers to force the subroadbed into the gentle curve that you want.

Byron, just want to say that I have admired your work in MRP and at your website.

Thanks, I'm glad it's been interesting and (I hope) useful.
 
I try to allow one car length for each percent of grade for the transition.

And in that car length, do you increase the grade increment by 1%? ie, leading into a 2.5% grade, the first car length is 1% grade, the second car length is 2% grade, and then the 3rd reaches the 2.5%? Or do you increase the increment by some other factor?
 
Can you explain? I get what the result is, but I'm curious how you actually "got there" in the building of it...

I wish I could give you an exact answer for the traditional roadbed. With my elevated layout it is just a matter of putting the bend in the girder type woodwork I build for everything.
 
And in that car length, do you increase the grade increment by 1%? ie, leading into a 2.5% grade, the first car length is 1% grade, the second car length is 2% grade, and then the 3rd reaches the 2.5%? Or do you increase the increment by some other factor?

That's sort of the end result, but as built it's a spiral curve, not incremental adjustments.

I usually leave any elevation gained in the transition out of the grade calculation. It will be modest in any case.

But again, I'm conservative in the layouts I design for others.

If I was trying to cram a steep grade into too little space on a layout I was building for myself for some reason, I'd expect to spend time mocking it up, smoothing things out, and testing with all my equipment before committing to the design.

Also, bear in mind that tight curves increase the effective grade substantially. An old rule-of-thumb* for HO is that the additional grade is approximated by the calculation 32/R, where R is the radius. So in other words, for a 24" radius curve, the effective added grade due to friction through the curve is 32 ÷ 24 or 1.33%. Add that to your nominal grade for the effective grade exerted on your trains.

So for your 3% nominal grade, the effective grade through a 24" curve would be 4.33%, beyond what many would be comfortable with.

* This rule-of-thumb was first suggested by John Allen(!) in the 1960s. There is a project underway now by members of the Layout Design Special Interest Group (LDSIG) to empirically measure the added effective grade with today's more freely rolling trucks (which might help) and longer cars (which won't). The full results of this testing are some months away and will be reported in a future issue of the LDSIG's Layout Design Journal magazine. Preliminary data suggest that the old HO rule of thumb is probably reasonably accurate between about 24" and 36" radius, slightly overstates added grade above 36", but may understate it below 24" (so the effective grades on sharper curves are actually a bit worse than the formula suggests for radii below 24"). It will be interesting to see the final results, but the bottom line is that curves definitely increase effective grade.
 
Last edited by a moderator:
On my layout, (a first build containing many of the mistakes that people make) I have a 3.3% gradient with a 22" curve on the flat above it. Ive got a 4 axle kato deisel that Ive added a lot of weight to. It can pull a huge train up that gradient but if there are more than 6 passenger cars on the hill they will pull any passenger cars that are on the curve sideways off the rails. Freight cars being shorter don't have such a problem. I guess it could be fixed using reverse super-elevation on the curve, but Im planning a new layout at some stage.
 
On my layout, (a first build containing many of the mistakes that people make) I have a 3.3% gradient with a 22" curve on the flat above it. Ive got a 4 axle kato deisel that Ive added a lot of weight to. It can pull a huge train up that gradient but if there are more than 6 passenger cars on the hill they will pull any passenger cars that are on the curve sideways off the rails. Freight cars being shorter don't have such a problem. I guess it could be fixed using reverse super-elevation on the curve, but Im planning a new layout at some stage.

Over the past five months, I have learned all the basic railroading 101 lessons on the subject lol. This has been by trial and error type lessons. It has been a pain at times, but I am glad I learned them now for future use. This applies to grades especially. Good grief I could write a book.


Back
Top