Building the Pinnacle Creek Mining & Timber Co. RR


Tony, Another good question. I did not follow directions on the packaging. Normally I overlap maybe 30%. This saves money without sacrificing much strength. Now if I was building a layout for a museum or a rich fellow like you you can be sure I would overlap these cloths. I am not worried at all about the fudging on the steep sides, plus I wanted to show the area one package would cover, in the best of circumstances of course. I've found that after Sculptamold dries and cures that virtually all the webbing and plaster cloth is not even needed. Sculptamold is quite strong in its own right. Actually, I pulled out most of the webbing and plaster cloth from under the mountains to help with train access. Nothing has fallen down yet! Jim:)
 
Hope your efforts of applying goop to vertical surfaces is better than my efforts to fill joints in drywall. Plenty of paper on the floor otherwise.
 
Toot, No worries about sagging goop. Sculptamold is perfect for the vertical walls. Just let it dry in the bowl for and extra two minutes and apply. Best stuff I've found for vertical modeling. Jim:)
 
Like me, you use plaster cloth to "hold stuff together and as a platform only", and that makes very good sense in my opinion. That is something I should have remembered from reading your post.

I did my first layout using plaster cloth only, not only did it become expensive BUT, even following the instructions, the strength it provided was minimal at best. That is the reason I went to plaster of paris, only using plaster cloth as a foundation.
 
Hope your efforts of applying goop to vertical surfaces is better than my efforts to fill joints in drywall. Plenty of paper on the floor otherwise.

A quick "hijack" for one second - either your mud is too wet or too dry or you are putting it on too thick. Two or three thin layers should stick to your joint tape without falling off. One other tip, put your mud on from bottom to top.

Sorry for the hijack Jim - wont happen again :)
 
Tony, No problem. Good insight. Bottoms up will almost always do the trick!:eek:

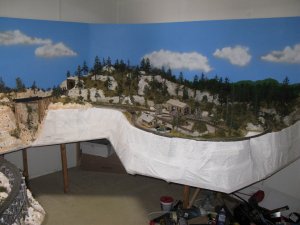
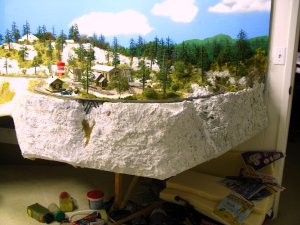
Here we have the last of the plaster cloth. Next is Sculptamold. Jim:)

IMG_6510.JPG
 
Last edited by a moderator:
The "Next to the Track" scenery discussion will appear Thursday. I'm using the bad back excuse as I was unable to get out of bed these last few days. ALSO, I will need a couple of hours to put this together here in the thread. I'm asking that any comments be made after the "Next to the Track" segment is finished. Thanks, Jim:)
 
Toot, That is funny. Good on ya! Actually I meant let me get the posts in the thread up tomorrow. Some will probably see it half post/completed and make a comment. I would like to avoid that.

In the meantime I have just finished the canyon wall Sculptamold applications. Not finished with coloring and planting until next week. I have family coming in and work on the layout will be scarce for a couple of weeks. Plus, my wife, Gayle is having a cataract operation on July 9. Busy me. Jim :)

IMG_6511.JPG
 
Last edited by a moderator:
Next to the Track

I feel that modern day railroad mainlines don't really translate very well when we tried to model them on our layouts. I must admit that this sight of immaculately groomed ballast and brush free right of ways actually drives me crazy. True, I'm old school and I really don't like modern railroading, but that aside I believe I can make a clear judgment on scenery done well and scenery done poorly. I also realize that we modelers come in all skill levels. However, remember that my only goal in this thread is to encourage poor, average, and the odd above average scenery modeler to the next step. We all can find room to improve our skills. Me included!

Here's an example of what I'm talking about:
Gallery%206%20CrawfordHill.jpg


It looks like you could 'eat' off this scene! If your layout mainline looks like this one and you intentionally modeled it so, then, of course, you're not wrong. We can assume you've done your homework and modeled it they way you see it. Hopefully, you simply didn't just plunk down your track ballast it, used a piece of thin cardboard to protect the ballast, sprayed glue and then shook your favorite green ground cover down to achieve this scene without study. I'm hoping you did the former, but when I see the rest of some of these layouts I have some serious suspicions that shortcuts may have been taken.

So, basically I would like to see modern layouts look less like the photo above and more like this one:

bnsf-ridgefieldWa-040607-02.jpg


Later, Jim:)
 
Last edited by a moderator:
Next to the Track

Back to business. The point in all this is 'too clean' is generally interpreted as poor modeling. You see the too clean look everywhere. Layouts, photos in model railroading magazines, and especially trainshows. And again, one can always say my 21 century prototype looks too clean and for the most part they are correct. So, is there some solution or solutions to the too clean look? Yes, of course.

This great hobby has room for everyone and that is the ultimate reality; we are all different. 'Too clean' to some is the way it 'has' to be. That's okay. It is not for everybody and I wouldn't give anyone poor marks if they gave me a reason for a railroad running through a clean city park environment when the local of their layout is Idaho mountains.

One of the ways our layouts are like they are is because of era, locos and rolling stock, locals. Mainlines by their very nature have always 'looked' the best. Money needs to be made, safely and economically. If cutting down and spraying weed killer on the right of ways accomplish these two goals then that is the way they have to do it. But, do we? I think not. To help us through this mess let's go to the last place on my layout that has, in some folks eyes, finished and acceptable scenery.

IMG_6512.JPG

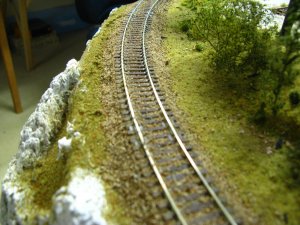
Acceptable? Not to me. Wrong to leave it this way in a 2014 time frame layout? Maybe, maybe not.

On the PCM&T Co. Southern Division which is modeling 1941 I'm afraid this is not adequate. So if you are a 'steamer' then pay attention. If you are a modern huge diesel fan and modeler stick around for the ride.

Later, Jim
 
Last edited by a moderator:
Next to the Track.

For you modern modelers I offer this solution to a more realistic look on your layout.

IMG_6513.JPG

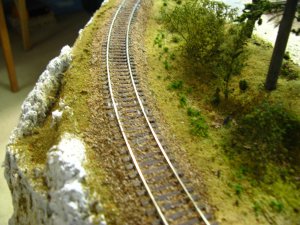
I used some heavier green ground cover, a shake of Woodland Scenics 'Yellow Grass' and some spray glue. Two items, total time less than one minute. If you like the look of this photo better than the previous one then good for you. If not, there may be no hope!

Remember, I made these small additions for you modern modelers. Not much really no effort. So if you like this 'modern' trackside look then give it a try if you need to. Maybe encourage a friend to add just a little bit. Jim:)

Later:
 
Last edited by a moderator:
Finally we come to the era of pre WWII. Things were changing in our lands at this time. The Great Depression was over. Europe was an uneasy place to live. Mainline railroads around the world suffered during the Great Depression. Junk laying around, track projects underfunded and not finished. This next photo shows a mid-thirties mainline. I've left the left side of the tracks undecorated to you can see the changes on the right side better.

IMG_6514.JPG

If you've read all the words and studied all the photos you may have noticed that as we go back in time on our layouts scenery tends to creep closer to the mainlines. Check out that BNSF pic earlier in the trees and even today all is not too clean on modern mainlines.

I've tried throughout this thread to get across the fact that we should try to achieve as much 'realism' in our little worlds as we can. Trust me in the long run it is more pleasant to sit back in your layout room and look at the last two photos above than the first. After a while scenery gets to be fun, not a chore. It has been mentioned about junk laying about. Fair enough. It never hurts to add the odd oil drum or even a keg of nails to a scene. BUT REMEMBER your modeling time frame. Today mainlines are maintained to be spotless. Trash and junk are simply not allowed. It's there but not like the 'olden' times! ALSO remember that if you like Depression era railroading that one of the great surprises was how clean mainlines were in the 1930s. Even small roads were for the most part 'clean.' Reason for this was most everyone here in North America was on some level of "hard times." Everything was scavenged and used. What better place than picking up junk and wood to burn near your loco train track right of way? If you model 1930 and back then you mainlines were much 'dirtier' than the Thirties. Junk everywhere. Shrubs and trees very close to the tracks.

Lastly don't forget to use different types of vegetation, rocks, etc. around your layouts if you model in changing seasons or even elevations. Here are a few ideas for Next to the Track:

IMG_6691.jpg

IMG_6693.jpg

IMG_6694.jpg

Done. Jim:)
 
Last edited by a moderator:
Just a quick note. I didn't talk about techniques. I didn't talk about them on purpose. I will let you in on 'Jim's Secret to Realistic Modeling.' First try not to be too neat about scenery. Mother Nature is not neat about it, nor should you be. If you use shaker bottles then spray your glue and shake. Of course you will need to use maybe four or five different shakers to get a 'real' look. Don't worry about different shaken items running together. They do in real life. Especially in my semi-desert scene above. Look very closely at the Next to the Track area. Different shakes from many different ground covers, rocks, and weeds. Throw in some grass tufts. Most everybody like them. Glue down a practice track on some roadbed and learn to ballast and practice Next to the Track scenery. Lastly, if you model modern lay your ballast last. If you model pre-WWII lay your ballast first. Jim:eek:
 
This picture is amazing!

Railrunner130, You're welcome.

Next up is the final pour on the water scene. I made four pours of WS Realistic Water, any water will do of course. Now you see the Modge Podge layer of water. Modge Podge is simple to use. Just pour it on and after about and hour I make 'waves' and ripples. What you see in the photo is after 24 hours of drying. It goes on white but clears somewhat after drying.

Also, in the photo you can see rivets in the tipple. Under the tipple you can see minor ripples. Underneath I applied the Modge Podge with a teaspoon. On the dock I've added some used oil drums. Looking at the scenery you can see a finished job on the the land. Scenery in the front of the layout takes a long time. I look at the layout area each day and a day seldom goes by where some bush or tree is not added. See the floating oil drum and seaweed? These things help out the over all effect of your scene. Jim

DockandTipple.jpg

When I saw this picture you posted, I could not avoid staring at it for a long time. It looks incredibly realistic! So much in fact, it seems as though I'm standing on the opposite side of the water and actually watching this man climb out of his boat and up the ladder to the level above him! In fact, up until recently, I had no idea model railroads could be so life-like! I've been getting all sorts of ideas for my own model railroad project, and I can hardly wait until I can start buying modeling supplies! Very nice job!
 
A2T, Thank you. Nothing I haven't mentioned before, but now those passing thoughts are in one place.

SS, Welcome, I'm happy you like the photo. Realism is what I strive for. Since I only do this modeling to take pictures the onus is on me to get it 'right' as possible. The above photo was not the final. In the water you see the ModgePodge not quite dry. Since you found this photo that means you been going through the thread. Good for you. Glad to be of help. Here is the 'final' photo. Jim:)

finished.jpg
Could not upload this photo. No clue why!
 
Last edited by a moderator:
A2T, Thank you. Nothing I haven't mentioned before, but now those passing thoughts are in one place.

SS, Welcome, I'm happy you like the photo. Realism is what I strive for. Since I only do this modeling to take pictures the onus is on me to get it 'right' as possible. The above photo was not the final. In the water you see the ModgePodge not quite dry. Since you found this photo that means you been going through the thread. Good for you. Glad to be of help. Here is the 'final' photo. Jim:)

finished.jpg

Amazing! I agree with spiral storm, this photo looks extremely realistic! You sure nailed this one


Back
Top