Dave's Layout v. 4.0


Yeah wasn't exactly sure the type you were looking for, I'll dig around, sure to be some somewhere.
Chris,

The literature that I have indicates that 3' x 3' x 5' chunks of sandstone were cut with a series of 5 gang saws suspended from the ceiling. They were adjustable in width. It says that the blades were made from "bands of steel". Not sure if the author of the article meant literally bandsaws, I don't think so but I think they were oscillating lengths of strips of steel.

Further, they were specific in that the blocks were loaded onto smaller "flat cars" and those were pushed under the gang saw arrangement. Sounds kind of fascinating to me. This system was in use from 1910 until the mid 1920's, At that time, a different entity built a new sandstone cutting building up on top of the hill and they contracted out all the sawing to that outfit. That was a much larger building.

I understand the quality "hard" sandstone ran out. There were other financial difficulties and around 1940 operations ceased. There is still one spar pole left in the quarry. The quarry is now part of a city and state park and well used by tourists.

Thanks for your interest!!!!

Dave LASM
 
The literature that I have indicates that 3' x 3' x 5' chunks of sandstone were cut with a series of 5 gang saws suspended from the ceiling. They were adjustable in width. It says that the blades were made from "bands of steel". Not sure if the author of the article meant literally bandsaws, I don't think so but I think they were oscillating lengths of strips of steel.
Hi Dave.

From what your describing this also called is a Bridge Saw, I believe they used a metal wire as the blade. , I can't find any preserved diagrams and only one actual example from around 1920 in Scotland I've found is in this article (page 9) not very good or clear I'm afraid.


Some of the wall sections glued on over the weekend, the Chooch product I purchased does not have a sticky backing. I am using CA glue to get adhered to my cardboard, using JB weld epoxy to stick the corners together.

A lot of finishing work to be done as well, however one step at a time with a tablespoon of patience

bldg under constru.jpg


the building just sitting where3 its destination is planned

under constr 2.jpg


Trim work to be done around the steps, upper stone cutout for perspective. I will be cutting a sheet that covers the whole wall section and both sides of the staircase

Dave LASM
 
Hi Dave.

From what your describing this also called is a Bridge Saw, I believe they used a metal wire as the blade. , I can't find any preserved diagrams and only one actual example from around 1920 in Scotland I've found is in this article (page 9) not very good or clear I'm afraid.


Very interesting, Chris. A lot of similarities to the sandstone operation seen locally back around the turn of the century.

Sandstone is much softer than granite I suspect they altered the methods some based on the stones softness. I will include some excerpts from our local historical society when I get a chance. I will try to enhance the photo I have showing the stone slabs entering the sawmill.

Great research work, and Thank You!

Dave LASM
 
Here are some pics from around 1900-1920 showing the stone cutting operation:

This is the publication credit:

publication.png

Two shots from the "back" of the mill (as it sits on my layout). These details will not be modeled, except the Derrick, Sandstone chunks, maybe some perpendicular track:


back of mill.png


another view. Not very good lighting back there:

blocks being loaded.png


Here is their locomotive, called "one spot". Not sure why.

steam engine, old one spot.png


also, a derrick with some spoil, will have a bunch of this around. Making sandstone out of hydrocal.

Derrick.png


Thats a good shot of a working derrick.

Dave LASM
 
Nice job on that Varney steamer...and someone made mistake describing wheel arrangement, it's not a 4-6-2 (Pacific), but a 4-6-0 (Ten wheeler) there is no trailing axle. Here is a real Ten wheeler on display at the railroad station in Missoula, MT:
20230806_074801.jpg
20230806_074729.jpg
20230806_074901_HDR.jpg

That fence was almost as bad as the one around Great northern Mikado several days earlier. Weather as you can see, it was raining all night.
20230806_074831.jpg

Kind of similar to your model, although yours looks more squat. I'm just digging into Northern Pacific types but distinctive feature seems to be exceptionally large headlight on NP steam power.
 
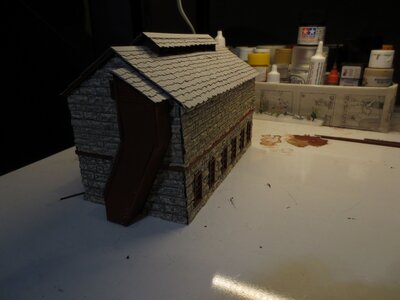
I made lots of progress on the stone cutting building, all the shingles are on and its weathered:

glueing on the shingles.jpg


above - I am applying the shingles. I use Gorilla CA glue, have tried just about everything else and this is the one glue that stands the test of time.

This is the back side, I was not happy with all the application. Always good to start on the back side.

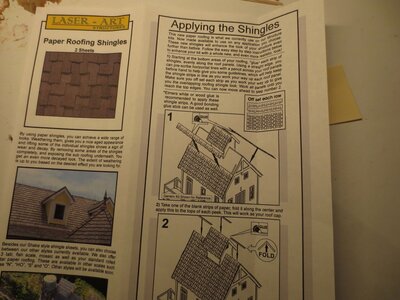
The instruction sheet:

shingle instructions.jpg

I did not like the look of all those lines lining up so I tried to get them more staggered on the other side,

shingles prior tio weathering.jpg

Above see a look of the shingles (good side) prior to weathering

weathered 2.jpg


Lots of work left to make the scene, however the building is done

weathered 1.jpg


I like the way the building turned out, next step to make the derricks for moving the sandstone chunks, also fabricating the pieces of sandstone


On a personal note I have some big news, I applied for and accepted a new job. Many of you know I am commuting 126 miles per day, have been for two years.

Well, I got a job 6 miles away so that is a game changer for me. Wages are comparable and I will be working for a different county government and different department, however I have some duties that overlap with my old job. So, with an extra 16 hours per week or so that I used to spend driving, I can work on my railroad, along with other things. All I can say is Praise God!!!!!


THANKS for likes and comments,

Dave LASM
 
I made lots of progress on the stone cutting building, all the shingles are on and its weathered:

View attachment 175360

above - I am applying the shingles. I use Gorilla CA glue, have tried just about everything else and this is the one glue that stands the test of time.

This is the back side, I was not happy with all the application. Always good to start on the back side.

The instruction sheet:

View attachment 175361

I did not like the look of all those lines lining up so I tried to get them more staggered on the other side,

View attachment 175362

Above see a look of the shingles (good side) prior to weathering

View attachment 175363

Lots of work left to make the scene, however the building is done

View attachment 175364

I like the way the building turned out, next step to make the derricks for moving the sandstone chunks, also fabricating the pieces of sandstone


On a personal note I have some big news, I applied for and accepted a new job. Many of you know I am commuting 126 miles per day, have been for two years.

Well, I got a job 6 miles away so that is a game changer for me. Wages are comparable and I will be working for a different county government and different department, however I have some duties that overlap with my old job. So, with an extra 16 hours per week or so that I used to spend driving, I can work on my railroad, along with other things. All I can say is Praise God!!!!!


THANKS for likes and comments,

Dave LASM
WOW, First, congratulations on your new job well deserved I'm sure.

The building looks amazing, I wish I had half your talent for doing things like that, amazing work,
 
Congratulations are in Order!
That is certainly Praiseworthy!

The model work is unbelievable realistic!

I have a question for NP fans? Why did they mount the headlight "off center" that way?
Most RR's had the headlight centered on the smokebox - if it was not on top.

Also, on most all 4-6-0's -- why is the rear set of drivers "offset"?
Can't answer the first question, i just think it's a matter of styling choice. Rear offset driver set has to do with weight distribution. As even the "Ten wheelers" were becoming bigger and heavier, so did their fireboxes. And steam locomotives tend to shift their weight backwards when accelerating.
 
Congratulations are in Order!
That is certainly Praiseworthy!

The model work is unbelievable realistic!

I have a question for NP fans? Why did they mount the headlight "off center" that way?
Most RR's had the headlight centered on the smokebox - if it was not on top.

Also, on most all 4-6-0's -- why is the rear set of drivers "offset"?

Thank you, and all good questions Sherrel, none of which I have an answer for!

Kriegslock has a lot more knowledge on that kind of stuff than I do.

THANKS for all the comments!

Dave LASM
 
Well, I got a job 6 miles away so that is a game changer for me. Wages are comparable and I will be working for a different county government and different department, however I have some duties that overlap with my old job. So, with an extra 16 hours per week or so that I used to spend driving, I can work on my railroad, along with other things. All I can say is Praise God!!!!!
Congratulations! Considering your time and fuel that is a significant raise!

I like to say, "Do your best and let God take care of the rest" You must be giving your best effort.
 
I made some progress on the quarry scene over the weekend, the derricks are a key component of the stone manufacture and this is my next detail to add to the area:

IMG_3880.JPG


Here I have placed some of the 3/16 wooden dowel that I am using, the masts are scale 40' long and the beams 31'. I just have them roughed in and think I will be tapering them a little more. I have lots of pullys, block and tackle that I have been collecting so I can get them looking more authentic, the wire holders are temporary

IMG_3881.JPG


In the prototype, there was a derrick here to move the large chunks off the rail flat car and onto a smaller conveyance that took the blocks into the mill. One of the products was sandstone sidewalks, they sliced them into slabs that were used in cities for sidewalks

IMG_3882.JPG


The large sandstone chunks are prototypical of what they produced, I made them from hydrocal:

sandstone blocks from hydrocal.jpg


I made them scale 3' deep on the tin foil and cut them in the 3 x 5' size they indicated in the book,

sandstone pieces.jpg


The bottom two piles of sand came from chunks of local sandstone, to help get the color right. I will be mixing some of this into my scenery as well.


THANKS for commenting and more later,

Dave LASM
 
I painted the derricks also ordered the pullies, found what I believe to be the most authentic at Harbor

derrick 1.jpg


I want them to look like weathered wood. I used gray and india ink with dry brushing of brown. The lighting may be harsh I may have to compensate by adding more brown

Derrick 2.jpg


Here is the other one, maybe needs more brown dry brushing, too.

I also ordered some pulleys for the block and tackle setups, will be two sets per derrick:

Double block.PNG


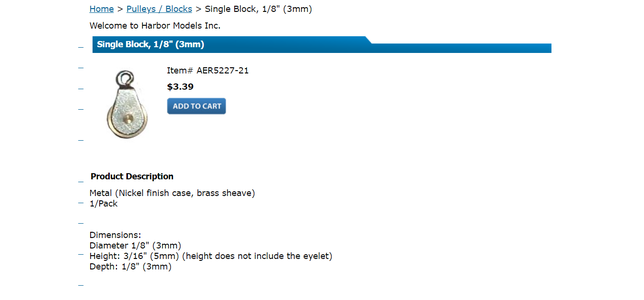
So I purchased enough for 4 sets of block and tackle, I believe, also some rope/cable

single block.png

Spent $57 on all the tackle and shipping, the rest cost almost nothing so we'll see how it works out when they arrive.

In the meantime, I will be making the scene around there. The derricks just poke into the plywood with a cut off nail on the bottom of each beam which inserts into a hole in the layout, so easy peasy to work on

Dave LASM
 
It rained all day yesterday, I worked in the Quarry area, getting the blocks staged, also tailing piles. The prototype had a rock crushing building and they sold sorted materials as well, not enough room on this layout to fit that in

Here is the full quarry roughed in:


quarry.jpg


The 3x3x5' chunks were transferred to the sawmill building for cutting into slabs and then further processed

An additional detail, large sheets of sandstone are initially blasted off, 3' thick, then these are broken into the chunks transported above

moving blocks.jpg


Here is the scene roughed in

roughed in scene.jpg


And a picture of one of my neat old trucks:

neat truck.jpg


Old job last day was Wednesday, and confirmed yesterday new job begins Nov. 1. Looking forward to the new schedule with an extra 2 1/2 hours each day that I was spending commuting.

THANKS for the comments,


Dave LASM


Back
Top