Weathering Rolling Stock, a Continous thread

ModelRailroadForums.com is a free Model Railroad Discussion Forum and photo gallery. We cover all scales and sizes of model railroads. Online since 2002, it's one of the oldest and largest model railroad forums on the web. Whether you're a master model railroader or just getting started, you'll find something of interest here.


Status
Not open for further replies.
It may not be the look you want, but I’ve seen flat mild steel surfaces look like that: a little standing water for a few days, some structure overhead to drip in areas and flush away fresh rust in the dark spots, and you’ll get that.

Haven’t seen it in railroad gondolas, but on flat mild steel surfaces of similar size.
Thanks
I was thinking the same thing where water sits in the low spots!
It even looks like dents in the floor, 😎
Thanks
IMG_8388.jpeg


When I sent the pictures to the client, he liked it. His reasoning was some what what Rico and C&O MthMan suggested, pooling water in low spots

I appreciate the comments, compliments and suggestions, both here, my FB page and via Messenger. I can’t believe how 2 gondolas not even finished brought about so much conversation! That’s a good thing
 
The client wants more fading on the coil covers!
IMG_8462.jpeg


Abteilung502 Snow White #abt001 is the fading white oil paint I use on my own units. Little dots of white dabbed onto to the covers. In 30 minutes I will dampen a flat brush with odorless mineral spirits and blend the white dots to fade the covers some more

IMG_8461.jpeg

The previous work has been sealed with a clear coat. So adding the oils and mineral spirits should not mess with the previous weathering

Plus a few other units getting the oil dot fade method on the bench!
IMG_8463.jpeg
IMG_8464.jpeg

Because I put out too much paint on my paper towel I thought I’d grab so cars that needed a bit more fading.

Back to the covers as it’s time to blend. This picture is more indicative of my bench when I am weathering
IMG_8465.jpeg
 
Last edited:


I have done something never done by me before. I was cleaning out my favorite air brush, I was not over my bench and I lost the tip. Crawled on the floor with the spot light looking for it.

It bounced off my apron and not into the apron pockets. I have other air brushes so the end of world is not occurring. Dick Blick has the part in stock at a decent price and $2.95 shipping using the promo code or $11 without! The cheapest shipping anywhere else was at least $15.00.

So I added a few items, used the promo code and spent $55.00.

I rarely have to even clean the air brush let alone disassemble it. But I decided to use Vallejo Air in the air brush and I did not increase the PSI to at least 25 from the 18 it was set at. My fault and then I compound the issue by disassembling the air brush at the spray booth and not the bench! I should have switched air brushes, but I wanted to finish…

Frustrated and wasted time. Switched air brushes and finished

Tomorrow I will find the tip…
 
I have done something never done by me before. I was cleaning out my favorite air brush, I was not over my bench and I lost the tip. Crawled on the floor with the spot light looking for it.
L

Today must be the day for the dropsies… I lost a truck screw for one of my cars earlier this afternoon. N scale. Couldn’t find it. Called the Rescue Team in: My 20-year-old daughter. When she came in the room, I “read her in” on “Special Ops” for finding N scale parts. She found it, and saved the day and much anguish.
 
Last edited:
The day has finally come:

My old school box cars are finished.

Airbrushed Dullcote on the outside braced cars, and attached trucks:

IMG_4469.jpeg

IMG_4474.jpeg


Attached trucks to these other cars that have been waiting, all posted in these pages previously:

IMG_4471.jpeg

IMG_4479.jpeg


I did identical treatment for the trucks and wheels for all of them, but I did something entirely new for the process:

In the past, I used pastel chalks, dipped a paint brush in 70% isopropyl alcohol, , then into the ground chalk dust, and swabbed it on the wheels. I generally did the same with the trucks, maybe mixing a different color of pastels.

This time, I decided to go a more involved painting route. First, the trucks:

I mixed 2 parts Vallejo Dirt, 2 Parts Vallejo Burnt Umber, 1part Mission Models sStandard Rust, and one part Vallejo White, and painted the trucks. I then gave them a wash made from Vallejo Black, and then dry-brushed the above mix back in some spots, then applied Dullcote over the trucks via hand brushing. For my wheels, I still wanted the texture offered by the pastel chalks. So, ground up some brown pastel chalk dust, and poured it into my above mix, stirred it up vigorously, and brushed it on the wheels faces.

I was pleased with the results, especially for something I can’t really see while I’m doing it. It looks a bit rough zoomed in close, but I’m trying to push the bounds of what I can do in N scale:

IMG_4473.jpeg
IMG_4478.jpeg


That last one is a truck from the C&O 1899 box car, an Athearn. The shape of the metal wheels Athearn uses really shows the wheel face work the best.

Here are the colors I used for the trucks and wheels:

IMG_4483.jpeg
 
Today must be the say for the dropsies… I lost a truck screw for one of my cars earlier this afternoon. N scale. Couldn’t find it. Called the Rescue Team in: My 20-year-old daughter. When she came in the room, I “read her in” on Special Ops” for finding N scale parts. She found it, and saved the day and much anguish.
That’s great you had help.

The wife while I am gone today is going to wash my denim painting apron ( no idea why but twice a year) and has my hand held vacuum cleaner she will use inside the pockets. I believe the tip is in there. The area around the spray booth is clear and finding lost parts should be easy. But…

At my weathering bench the space I live in is 8’ x 8’ with a work top 18” deep in a L shape. Lots of places to hide with carts underneath. In the last shop I had the floor painted white and it really did not help when looking for things on the floor. This space is just a concrete floor color. It has 4 carts on wheels but I unfortunately I wasn’t in this space.

The new tips and assorted goodies per FedX should be here Wednesday!
 
The day has finally come:

My old school box cars are finished.

Airbrushed Dullcote on the outside braced cars, and attached trucks:

View attachment 203573
View attachment 203575

Attached trucks to these other cars that have been waiting, all posted in these pages previously:

View attachment 203577
View attachment 203578

I did identical treatment for the trucks and wheels for all of them, but I did something entirely new for the process:

In the past, I used pastel chalks, dipped a paint brush in 70% isopropyl alcohol, , then into the ground chalk dust, and swabbed it on the wheels. I generally did the same with the trucks, maybe mixing a different color of pastels.

This time, I decided to go a more involved painting route. First, the trucks:

I mixed 2 parts Vallejo Dirt, 2 Parts Vallejo Burnt Umber, 1part Mission Models sStandard Rust, and one part Vallejo White, and painted the trucks. I then gave them a wash made from Vallejo Black, and then dry-brushed the above mix back in some spots, then applied Dullcote over the trucks via hand brushing. For my wheels, I still wanted the texture offered by the pastel chalks. So, ground up some brown pastel chalk dust, and poured it into my above mix, stirred it up vigorously, and brushed it on the wheels faces.

I was pleased with the results, especially for something I can’t really see while I’m doing it. It looks a bit rough zoomed in close, but I’m trying to push the bounds of what I can do in N scale:

View attachment 203585View attachment 203586

That last one is a truck from the C&O 1899 box car, an Athearn. The shape of the metal wheels Athearn uses really shows the wheel face work the best.

Here are the colors I used for the trucks and wheels:

View attachment 203589

They look great. While your trucks are an involved process they look worth the effort. Congrats


That’s great you had help.


…

Yeah, it was kind of demoralizing; it was from the Borden wood reefer. Those pieces sat in their jewel boxes for months, and then on D-Day that happened. I reached in the wrong box for an axle, and the screw stuck to my finger long enough to get flung; it was a good bit further away than I thought possible, and behind a box of flex track.

In the last shop I had the floor painted white and it really did not help when looking for things on the floor. This space is just a concrete floor color. It has 4 carts on wheels but I unfortunately I wasn’t in this space.

My floor is a dark reddish-brown laminate. Hard to find black parts ln it, great for stainless steel/chrome. Nozzles would be easy to find, but as you know, you shoot weathering colors through it, and becomes a dirty gray-brown. Hides great on my floor.

“Relating the experience of a friend.”

That’s my story, and I’m sticking to it.
 
The lost air brush tip is still missing. I figured when the replacement tip showed up I would find the missing one. I still might.

I grabbed the parts manual when I decided to order the replacement. Found it on Dick Blick and ordered it. At noon today it was here and after fiddling with it for a few minutes, I pulled out the manual. I had the correct replacement tips for my Paasche VL series airbrush but they didn’t fit!

The reason? You cannot orfer tips for a Paasche airbrush when the tip you lost is for a Badger Renegade Krome air brush. I can’t believe I did that!

So with a check enclosed for return shipping I took the brush, noted on a sticky the issue and sent it and 2 other Badger units for warranty work and a new tip.

I am using a single action Badger 350(??) for clear coats and my Paasche VL unit for weathering
 
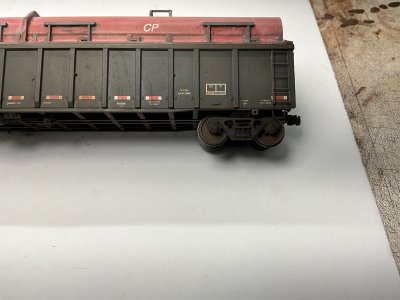
The last pictures of gon #2

The original intent was to make one of the covers more weathered than the other. I know I did that by basically leaving 1 cover faded with some rust but not much. The second cover has more rusting and streaking

The gondolas were to be weathered similarly but with difference without graffiti and tags. I went with basic rust oil washes and while I think I achieved that we’ll see what the client says.

The inside of the gondolas were not changed from previous postings

IMG_8521.jpeg
IMG_8520.jpeg


These are Atlas gondolas and they roll very nicely. The couplers were switched out by the client and work except they don’t return to center. I cannot figure out what brand they are.

There are 2 tank cars to show later that he added shelf couplers to but while they work when rolling they also don’t return to center position.


Status
Not open for further replies.


Affiliate Disclosure: We may receive a commision from some of the links and ads shown on this website (Learn More Here)

Back
Top