Weathering Rolling Stock, a Continous thread

ModelRailroadForums.com is a free Model Railroad Discussion Forum and photo gallery. We cover all scales and sizes of model railroads. Online since 2002, it's one of the oldest and largest model railroad forums on the web. Whether you're a master model railroader or just getting started, you'll find something of interest here.


Status
Not open for further replies.
My try at grain spillage. The CSX tan makes it tough to see compared to red or gray.View attachment 201909
I need to experiment more seriously than I have with grain spillage. Not found anything that keeps resembling grain after it dries.

When in Abilene last week one of the trains was spilling kernels of corn but that was on the ground and more of a scenery item
 
We have been home about 6 hours of which an hour was a nap!

I went into the train room and only I issue was I had unplugged my refrigerator under the layout. The small freezer department melted and seeped out and into a bin of still new in the box 3 packs of Athearn Genesis covered hoppers. 4 packs are wet and are drying with just a fan blowing on them. I’m sure the cars are fine

I left a few items to work on before we left. 6 of 12 STX Operator version tank cars. The 6 shown here are for a client. The other 6 (not shown) are for me or maybe Facebook sales before Xmas 2024
IMG_8225.jpeg

I need to add the safety striping, blue dots on the wheel bearings, replace the couplers and then weather the cars. These cars were sent direct from Scaletrains sometime in September. These will be faded and tagged per some prototype photos. Here r 2 examples
IMG_8223.jpeg
IMG_8222.jpeg

DPRX 259696 is a match to one of the cars from STX and will be closely tagged and graffiti. Of the 12 operator version cars received this is the only matching number I have a photo of. I have plenty of photos from an online search of the cars built in the number series, so ideas for tag placement is ok

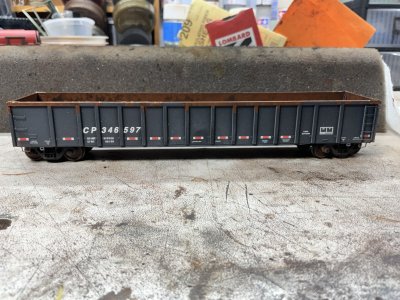
I also received before we left 2 tank cars, 2 gondolas
IMG_7971.jpeg


all from Atlas for a Chicago area client, along with 2 coil covers from Hubert’s. As Terry drove today, I was searching online for prototype photos. Not real successful but the idea is no graffiti or tags, heavy fades on the tank cars and my choice on the gondolas. I do have to notify the client that 2 of the couplers are busted. Pictures of the covers and cars tomorrow


Good to be back home
 
Last edited:


Getting these B&O single sheathed wood box cars perilously close to the finish line.

Last night I did letter streaking, some random fade/grime streaking, hand grab/ladder grime, and mud splatter.

Letter streaking was with Master’s Touch artist oil Titanium White, applied at the bottom edge of selected lettering/logos with a tiny brush, then drawn down with a flat dry brush. All areas done were a bit too vivid for my taste, and were dry-brushed over with a thickish wash of Mission Models Brown and Mission Models Anthracite, mixed 1:1, and thinned with Vallejo airbrush thinner. (The Anthracite is incredibly thick stuff, and needs thinning to get even to a hand brushing consistency.)

Hand grab/ladder grime was done with the same heavy wash.

Photos:

View attachment 202088
View attachment 202089

End view:
View attachment 202091

Roof griming was done with pastel chalks, then the cars were sealed with airbrushed Dullcote:

View attachment 202092

The final step was the mud splatter. I usually use Vallejo “Dirt” straight up, but I wanted a darker, more brown/red tone, so I made a mix of eight drops Vellejo Dirt, two drops Mission Models Standard Rust, and four drops of Mission Models Brown:

View attachment 202093
View attachment 202094

I think the splatter is on on the first photos as well, but the above two pictures show it a bit better.

The colors used in this installment:

View attachment 202095

This is pretty much the way these are going to look when finished. All that remains is sealing of the mud splatter, and weathering trucks and wheels.

In retrospect, there are two things I would do differently (and will, because I have more boxcar red subjects in hand):

1. A darker, reddish-brown mud splatter
2. A wash that more closely matches my home-brew B&O box car red for subduing the letter streaking. (but keep the existing mix for grime on grab irons/ladders)
I think it looks great. I do understand the things you would do differently but I really like the reddish-brown splatter you have shown. I think darker might get lost in the boxcar reddish cars.

I have issues with brake wheels! But my issue is with the more modern cars. I never know when the brake wheel should show a darker rust or not. With the brake wheel you are showing in the photo because this is an older car I would rust it. It of course depends on how old the car is from the build date. So, I tend to error on the side of a heavier rust

Well done and thanks for sharing, especially the paint bottles!
 
Last edited:
I need to experiment more seriously than I have with grain spillage. Not found anything that keeps resembling grain after it dries.

When in Abilene last week one of the trains was spilling kernels of corn but that was on the ground and more of a scenery item
I took a tip from Dansrailroad2011 and used ground ginger. I think I need to dry it out some it was a little clumpy.
 
I took a tip from Dansrailroad2011 and used ground ginger. I think I need to dry it out some it was a little clumpy.

I would worry about vegetable material absorbing moisture over time, or maybe drawing “critters,” or about decay/interaction with sealing media.

I have hit upon (stumbled, perhaps) a way of texturing with pastel chalks that results in a very grainy texture, that also stands up to Dullcote and other flat sealing coats:

Brush on an artist oil of a color near that of the desired grain color. While the oil is still tacky (perhaps a day, even two after applying it), apply pastel chalk dust of the desired color over the artist oil. Application can be either by sprinkling or by dabbing a brush with the pastel chalk dust at the patch of artist oil.

Let all of that dry completely. Dullcote or other flatcoat will “hide/eat” some of the chalk dust, but the artist oil will retain plenty to both see and feel.

And the artist oil holds shape like a grease, so you can use that to build some three-dimensionality to the grain spill.
 
I would worry about vegetable material absorbing moisture over time, or maybe drawing “critters,” or about decay/interaction with sealing media.

I have hit upon (stumbled, perhaps) a way of texturing with pastel chalks that results in a very grainy texture, that also stands up to Dullcote and other flat sealing coats:

Brush on an artist oil of a color near that of the desired grain color. While the oil is still tacky (perhaps a day, even two after applying it), apply pastel chalk dust of the desired color over the artist oil. Application can be either by sprinkling or by dabbing a brush with the pastel chalk dust at the patch of artist oil.

Let all of that dry completely. Dullcote or other flatcoat will “hide/eat” some of the chalk dust, but the artist oil will retain plenty to both see and feel.

And the artist oil holds shape like a grease, so you can use that to build some three-dimensionality to the grain spill.
Interesting. I like the idea and the method, thanks.

As to ginger absorbing moisture, I think the matte clear coat would prevent that. Maybe in the next few days I will test both methods.

It’s very clear from the videos Cambriaarea51 (Tom) has been posting that there are definite grain piles on the tops of the covered hoppers
 
I have 2 gondolas and 2 sets of coil covers I will be working on the next few days.

Fade done using Tamiya xf-2 white thinned roughly 80/20 thinner to paint
IMG_8244.jpeg


IMG_8243.jpeg


The underside is also Tamiya colors, it is an assortment of left over colors tossed into a bottle already thinned with Isopropyl Alcohol (IPA) but mainly Hull Red Xf-9, xf12 JN Grey and some xf2 white
IMG_8242.jpeg
The inside of the gondola was unnecessarily faded but it allows for a better grip for the next batch of paints.
This is still a work in process and very wet yet
IMG_8239.jpeg

I brush first a mix of tap water and a few drops of IPA onto the body. Then 3 drops each color dropped from Vallejo Air dropper bottles

71.069 rust
71.040 burnt umber
71.039 hull red
71.274 Aggressor Gray
71.130 orange rust

IMG_8240.jpeg


Then I take a mop brush and dab all those dots of paint together and pulling some of it along the inside of the car. When that is done I spread some

AK pigment Dark Rust across the middle of the car and again with the mop brush dab it all together.

It will take an hour or so to dry and then I will check to see how it turns out


The coil covers
IMG_8241.jpeg


Were faded slightly with the same mix above. You can see in the picture what parts of the car were hand brush painted with
IMG_8245.jpeg

#70.941 Vallejo Model Color burnt umber. No attempt was made for a full coverage or neatness.

This will be sprayed later today with a matte clear coat. The final colors and rust streaking will be done with Abtielung502 oils

Thoughts are appreciated
 

Attachments

  • IMG_8238.jpeg
    IMG_8238.jpeg
    660.5 KB · Views: 182


It of course depends on how old the car is from the build date.

(Thanks for the kind words, btw!)


And that above is the hard part. And this dovetails nicely into a subject that I was actually drafting a post for:

“Einstein’s Universal Theory of Rolling Stock Weathering”

Now, I’m no Einstein (but take it easy with the heartiness in agreeing, fellas), but in my mere two years of weathering, I’ve wrestled with how much internal consistency to apply to what I’m doing - not that every car should look alike, but rather to what extent should I carry out a set of governing principles or common guidelines throughout my railroad?

As I recall, Tom, you model a fairly narrow time span for your layout, and that drives a framework that is, not necessarily easier, but is more logically driven and more straightforward.

I’ve chosen to model a wider time span of 3-4 decades, but wherein some of the motive power and rolling stock in use all the way up to the end of that era came from 2-3 decades before.

So, I’ve got a few box cars from as far back as the 1890s and 1910s mingling with Consolidations from “nineteen ought something” mixing with Clinchfiield 4-6-6-4s and y6bs that ran to 1960.

And then there is my railroad itself. C&O Railroad, New River West Virginia area, same time span, 1920s-1950s. I’m modeling switchbacks running up the mountain to the coal mine and timber camp, and back. But by the 1920’s a lot of the switchbacks were phased out, and the branch lines rebuild with longer, much more meandering paths. Why? Apparently, improved motive power premited greater speed up the mountain, such that they could make better progress up a longer branch line, non-stop, than could be achieved with the reversing, stop & go pace of the switchbacks.

So why the switchbacks for me? Well, the more roundabout paths from the 1920s forward would require more of my layout real estate be hidden under mountains, and I didn’t go building and weathering all this stuff for it to not be seen.

And so the same wrestling ensues when weathering the rolling stock - how old is it? But wait, would it likely have gotten a repaint? If a repaint, it would be painted with a hardier contemporary paint, right?

And then there is the matter of improving my skill set and working with different materials and techniques.

All this combined conflicted with my goal of depicting an era, vs. presenting a snapshot in time. This, of necessity, results in a “light hand” on the controls of “general principles”:

My switchback-laden branch line of the 1910s & early 20s is the domain of the 2-8-0s and 2-6-6-2s of those times, an my old-time 1890s box cars get pulled/pushed there, having been late a few tears for repaints, and look like they were rode hard and put up wet, because their linseed oil-based paint still yet begs to be put out of its misery, accompanied by early 2-bay 33-foot hoppers.

When rejoining the main, the 2-8-0s revert to light switching duty, and the 2-6-6-2s drop their loads, (like both did dutifully, until the end of steam), to be taken up by the Goliaths of the 1930s and 1940’s that didn’t exist when they were up the mountain a few minutes before.

My 1890’s box cars are going to forever remain in 1915-1930, forever seeking their first ever repaint, and finding it not.

My 1919 outside braced box cars will fare a bit better, being forever 5-10 years from their original painting/last repainting, regardless of what year of locomotive or other rolling stock to which they’re coupled.

And it’s like that withe everything - although the older a car is the more wiggle room I accord myself: anything over 20 years old by 1956 (the end of steam on the C&O is fair game to be either a rustbucket or to have had some intervening repaint. I have some hoppers that have a 1954 paint scheme on them; they’ll get a basic dullcote, minimal fade and modest dusting & grime.

So, I don’t have a universal set of rules I apply; I go for a look that is viable for the type of car or locomotive achieved at any point during its years of service, even if that displaces it a decade (or two) from its peers - provided it remains era-appropriate.

How about you?

How about anyone else? This is intended to be open for all you weatherers out there - what ground rules do you lay down for yourself?

 
(Thanks for the kind words, btw!)


And that above is the hard part. And this dovetails nicely into a subject that I was actually drafting a post for:

“Einstein’s Universal Theory of Rolling Stock Weathering”

Now, I’m no Einstein (but take it easy with the heartiness in agreeing, fellas), but in my mere two years of weathering, I’ve wrestled with how much internal consistency to apply to what I’m doing - not that every car should look alike, but rather to what extent should I carry out a set of governing principles or common guidelines throughout my railroad?

As I recall, Tom, you model a fairly narrow time span for your layout, and that drives a framework that is, not necessarily easier, but is more logically driven and more straightforward.

I’ve chosen to model a wider time span of 3-4 decades, but wherein some of the motive power and rolling stock in use all the way up to the end of that era came from 2-3 decades before.

So, I’ve got a few box cars from as far back as the 1890s and 1910s mingling with Consolidations from “nineteen ought something” mixing with Clinchfiield 4-6-6-4s and y6bs that ran to 1960.

And then there is my railroad itself. C&O Railroad, New River West Virginia area, same time span, 1920s-1950s. I’m modeling switchbacks running up the mountain to the coal mine and timber camp, and back. But by the 1920’s a lot of the switchbacks were phased out, and the branch lines rebuild with longer, much more meandering paths. Why? Apparently, improved motive power premited greater speed up the mountain, such that they could make better progress up a longer branch line, non-stop, than could be achieved with the reversing, stop & go pace of the switchbacks.

So why the switchbacks for me? Well, the more roundabout paths from the 1920s forward would require more of my layout real estate be hidden under mountains, and I didn’t go building and weathering all this stuff for it to not be seen.

And so the same wrestling ensues when weathering the rolling stock - how old is it? But wait, would it likely have gotten a repaint? If a repaint, it would be painted with a hardier contemporary paint, right?

And then there is the matter of improving my skill set and working with different materials and techniques.

All this combined conflicted with my goal of depicting an era, vs. presenting a snapshot in time. This, of necessity, results in a “light hand” on the controls of “general principles”:

My switchback-laden branch line of the 1910s & early 20s is the domain of the 2-8-0s and 2-6-6-2s of those times, an my old-time 1890s box cars get pulled/pushed there, having been late a few tears for repaints, and look like they were rode hard and put up wet, because their linseed oil-based paint still yet begs to be put out of its misery, accompanied by early 2-bay 33-foot hoppers.

When rejoining the main, the 2-8-0s revert to light switching duty, and the 2-6-6-2s drop their loads, (like both did dutifully, until the end of steam), to be taken up by the Goliaths of the 1930s and 1940’s that didn’t exist when they were up the mountain a few minutes before.

My 1890’s box cars are going to forever remain in 1915-1930, forever seeking their first ever repaint, and finding it not.

My 1919 outside braced box cars will fare a bit better, being forever 5-10 years from their original painting/last repainting, regardless of what year of locomotive or other rolling stock to which they’re coupled.

And it’s like that withe everything - although the older a car is the more wiggle room I accord myself: anything over 20 years old by 1956 (the end of steam on the C&O is fair game to be either a rustbucket or to have had some intervening repaint. I have some hoppers that have a 1954 paint scheme on them; they’ll get a basic dullcote, minimal fade and modest dusting & grime.

So, I don’t have a universal set of rules I apply; I go for a look that is viable for the type of car or locomotive achieved at any point during its years of service, even if that displaces it a decade (or two) from its peers - provided it remains era-appropriate.

How about you?

How about anyone else? This is intended to be open for all you weatherers out there - what ground rules do you lay down for yourself?
There is a lot here to digest.

But for me, I narrowed in on a time frame 2015 to 2022 for a reason. I am a compulsive impulse buyer. If I like it I’ll buy it. I was that way from 1981 to 2000 when I did not have a layout at home, just a club layout. I spent my $200 a month hobby budget on trains for many of those years and if I liked it, home it came. There was a time I was into RC helicopters and weed eater engine propelled RC boats. When I retired in 2014 I knew what I wanted, to model the Wisconsin Central during the final 1/4 of 2001 when the WC was sold to the Canadian National. I could run my WC equipment and CN together. I also discovered the HO scale buy/sell pages on Facebook and started selling items that did not fit into the 2001 timeframe. A few years later 2017, I moved to 2015 for modeling. Now when I buy, with a list, it’s for models that fit 2015. I have my list on my phone and it’s updated as I buy and sell equipment. If it’s not on the list I don’t buy it.

Running multiple eras, mixing eras or running any era with any other equipment is not wrong, right or anything. It’s what you want to do. That’s fine. Rivet counters, era experts or assho..s are not welcome to my layout room even though some have accidentally been invited once!

I just recently did some 12 cars for a forum member Marlin39. He should have received his shipment yesterday. It was a mix of equipment from various model makers but for maybe the 40’s and 50’s. Many of the colors I would use on my modern stuff just didn’t work with cars with roof walks. Was it harder, not really but what was harder was the lack of color photos to get inspired from. Marlin39 can comment on his own but we communicated a lot to get what I hope he really likes.

I fortunately can operate on 18 different layouts of all eras except the extreme modern stuff of today. My layout will fill the groups void. One of the guys built his layout to represent his hometown of Green Bay in the 40’s. The layout depicts the 40’s but he operates equipment in eras. 1900 to 1920, 1925 to 1945 and 1947 to 1960 ( I have his operations sheet) He does keep era equipment seperate but that’s his thing.

The weathering you have shown has always been era appropriate to my eye. Have fun doing what your doing and keep posting
 
Getting ready for a test session on the Wisconsin River Valley and Terminal RR some covered hoppers are venturing across the rails.

All cars are HomeShops.net products

T&GN #215071
MCIS #9199
WFN #21105
GSI #43840
AV #64014

Being pulled by Wisconsin River Valley Sd40-2f (bowser) #9010

So far the tests runs have been a success

Next up is doubling the train and more test running
IMG_8264.jpeg
IMG_8267.jpeg
IMG_8268.jpeg
IMG_8269.jpeg
The cars were faded with Tamiya’s Flat Clear #xf-86 which was allowed to dry and then the chalky effect brushed off.

The weathering was done 100% with Pan Pastels except the GSI car. The clear coats were sprayed using VMS matte clear varnish at 16PSI

Grain spillage will be tried later this weekend using a ginger spice that is in the oven drying at 150f degrees for at least 2 hours
 
It’s been determined to use this picture for the coil cover inspiration!
IMG_8236.jpeg


I sent these to the client. The gondola has its 1st fade only
IMG_8280.jpeg
IMG_8279.jpeg

IMG_8286.jpeg
IMG_8285.jpeg

Edit: 10/26 @9:31am

Client is sending me a new picture of what he wants. So the above is a FAIL. No weathering today so I will strip it down Sunday morning
 
Last edited:
I think it looks great. I do understand the things you would do differently but I really like the reddish-brown splatter you have shown. I think darker might get lost in the boxcar reddish cars.

I call it mud splatter, but in this case it’s not: it’s lower-body rusting, and therefore, it would be for steel cars. Lots of heavily worn cars get it, but only a few get it uniformly along the lower region of the body. Most of the time, it’s localized in spots on the body.

More of a reddish black than a reddish brown.
 
Last edited:


Status
Not open for further replies.


Affiliate Disclosure: We may receive a commision from some of the links and ads shown on this website (Learn More Here)

Back
Top